Untitled Document
-
-
Scanning an Image
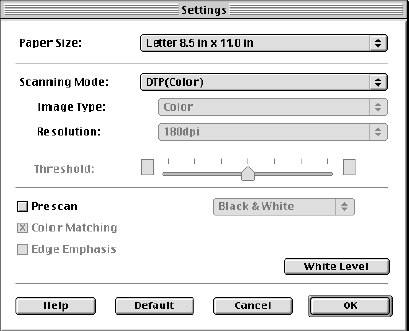
- Click the 'Menu' button and then select 'Settings'. The Settings dialog box displays:
-
Make the necessary settings for the image to be scanned.
- Click on 'Paper Size' to select a size that approximates the image to be scanned.
-
Click on 'Scanning Mode' to select the item that best approximates the image to be scanned.
Changing the Scanning Mode
- Place a check mark in the Prescan check box. Prescan performs a quick scan so you can check the image. You can disable this function.
- Click the 'OK' button and then close the Settings dialog box.
- Place the object to be scanned in the printer and then click the 'Prescan' button. You see the image displayed in the Preview Area.

- If you only want to scan part of the object, drag the mouse within the Preview Area to select the part to be scanned. The Selection Box indicates the area that will be scanned.
Note: To create a Selection Box, position the cursor over one corner of the area to be selected, press and hold down the mouse button, and then drag the mouse diagonally to the opposite corner of the area you want to select. Release the mouse button. If you position the cursor over a point within the selected area, you can move the area by dragging. If you position the cursor over one of the lines indicating the selected area, you can change the size of the selected area by dragging that line in or out. The minimum size of the selected area is 1" x 1" (25.4 mm by 25.4 mm). The size of the selected range is displayed in the Image Control Panel.
- Place the image to be scanned in the printer and click the Scan button. Remember, only the range indicated by the Selection Box is scanned.
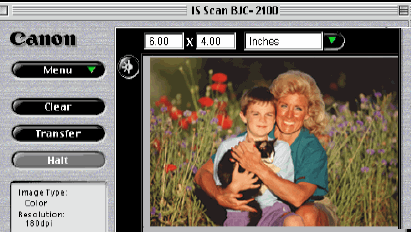
- If the image displayed in the Preview Area is not what you expect, click the Clear button and start over. If you like the image, click the Transfer button. The scanned image is transferred to the application software. Edit the image data as required prior to printing or saving it.
Note: Some application programs do not display the main IS Scan dialog box, but display their own scanning screen. In this case, refer to the documentation supplied with the scanning software. Do not close an application program that started IS Scan while IS Scan is still running. This may cause the system to lock up.
Top of Page
Changing the Scanning Mode
Scanning
Mode |
Use
|
Image Type
Resolution |
DTP
(Color) |
Standard setting used when a
color draft is to be scanned |
Color
180 dpi |
| Photo |
Recommended when scanning
a photograph |
Color
360 dpi |
DTP
(B&W) |
Standard setting used when a black & white draft is to be scanned |
Grayscale
180 dpi |
| Text |
Recommended when scanning a document consisting entirely of text, such as a document created with a typewriter or word processor |
Black &
White
180 dpi |
| FAX |
Scans by converting a monochrome image into the data suitable for facsimile
transmission |
Black &
White (Text
Enhanced)
200 dpi |
| OCR |
Scans by converting a monochrome image into the data suitable for OCR input |
Black &
White
(Text
Enhanced)
360 dpi |
| Custom |
Selected when a specific range of settings are to be made. Customizing the Scanning Settings |
|
*By default, Prescan is not enabled. When enabled, B&W is the default Prescan Mode. You can choose Color, Grayscale, or Black & White.
Note: The Settings dialog box displays when you select Settings after you click the 'Menu' button in the main dialog box. When you select 'FAX' or 'OCR', the document is scanned and processed as a grayscale image and converted to monochrome binary image data. This process eliminates unnecessary image background and increases the quality of the scanned text and line art. When you select Text, the document is scanned and processed as a monochrome image.
Top
Customizing the Scanning Settings
When you select Custom for Scanning Mode in the Settings d ialog box, you can specify the scanning settings.
1. Click the Menu button in the main dialog box and then select Settings.
2. Click the up- or down-arrow in Scanning Mode and then select Custom.

3. Make the appropriate settings for the image to be scanned.
Image Type
Select a mode according to the image to be scanned. You can select Color, Grayscale, Black & White, or Black & White (Text Enhanced).
Resolution
Select a resolution according to the image to be scanned. The higher the resolution, the finer the image you can get, although the amount of data will be large. In general, 90 dpi is sufficient for home pages, while 180 dpi is good for output to a printer. Available settings: 90, 180, 200, 300, 360.
Threshold
This function is valid only when Image Type is set to Black & White. The lightness/darkness of monochrome images can be adjusted by moving the slide bar. If the slide bar is moved to the left, the scanned image will be lighter, while if the slide bar is moved to the right, the image will be darker.
Prescan
Place a check mark in the Prescan check box to perform the prescan. The scanning mode can be set to Black & White, Grayscale, or Color.
Color Matching
This function is effective only when Image Type is set to Color. When this function is enabled, the colors are adjusted according to the monitor when the image is scanned. The monitor itself is set with the system feature of ColorSync in the Apple menu control panel.
Edge Emphasis
This function is valid only when Image Type is set to Black & White. If this function is selected, only the edge of the image is emphasized when the image is scanned. This is disabled for prescan.
4. Click the 'OK' button. The main IS Scan dialog box displays.
5. Place the image to be scanned in the printer, then click the 'Prescan' button or 'Scan' button to start scanning.
Top of Page
