Untitled Document
Using IS Scan Plus
IS Scan Plus is a utility program that allows you to edit, enhance, print, and save an image acquired by the IS Scan scanner driver. You can use IS Scan Plus if you do not have a graphics application program.
Launching IS Scan Plus
1. Select 'Programs' from the Start menu, then click 'IS Scan Plus'.
2. Select 'IS Scan Plus'. The main IS Scan Plus screen appears:

3. Select an option:
Copy
Scan and immediately print an image without editing.
Using Copy
Capture Image
Scan and edit an image other than a photographic print.
Using Capture Image
Capture Photo
Scan and edit a photographic print such as a snapshot.
Using Capture Photo
Device Information
Verify the name of the printer that is currently connected to your system and information on the communication mode.
Top of Page
Using Copy
Use the Copy feature when you wish to print an image immediately after scanning. You cannot edit or enhance the scanned image before printing.
1.Click the 'Copy' button in the main IS Scan Plus screen. The Copy screen displays:
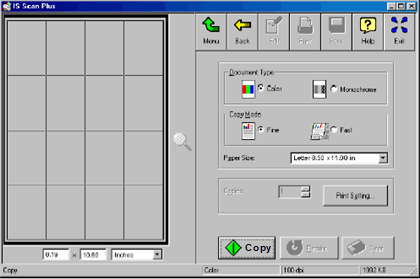
2. Specify any required settings:
Select 'Color' or 'Monochrome' in the Document Type box.
Select 'Fine' or 'Fast' in the Copy Mode box.
Select the paper size in the Paper Size box.
The Copies option is disabled.
3. Click the 'Print Setting' button. This displays the Print Setup dialog box.
Make sure Canon BJC-2100 is displayed as the default printer. Click the 'Properties' button, if necessary, to display the Printer Properties dialog box and specify any printer settings. See your online BJC-2100 Users Manual for details.

4. When you click the 'Copy' button, a message box appears. Click the 'OK' button in the message box to confirm that the scanner cartridge is installed. Copying begins.
5. Another dialog box appears to remind you to remove the scanner cartridge, and install the BJ cartridge according to your print job. Also, make sure paper is loaded in the auto sheet feeder of the printer.
6. Click the 'OK' button in the dialog box. Printing begins.
Note:
To print the image displayed in the Preview Area again, click the 'Reprint' button.
To make a copy of another image using the same settings, click the 'Copy' button. When a confirmation message appears, click the 'Yes' button and repeat the procedure described above.
To make a copy using different settings, click the 'Clear' button to clear the copied image from the preview area. Repeat the procedure described above.
Top of Page
Using Capture Image
Use the Capture Image feature to scan an image other than a photographic print. You can also edit, enhance, save, and print the scanned image.
1. Click the 'Capture Image' button in the main IS Scan Plus screen. This displays the Capture Image screen.
2. Select the most appropriate icon in the Scanning Mode box of the Capture Image screen according to your scanning purpose.
 Standard setting for scanning a color image.
 Standard setting for scanning a monochrome image.
 Suitable for scanning a photographic print such as a snapshot.
 Suitable for scanning an image that consists mostly of text.
 Used for customizing the settings for special scanning jobs.
3. Select the paper size in the Paper Size box.
4. Insert the image you wish to scan in the scanning holder, and then load it in the auto sheet feeder of the printer.
5. Click the 'Prescan' button.
The remaining steps are similar to those described for Scanning an Image Using IS Scan.
Scanning an Image
Top of Page
Using Capture Photo
Use the Capture Photo feature to scan a photographic print such as a snapshot. You can also edit, enhance, save, and print the scanned image.
1.Click the 'Capture Photo' button in the main IS Scan Plus screen. The Capture Photo screen displays:

By default, a Selection Box appears in the Preview Area. To delete the Selection Box, point to any location in the Preview Area and right-click your mouse.
2. Specify these settings:
Select 'Color' or 'Black & White' in the Photo Type box.
Select 'Regular' or 'Panorama' in the Photo Size box.
3. Insert the image you wish to scan into the scanning holder, and then load it in the auto sheet feeder of the printer.
4. Click the 'Prescan' button.
The remaining steps are similar to those described for Scanning an Image Using IS Scan.
Scanning an Image
Top of Page
