Untitled Document
Uninstall then reinstall Easy-PhotoPrint
1. Click 'Start', then '(All) Programs'
2. Point to 'Canon Utilities', then 'Easy-PhotoPrint' and click 'Easy-PhotoPrint Uninstall'

3. Click 'Yes' on the Uninstall Confirmation dialog box.

Reinstall in a 'Selective Startup'.
1. Use the System Configuration Utility ( Click 'Start', then 'Run', Type msconfig, click 'OK') and either choose 'Selective Startup' on the General tab, or disable startup items on the 'Startup' tab.
Click to view System Configuration Utility
2. Restart the computer and install Easy-PhotoPrint from the CD-ROM or from a download.
Accessing System Configuration Utility*
System Configuration Utility (Msconfig.exe) allows you to temporarily change the way Windows starts by disabling startup programs and services individually or several at a time.
Caution: Making changes using the System Configuration may cause some applications not function properly. Always note any changes made, so that you can reconfigure the utility if problems were to occur.
To open System Configuration Utility:
-
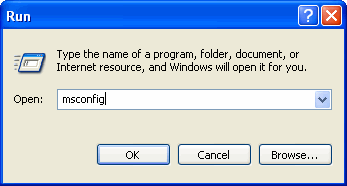
On the Window desktop, click Start, and then Run.
-
In the 'Open' box of 'Run' window, type msconfig, and then click OK.
-
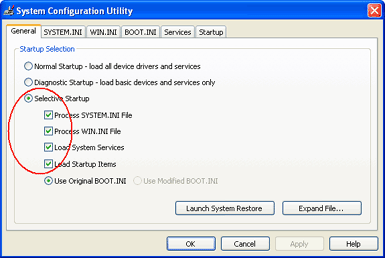
In the General tab of 'System Configuration Utility' dialog box, click Selective Startup radio button.
Caution: If Selective Startup is already selected, write down the items that are still checked here and on the Startup tab so that they can be re-enabled after troubleshooting.
-
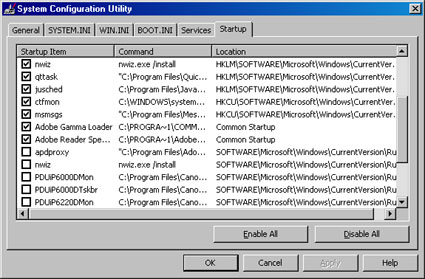
Click the Startup tab. Remove the check in the boxes for individual applications to keep them from starting automatically with Windows.
Caution: Only disable applications that you are familiar with. If you are unsure of what a particular application does, do not uncheck it.
-
Click OK.
-
Click Yes when prompted to restart your computer.
-
Attempt to install, print, scan or complete the original task you began.
-
If installation, printing or scanning is unsuccessful, open 'System Configuration Utility' again.
-
Click the Services** tab.
-
In 'Services' tab, click Hide All Microsoft Services to place a check in the box, and then remove the check in the boxes for the individual services that you wish to disable.
Caution: Disabling certain services may have adverse effects on computer operation. Only disable services that you are familiar with. If you are unsure of what a particular service does, do not uncheck it.

-
Click OK.
-
Click Yes when prompted to restart your computer.
-
Attempt to install, print, scan or complete the original task you began.
To disable Selective Startup:
-
On the Window desktop, click Start, and then Run.
-
In the ' Open' box of 'Run' window, type msconfig, and then click OK.
-
In the General tab of ' System Configuration Utility' dialog box, click Normal Startup radio button.
-
Click OK.
-
Click Yes when prompted to restart your computer.
* System Configuration Utility (msconfig) is not available on Windows 95, NT 4.0 or 2000.
** 'Load System Services' radio button and 'Services' tab are not available on Windows 98 or Windows Me (Millennium).
