Summary of Windows XP Compatibility:
Since the MultiPASS C3000 / C5000 were sold years prior to the release of Windows XP, an upgraded version of the Desktop Manager software and other drivers for this product is not available. However, a simple workaround is available that provides limited functionality with the Windows XP operating system.
This workaround will provide Windows XP printing functionality by utilizing an emulation printer driver and changing the settings of your MultiPASS to recognize the emulation. Please note that this workaround addresses printing within Windows XP only. You will not be able to use your MultiPASS for any other PC-based functions (scanner or faxing). You will be able to use the copy function and also send and receive faxes through the standalone modes built in to the product.
Note: Canon provides this information for your convenience; we do not provide technical support if problems are encountered with print performance or quality while using an emulation printer driver.
Detailed Steps - Windows XP Workaround:
To provide Windows printing functionality, install an emulation printer driver (Canon BJC-4200 mini-driver) and then set the C3000 / C5000 to 'Print Mode'.
Note:
- The C3000 / C5000 have always been capable of copying and faxing without installing the Desktop Manager. This functionality does not change.
- As the Desktop Manager will not be installed, scanning and PC Faxing using the C3000 / C5000 will not be possible.
- Please ensure a parallel cable is connected to the PC and MultiPASS prior to printing. However, you must disconnect the cable immediately after printing. If the cable is connected while the computer is starting up, Windows Plug and Play will detect the hardware and will attempt to install software.
- After connecting your cable, enable the 'Print Mode' prior to printing.
- Disable 'Print Mode' after printing from your computer so any incoming faxes will print automatically.
Install a Canon BJC-4200 mini-driver:
- Click 'Start' and select 'Printers and Faxes'.
- In Printers and Faxes window under Printer Tasks, click 'Add a printer'.
- At the Add Printer Wizard welcome screen, click 'Next'.
- At Local or Network Printer dialog box, click 'Automatically detect and install my Plug and Play printer' to remove the check from the box and then click 'Next'.

- At Select a Printer Port dialog box, confirm the port you've connected the printer appears beside Use the following port drop-down box and then click 'Next'.
- At Install Printer Software dialog box, select 'Canon' under Manufacturer, select 'Canon BubbleJet BJC-4200' and then click 'Next'.

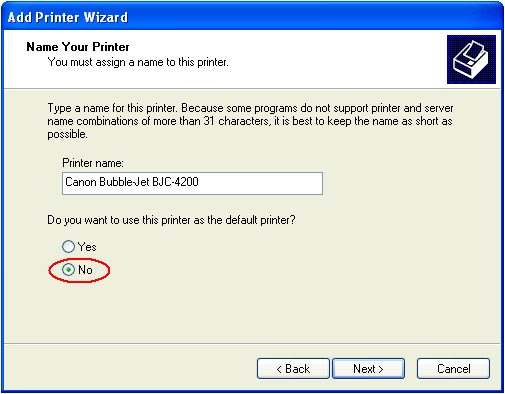
-
At Name Your Printer dialog box, select 'Yes' if you do not have another printer and want to set the BJC-4200 as the default printer; or, click 'No' to not set the BJC-4200 as the default printer and then click 'Next'.
- At Printer Sharing dialog box, confirm radio button Do not share this printer is selected and then click 'Next'.
- At Printer Test Page dialog box, select 'No' to not print a test page and then click 'Next'.
- At Completing the Add Printer Wizard screen, confirm the printer settings and then click 'Finish'.
To enable Print Mode:
- Press <FUNCTION> on the operator panel.
- Press <0> on the dial keypad. [MEMORY CLEAR] will appear.
- Press the right arrow button (2 on the right hand side) continuously until [DOS PRINTING] appears.
- Press <START/COPY> twice. [PRINTER MODE] will appear.
To disable Print Mode:
- Press <FUNCTION> on the operator panel.
- Press <PRINTER RESET> (3 on the right hand side).
