|
|
How to install driver and software that came with the EOS 20D.
| Article ID: ART160729 |
| |
Date published: 06/09/2015 |
| |
Date last updated: 08/18/2015 |
Description
How to install driver and software that came with the EOS 20D.
Solution
Note:
- Do not connect the camera to your computer until the Solution Disk is removed from the computer. With the camera connected, the software will not be installed correctly.
- You must first log in as an Administrator (computer system administrator) to install the driver.
- Close all programs that are running.
-
Load the EOS DIGITAL Solution Disk into your computer. The Installer panel will start automatically.
If the Installer Panel does not appear, use the following procedure to display it.
- Double-click My Computer on the desktop.
- Right-click the EOS DIGITAL Solution Disk icon, and then select 'Open from the menu that appears.
- Double-click the Setup icon.
- In the Installer Panel, click 'Install'.

If a message that prompts you to restart your computer appears, follow its instructions and restart your computer.
- In the dialog box that appears, click 'Next'.
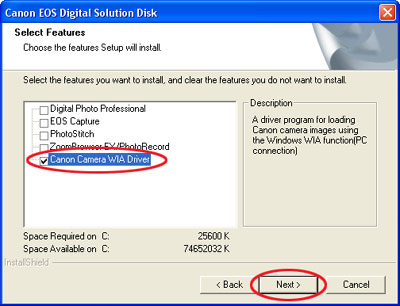
- In the Setup Type dialog box, select 'Custom Installation', and then click 'Next'. Select 'Custom Installation' because only the TWAIN driver needs to be installed at this stage.

- Check the details of the License Agreement, and then click 'Yes' if you consent to all the conditions.
- In the dialog box that appears, select a destination for the installation and then click 'Next'.
- In the Select Features dialog box, select 'Canon Camera WIA Driver' and make sure all the other features are cleared and then click 'Next'.
- Click 'Select All' in the dialog box that appears, leave the check mark on 'EOS Kiss N/REBEL XT/350D (PC connection)', and then click 'Next'.

- In the Start Copying Files dialog box, check the settings of the installation and then click 'Next'.

- When the InstallShield Wizard Complete dialog box appears, click 'Finish'.
- When the installer panel appears, click the 'Exit' button.
- Remove the EOS DIGITAL Solution Disk from your computer.
- Set the camera's power switch to <ON>.
-
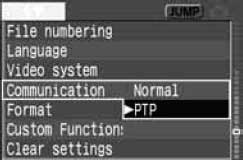
Press the <MENU> button to show the menu as shown below, and then select the menu items as follows:
- Press the <JUMP> button to select the far right tab, and then press the cross keys to select [Communication].
- Press the <SET> button and select [PC connection] from the menu that appears, and then press the <SET> button again.
- Press the <JUMP> button to display the following menu tab, and then set the [Auto power off] settings to [Off] using the cross keys and the <SET> button. Please refer to the instruction manual supplied with your camera for information on Auto power off settings.
- Press the <MENU> button to turn off the LCD monitor, and then set the camera's power switch to <OFF>.
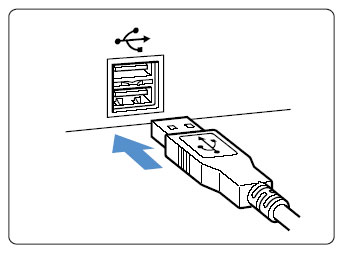
- Plug the USB cable supplied with your camera into the USB port of your computer. The port's location differs between computers. Refer to the documentation provided with your computer for further details.
-
Connect the other end of the USB cable to the <DIGITAL> terminal on the camera.

Please note the following things when making the connection using a USB cable.
- Use only the USB cable supplied with your camera to connect the camera to the computer.
- Directly connect the camera to the computer with the USB cable. If you connect the camera to the computer via a hub, the camera may not operate correctly.
- Do not connect multiple USB devices to your computer while the camera is connected. This may prevent the camera from operating correctly.
- Do not simultaneously connect multiple cameras to the same computer. The camera may not operate correctly if other cameras are connected to the same computer.
- Do not let your computer go into standby (sleep) while it is connected to the camera. If your computer goes into the standby (sleep) mode, wake your computer up while it is still connected to the camera via the USB cable.
- Set the camera's power switch to <ON>.
This completes the installation of WIA Driver. If a dialog box such as Found New Hardware appears, the installation will be completed when the dialog box disappears automatically.
Your computer may display a window such as Scanner and Camera Wizard, depending on its settings. Close the window if it appears to complete the installation of WIA driver.
Do not set the camera's power switch to <OFF> until the installation is completed.
|
