Setting Auto Exposure Bracketing (AEB) PowerShot Pro1
Article ID: ART160796
|
Date published: 06/09/2015
|
Date last updated: 11/16/2015
Description
Setting Auto Exposure Bracketing (AEB) PowerShot Pro1
Solution
Auto Exposure Bracketing (AEB Mode)
This function is only available in the P, Tv, and Av modes.
In this mode, the camera automatically changes the exposure within a set range to take three shots after you press the shutter button once.
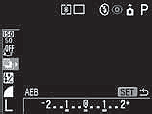
You can adjust AEB settings in 1/3 stops within the range of -2EV to +2EV of the standard exposure setting. AEB settings can be combined with exposure compensation settings to extend the adjustment range. The images are recorded in the following order: Standard exposure, underexposure and overexposure.
Press the <FUNC.> button.
Select (BKT-Off) (LCD monitor/Viewfinder) or (Display Panel) using the or arrow on the omni selector.
Select (LCD monitor/Viewfinder) or (Display Panel) using the main dial or the or arrow on the omni selector, then press the <SET> button. The range indicator appears. If you wish to use the currently set exposure range, press the <FUNC.> button to end the mode setting operation and shoot the image.
Use to expand the range and to contract it, or simply use the main dial.
You can shoot the image right after selecting settings by pressing the shutter button. The menu displays again after the shot, allowing you to change the settings easily.
The camera returns to the Step 3 screen if you press the <SET> button.
Press the <FUNC.> button or click the main dial. Select or in Step 3 to cancel the AEB mode.
The AEB mode cannot be used for flash photography. If the flash fires, only one image gets recorded.

 (Display Panel) using the
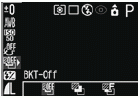
 (Display Panel) using the main dial or the