Setting the Auto Rotate Function
This camera is equipped with an Intelligent Orientation sensor that detects the orientation of an image shot with the camera held vertically and automatically rotates it to the correct viewing orientation in the display. You can set this function on/off.
- In the [
 (Set up)] menu, select [Auto Rotate].
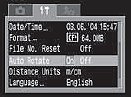
- Select [On] and press the <MENU> button.
- When this function is on, an icon showing the orientation of the camera appears at the upper right corner of the LCD monitor (or viewfinder).
|

|
Normal
|
|

|
Right end down
|
|

|
Left end down
|

- This function may not operate correctly when the camera is pointed straight up or down. Check that the arrow is pointing in the right direction and if it is not, then set the Auto Rotate function to [Off].
- Even if the Auto Rotate function is set to [On], the orientation of images downloaded to a computer will depend upon the software used to download the images.
|

- When the camera is held vertically to shoot, the Intelligent Orientation sensor judges the upper end to be "up" and the lower end to be "down". It then regulates the optimal white balance and exposure for vertical photography. This function operates regardless of the on/off status of the Auto Rotate function.
- When changing the camera's orientation between the horizontal and vertical positions, you may hear a rattling or clicking noise coming from the orientation detection mechanism. This is not a malfunction.
|
