How to attach the lens hood to the GL2.

Article ID: ART161115 | Date published: 06/09/2015 | Date last updated: 08/18/2015
 

Description

How to attach the lens hood to the GL2.

Solution

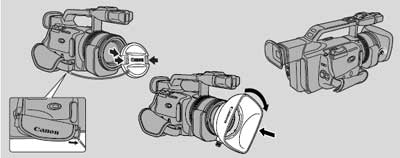
1. Remove the lens cap.

  • When you purchase the GL2, the lens cap cord is attached to the middle of the Velcro grip belt. Open the Velcro and slide the lens cap cord to the position as shown in the illustration.

2. Align the hood to the lens with the Canon logo facing to the left.

3. Twist it into position (clockwise), so that the Canon logo is on the top.

  • You do not need to assert any pressure, screw the hood lightly into place.

4. Finally, tighten the locking screw.

  • To remove, reverse the above procedure.

Since the lens hood cuts stray light that may cause flare and ghost images and protects the lens, be sure to attach the hood when you are recording.

SIMS Doc Id

0

Rate this Article
Was this article helpful?
Yes, This document is helpful
No, This document needs a clearer explanation
 
Please provide your comments