| Article ID: ART161280 |
| |
Date published: 06/09/2015 |
| |
Date last updated: 08/18/2015 |
Description
Reseating the print head.
Solution
Seat the print head
Reseating the Print Head
- Check that the printer is powered on, open the front cover and wait until the print head moves to the center.
- Remove all ink tanks.

- Raise the print head lock lever, and remove the print head.
- Re-seat the print head, and lower the print head lock lever.
- Install the ink tanks.
- Close the printer's cover.
Install the ink tanks:
- Remove the Yellow ink tank (BCI-6Y) from its package.
- Pull the orange tape in the direction of the arrow to remove it completely, and remove the shrink-wrap film.
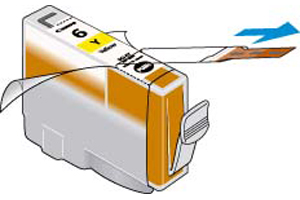
Note: Remove the orange tape so that a long thin hole can be seen.
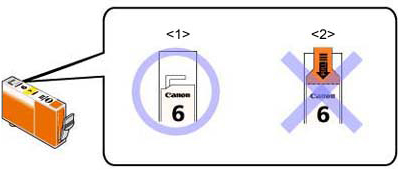
<1> Removed correctly
<2> Removed incorrectly (Remove the orange tape so that a long thin hole can be seen.)
- Hold the ink tank as shown in the image below.
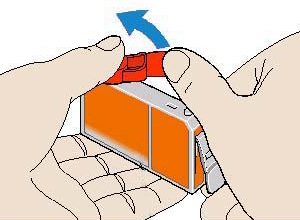
- Twist the orange protective cap in the direction of the arrow, and remove it.
- Insert the ink tank into the slot at the right end, and push down on the <PUSH> mark on top of the ink tank

- Push the ink tank down until a click sound is made. Install the other ink tanks in the same manner as the steps above.
- Verify the inks are installed in the correct order and seated completely.
Return to the top.
Ink tanks' installation order:

- <Y> Yellow (BCI-6Y)
- <M> Magenta (BCI-6M)
- <C> Cyan (BCI-6C)
- <PC> Photo Cyan (BCI-6PC)
- <G> Green (BCI-6G)
- <BK> Black (BCI-6BK)
- <R> Red (BCI-6R)
- <PM> Photo Magenta (BCI-6PM)
Note: Check that each ink tank is installed in the right position.
Return to the top.
Ink tanks' installation status:
- Properly installed

- Improperly installed
| 
|
| The BK ink tank is not fully seated. | All ink tanks are not fully seated. |
Return to the top.
