|
S820D
|
PIXMA iP4600
|
PIXMA iP1800
|
PIXMA iP4200
|
|
i470D
|
i320
|
PIXMA iP5200R
|
i250
|
|
S330
|
i960 Series
|
PIXMA Pro9500
|
PIXMA iP3000
|
|
S800
|
S450
|
PIXMA iP5000
|
i450
|
|
PIXMA iP6220D
|
i9100
|
PIXMA iP1700
|
S400
|
|
MultiPASS C555
|
PIXMA iP2700
|
i950 Series
|
MultiPASS C650
|
|
PIXMA iP1500
|
PIXMA iP6210D
|
PIXMA iP4820
|
i900D
|
|
PIXMA iP2600
|
PIXMA iP4700
|
MultiPASS L6000
|
PIXMA iP3300
|
|
PIXMA iX7000
|
PIXMA iP3500
|
PIXMA Pro9000
|
S830D
|
|
S630N
|
PIXMA iP5200
|
S600
|
i560 Series
|
|
PIXMA iP4000
|
PIXMA iP2702
|
PIXMA iP2000
|
PIXMA Pro9500 Mark II
|
|
PIXMA iP8500
|
S900
|
S9000
|
BJC-2100 Series
|
|
S300
|
MultiPASS C530
|
PIXMA iP6310D
|
PIXMA iP4300
|
|
i850 Series
|
S200
|
BJC-2000 Series
|
PIXMA iP90
|
|
i70
|
PIXMA iP90v
|
i455
|
S630
|
|
i475D
|
i550
|
S530D
|
PIXMA iP6700D
|
|
i80
|
PIXMA iP1600
|
PIXMA iP3600
|
S520
|
|
PIXMA iP6000D
|
PIXMA mini260
|
BJC-85
|
i9900
|
|
i350
|
|
Select the correct port setting (Windows)
| Article ID: ART161340 |
| |
Date published: 06/09/2015 |
| |
Date last updated: 08/18/2015 |
Description
Select the correct port setting (Windows)
Solution
Check if the Port Setting is Correct (Windows)If the Port setting in Windows is incorrect, the printer and computer will not be able to communicate with each other.Windows- Log on to the computer as a user account with administrator privilege.
- Open the printer's Properties.
For Windows 8 - On your keyboard, hold the windows
 key and press "X". key and press "X". - Click Control Panel
- Select Devices and printers.
- Click your right mouse button on the listing for your printer, and then select 'Printer Properties' from the menu that appears.
For Windows 7 - Click the 'Start' button from the bottom left of the Windows screen, and then click on 'Devices and Printers'.
- Click your right mouse button on the listing for your printer, and then select 'Printer Properties' from the menu that appears.
For Windows Vista - Click / Select 'Start' from the bottom left of the Windows screen, 'Control Panel', 'Hardware and Sound', and then click on 'Printers'.
Note: If you are in 'Classic' view, Click 'Printers' directly from the 'Control Panel'.
- Click your right mouse button on the listing for your printer, and then select 'Properties' from the menu that appears.
For Windows XP Home Edition - Click / Select 'Start' from the bottom left of the Windows screen, 'Control Panel,' 'Printers and Other Hardware,' and 'Printers and Faxes.'
- Click your right mouse button on the listing for your printer, and then select 'Properties' from the menu that appears.
For Windows XP Professional Edition - Click 'Start' from the bottom left of the Windows screen, and 'Printers and Faxes.'
- Click your right mouse button on the listing for your printer, and then select 'Properties' from the menu that appears.
- In the printer's Properties dialog box, select the Ports tab and locate the port with a check mark. Check the printer name of the selected port "USBnnn" (nnn denotes numbers). If the printer name is the same as the model connected, the correct port is set. If a different port is selected, find the port that the printer is actually connected to and click to put a check mark.
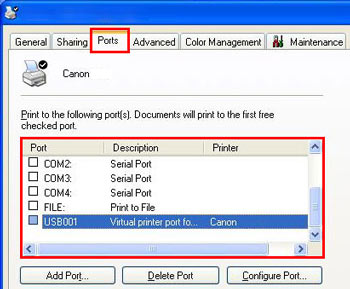
Note: If you are unable to find the correct port, uninstall and re-install the printer driver.
* The example Properties dialog box is with the USB port selected.
Note: When using infrared communication (only certain printer models), IR Local Port is the correct port. If a different port is selected, click the IR Local Port checkbox to add a checkmark.
- Click OK to apply the selected port setting.
Windows Me/98 (if applicable)- Open the printer's Properties.
For Windows Me/98 - Click / Select 'Start' from the bottom left of the Windows screen, and 'Settings,' then 'Printers.'
- Click your right mouse button on the listing for your printer, and then select 'Properties' from the menu that appears.
- In the printer's Properties dialog box, select the Details tab, and confirm the 'Print to The Following Port' contents. The correct port displays the connected printer name to the right of \"USBPRNxxx\" (xxx denotes numbers). If a different port is displayed, select the proper port from the drop-down menu or re-install the printer driver.
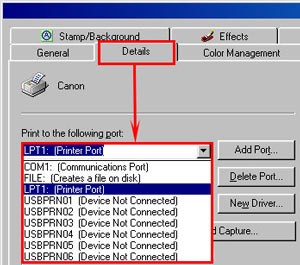
* The example Properties dialog box is with the LPT port selected.
Note: When using infrared communication, COM4 (Infrared Serial (COM) Port) is the correct port. If a different port is displayed, click the down arrow button, and select the correct port from the list.
- Click OK to apply the selected port setting.
|
