Select the Check scan results checkbox in Save Settings of the Settings dialog to display the Save Settings dialog after scanning.
You can specify the data format and destination while viewing the thumbnails of scan results.
 Important
- After scanning from My Image Garden or the operation panel, the Save Settings dialog does not appear.
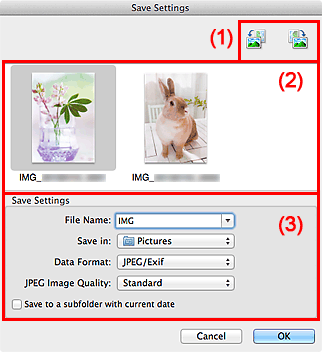
(1) Preview Operation Buttons

/
 (Rotate Left 90°)/(Rotate Right 90°)
Rotates scanned images 90 degrees counter-clockwise or clockwise.
Select the image you want to rotate, then click (Rotate Left 90°) or (Rotate Right 90°).
Important
- The preview operation buttons do not appear when the Enable large image scans checkbox is selected in the Settings (Driver) dialog.
(2) Scan Results Area
Displays the thumbnails of the scanned images. You can change the save order of images via drag-and-drop. The file names for saving appear below the thumbnails.
(3) Save Settings Area
File Name
Enter the file name of the image to be saved. When you save a file, the date and four digits are appended to the set file name in the "_20XX0101_0001" format.
 Note
Note
- When you select the Save to a subfolder with current date checkbox, the date and four digits are appended to the set file name.
Save in
Displays the folder in which to save the scanned images. To add a folder, select Add... from the pop-up menu, then click Add in the displayed dialog and specify the destination folder.
The default save folder is the Pictures folder.
Data Format
Select the data format in which to save the scanned images.
You can select JPEG/Exif, TIFF, PNG, PDF, or PDF (Multiple Pages).
Important
Note
- With network connection, scanning may take longer than usual when you set TIFF or PNG in Data Format.
JPEG Image Quality
You can specify the image quality of JPEG files.
Important
- This appears only when JPEG/Exif is selected in Data Format.
PDF Compression
Select the compression type for saving PDF files.
Standard
It is recommended that you normally select this setting.
High
Compresses the file size when saving, allowing you to reduce the load on your network/server.
Important
- This appears only when PDF or PDF (Multiple Pages) is selected in Data Format.
- When Black and White is selected in Color Mode, this option does not appear.
Create a PDF file that supports keyword search
Select this checkbox to convert text in images into text data and create PDF files that support keyword search.
Important
- This appears only when PDF or PDF (Multiple Pages) is selected in Data Format.
Note
- PDF files that are searchable in the language selected in Document Language on the
 (General Settings) tab of the Settings dialog are created.
Save to a subfolder with current date
Select this checkbox to create a current date folder in the folder specified in Save in and save scanned images in it. The folder will be created with a name such as "20XX_01_01" (Year_Month_Date).
If this checkbox is not selected, files are saved directly in the folder specified in Save in.
