Printing the Nozzle Check from the Operation Panel - MX490 / MX492
Article ID: ART162123
|
Date published: 09/17/2015
|
Date last updated: 04/15/2019
Description
This article explains how to print a nozzle check pattern for the PIXMA MX490 / MX492 from its operation panel.
Solution
Print the nozzle check pattern to determine whether the ink ejects properly from the print head nozzle.
You need to prepare: a sheet of A4 or Letter-sized plain paper
Make sure that the power is turned on.
Load a sheet of A4 or Letter-sized plain paper in the cassette.
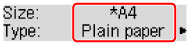
After pushing the cassette back, the paper information registration screen is displayed on the LCD. Select A4 or Letter for Size: and Plain paper for Type:, then press the OK button.
Pull the paper output support out from the paper output tray, then open the output tray extension.
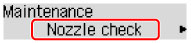
Press the Setup button, use the or button to select Maintenance, then press the OK button.
Use the or button to select Nozzle check, then press the OK button.

 or
or  button to select Maintenance, then press the OK button.