You can check the printer status and change the printer settings using the web browser on your smartphone, tablet, or computer.
 You can use this function on the following operating systems and web browsers.
-
iOS device
OS: iOS 6.1 or later
Web browser: iOS standard Web browser (Mobile Safari)
-
Android device
OS: Android 2.3.3 or later
Web browser: Android standard Web browser (Browser or Chrome)
-
Mac OS device
OS: Mac OS X v.10.6 or later
Web browser: Safari 5.1 or later
-
Windows device
OS: Windows XP or later
Web browser: Internet Explorer 8 or later, Google Chrome 38.0.2125.104m or later, Mozilla Firefox 33.0 or later
-
Print the network setting information to check the machine's IP address and serial number by following the steps below.
-
Make sure that the printer is powered on.
-
Load two sheets of A4 or Letter-sized plain paper.
-
Flick the HOME screen and tap  Setup.
The menu screen is displayed.
-
Tap  Device settings.
-
Tap LAN settings.
-
Tap Confirm LAN settings.
-
Tap Print LAN details.
-
Tap Yes.
The machine starts printing the network setting information.
-
Check "IP Address" column and "Serial Number" column on the network setting information sheet.
The password has been specified to the machine serial number at the time of purchase. Checking the serial number is not required if you have already changed to any password.
-
Open a web browser on your smartphone, tablet, or computer and enter the printer's IP address.
Enter the following in the URL field of the web browser.
http://XXX.XX.X.XXX
For "XXX.XX.X.XXX", enter the IP address that you checked in the "IP Address" column on the network setting information sheet.
see an example: 
When you access printer's IP address, the printer information will be displayed on the web browser on your smartphone, tablet, or computer.
If you want to check the printer status and change the printer settings, proceed to the next step. If you do not, close the web browser.
-
Select Log on to check printer status and change printer settings.
The Admin password authentication screen is displayed.
 Before the Admin password authentication screen is displayed, a message to warn you that the identification information is not verified may be displayed.
You can set not to display a message by specifying the SSL/TLS settings of certificate for encrypted communication in step 5.
-
Enter the printer's password.
The password is specified to the machine serial number at the time of purchase. If you have not changed the password yet, enter the machine serial number that is printed on the "Serial Number" column of the network setting information sheet.
When the password authentication is complete, the menus that can be utilized are displayed on the web browser.
-
Check printer status and change the printer's settings as desired.
You can utilize the following menus.
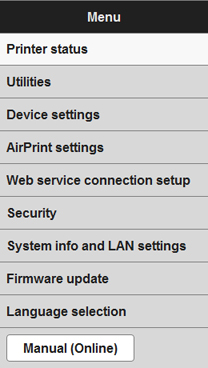
Printer status
This function displays printer information such as the remaining ink amount, the status, and detailed error information. You can also connect to the ink purchase site or support page, and use Web Services.
Utilities
This function allows you to set and execute the printer utility functions such as cleaning. Device settings
This function allows you to change the printer settings such as the quiet setting, the energy saving settings, and the print settings.
AirPrint settings
This function allows you to specify the AirPrint settings, such as position information.
Web service connection setup
This function allows you to register to Google Cloud Print or IJ Cloud Printing Center, or delete a registration.
Security
This function allows you to specify the administrator password and SSL/TLS settings of certificate for encrypted communication.
The password is specified to the machine serial number at the time of purchase.
The following character restrictions apply to the password that you change:
System info and LAN settings
This function allows you to check the system information and to change the LAN settings.
Firmware update
This function allows you to update the firmware and check version information.
Language selection
This function allows you to change the language on the display.
Manual (Online)
This function displays the Online Manual.
-
For security reasons, we recommend you use 6 and more alphanumeric characters.
-
The allowed characters are single-byte alphanumeric characters.
-
Set the password by using 4 to 32 characters.
-
When you finish checking printer status and changing printer settings, select Log off.
-
Close web browser.
If your product issue was not resolved after following the steps above, or if you require additional help, please create or log in to your Canon Account to see your technical support options.
Or if you still need help, visit our Canon Community by clicking the button below to get answers:

____________________________________________________________________________________________

