If print quality does not improve by the standard cleaning of the print head, clean the print head deeply. Cleaning the print head deeply consumes more ink than the standard cleaning of the print head, so clean the print head deeply only when necessary.
You need to prepare: a sheet of A4 or Letter-sized plain paper
-
Make sure that the power is turned on.
-
Load a sheet of A4 or Letter-sized plain paper in cassette 2.
After inserting the cassette into the machine, the paper information registration screen is displayed on the touch screen. Select A4 or Letter for Page size and Plain paper for Type, then tap Register.
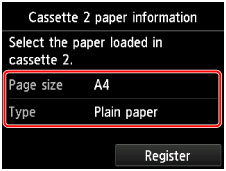
If a message is displayed on the screen, follow the directions in the message to complete registration.
-
Holding both sides of the paper output tray, gently open it.
The output tray extension will open automatically when the paper output tray is opened.
-
Extend the paper output support.
 If the disc tray guide is open, be sure to close it.
-
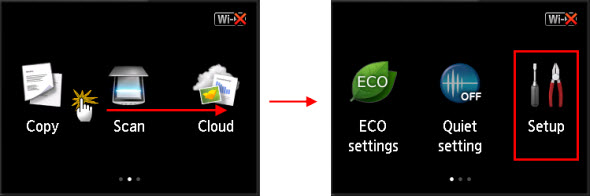
From the HOME screen, swipe from left to right and tap  Setup.
The setup menu screen will appear.
-
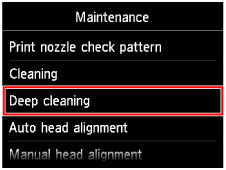
Tap  Maintenance.
The Maintenance screen will appear.
-
Tap Deep cleaning.
The confirmation screen will appear.
-
Tap Yes.
The machine starts cleaning the print head deeply.
Do not perform any other operations until the machine completes the deep cleaning of the print head. This takes about 2 to 3 minutes.
The pattern print confirmation screen will appear.
-
Tap Yes.
The nozzle check pattern will be printed.
-
When the completion message appears, tap OK.
-
Examine the nozzle check pattern.
If a particular color is not printed properly, replace the ink tank of that color.
If the problem is not resolved, turn off the power and clean the print head deeply again after 24 hours.
If the problem is still not resolved, the print head may be damaged.
For support and service options, sign into (or create) your Canon Account from the link below.
My Canon Account
