| Solution |
NOTE
- Listed in alphabetical order.
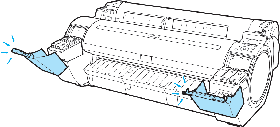
Before borderless printing, move the blue platen switch.
Blue platen switch is dirty.
| Cause |
Corrective Action |
| The blue Switch on the platen is dirty. |
Open the Top Cover and clean the blue Switch on the platen. |
Borderless printng not possible.
| Cause |
Corrective Action |
| The print job received specifies a type or width of paper that is not compatible with borderless printing. |
Follow these steps to change the settings of the print job to enable borderless printing.
1. Press  or or  to select Stop Printing, and then press the OK button. to select Stop Printing, and then press the OK button.
2. Make sure the correct printer driver for the printer is selected and try printing again.
For information on types of paper compatible with borderless printing, refer to the Paper Reference Guide. |
Press or to select Print With Border, and then press the OK button to continue printing.
The document will be printed with a border. |
| The loaded paper is a size not compatible with borderless printing. |
Press or to select Stop Printing, and then press the OK button. |
Replace the paper with paper compatible for borderless printing as follows.
1. Press or to select Change Paper, and then press the OK button.
2. Replace the paper with paper compatible for borderless printing.
(See " Loading and Printing on Rolls (iPF830) ")
(See " Loading and Printing on Rolls (iPF840) ")
(See " Loading and Printing on Rolls (iPF850) ")
The printer now starts printing the print job.
For information on types of paper compatible with borderless printing, refer to the Paper Reference Guide. |
| Press or to select Print With Border, and then press the OK button to continue printing. The document will be printed with a border. |
| Because paper expands or contracts depending on the environment of use, it may become narrower or wider than the supported width for borderless printing. |
Use each type of paper only where the recommended environmental conditions are met. For details on environmental conditions for various paper, see the Paper Reference Guide. |
Borderless printng not possible. Paper stretched or shrank.
| Cause |
Corrective Action |
| The loaded roll has expanded or contracted due to environmental conditions, making it wider or narrower than the supported width for borderless printing. |
Press the OK button to stop printing. |
| Use each type of paper only where the recommended environmental conditions are met. For details on environmental conditions for various paper, see the Paper Reference Guide. |
Cannot adjust printhead.
Cannot print as selected. Another roll is in use.
Cannot print as specified.
"Lift the release lever and replace paper with A4/LTR (vertical) or larger."
| Cause |
Corrective Action |
| The loaded paper is too small. |
Switch to paper A4/Letter (vertical) or larger. |
"Lift the release lever and replace roll with 10 in. wide or larger roll."
| Cause |
Corrective Action |
| The loaded paper is too small. |
Load a roll 10 inches wide or larger. |
Cannot recognize print head.
Check printed document.
Close Ink Tank Cover
| Cause |
Corrective Action |
The Ink Tank Cover is open.
 |
Close the Ink Tank Cover. |
Cutting Mode not Automatic.
| Cause |
Corrective Action |
| The Stacker is ready to be used, however, the Printer Cutting Mode is not set to Automatic Cut. Or Automatic Cutting is not set to Yes in the Printer Driver.(*1) |
After removing the Stacker, start printing by pressing or to select "Print again". |
Stop printing by pressing or to select CANCELED.
Set Cutting Mode to Automatic Cut in the Control Panel menu and then print again.
Alternatively, set Automatic Cutting to Yes in the Printer Driver and then print again.(*2) |
*1:This is for Windows.For Mac OS, it is not set to Printer Default.
*2:This is for Windows.For Mac OS, set to Printer Default and then print again.
End of paper feed.
| Cause |
Corrective Action |
| Although an attempt was made to advance the paper manually, it reached the limit position that can be advanced. |
Canceling manual advancing. |
ERROR Exxx-xxxx (x represents a letter or number)
| Cause |
Corrective Action |
An error requiring service may have occurred.
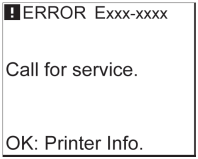 |
Write down the error code and message, turn off the printer, and contact your Canon dealer for assistance. |
Execute printhead cleaning.
File read error.
| Cause |
Corrective Action |
| Files on the printer's hard disk have become corrupted. |
Restart the printer. Only the corrupted files will be deleted, and the printer will restart. |
GARO Wxxxx (x represents a number)
| Cause |
Corrective Action |
| There is a problem with the print job. |
Try printing again, using the correct printer driver. |
It is also possible to continue printing in this state.
However, you may not be able to obtain the desired printing results. |
GL2: W0502 The parameter is out of range.
| Cause |
Corrective Action |
| A parameter specified in a HP-GL/2 command is out of the supported range. |
Check the print job. |
| If you have specified ProcessingOption > Warning > On in the Control Panel menu, set it to Off instead. |
GL2: W0504 This command is not supported.
| Cause |
Corrective Action |
| The printer has received an unsupported HP-GL/2 command. |
Check the print job. |
| If you have specified ProcessingOption > Warning > On in the Control Panel menu, set it to Off instead. |
GL2: Wxxxx The memory is full. (xxxx is 0501, 0903, or 0904)
| Cause |
Corrective Action |
| The printer memory is full. |
Because the entire print job could not be received, the printer may not be able to print the entire original. Check the printing results. |
| In the Control Panel menu, setting On-the-Fly to On may enable printing. However, check the printing results because the image may be incomplete in some cases. |
Hard disk error.
| Cause |
Corrective Action |
| The format of the printer's hard disk is invalid. |
Press the OK button to start reformatting the hard disk. When formatting is finished, data on the printer hard disk is erased and the printer automatically restarts. |
Hardware error. xxxxxxxx-xxxx (x represents a letter or number)
| Cause |
Corrective Action |
| The last portion of roll paper was used during a print job. The paper was not advanced because the trailing edge is taped to the roll. |
Turn off the printer and remove the roll from the printer before restoring power. |
| Fastening tape or the Belt Stopper has not been removed inside the Top Cover. |
Turn off the printer, open the Top Cover and remove the tape or the Belt Stopper before restoring power. |
An error requiring service may have occurred.
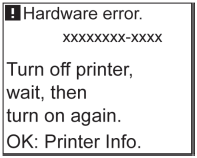 |
Turn off the printer and wait at least three seconds before restoring the power.
If the message is displayed again, write down the error code and message, turn off the printer, and contact your Canon dealer for assistance. |
Ink insufficient.
| Cause |
Corrective Action |
The ink level is low, so you cannot print, clean the Printhead, or do other operations that require ink.
There is not enough ink of the color with × displayed above the remaining ink indicator. |
Press the OK button, open the Ink Tank Cover, and replace the Ink Tank for the color that does not have enough ink.
(See " When and How to Replace Ink Tanks (iPF830/iPF840/iPF850) ") |
Ink tank is empty.
Insert the maintenance cartridge.
Insufficient paper for job
| Cause |
Corrective Action |
The printer has received a print job longer than the amount of roll paper left when ManageRemainRoll in the Control Panel menu is On.
 |
Press or to select Print, and then press the OK button to resume printing.
However, the roll paper may run out during the print job and you may not be able to print all of the document. |
Press or to select Change Paper, and then press the OK button to stop printing.
(See " Loading and Printing on Rolls (iPF830) ")
(See " Loading and Printing on Rolls (iPF840) ")
(See " Loading and Printing on Rolls (iPF850) ") |
| Press or and select Stop Printing or press the Stop button to stop printing. |
Mail box full. Delete unwanted data.
| Cause |
Corrective Action |
| 100 jobs are stored in the Personal Box. |
Press the Stop button and stop printing. |
| Delete print jobs from the queue. |
| Delete unneeded jobs stored in personal boxes. |
Mail box full. Now printing without saving data.
| Cause |
Corrective Action |
| No more space is available on the printer's hard disk, so jobs are now printed without saving them. (Print jobs can no longer be saved on the hard disk.) |
After printing, this message is cleared. |
Mail box nearly full.
| Cause |
Corrective Action |
| The free hard disk space left for Personal Boxes in the printer's hard disk does not have more than 1 GB, combined. |
Delete unneeded jobs stored in Personal Boxes. |
Maint. cart. The level is low
| Cause |
Corrective Action |
| The Maintenance Cartridge is almost full. |
You can continue to print, but prepare a new Maintenance Cartridge to use when the message for replacement is displayed. |
Maintenance cartridge full.
Maintenance cartridge problem.
Maximum jobs stored.
| Cause |
Corrective Action |
| 100 jobs are stored in the personal box. |
Delete unneeded jobs stored in personal boxes. |
Media take-up unit ready.
| Cause |
Corrective Action |
| The Take-up Reel setting in the printer Set./Adj. Menu was changed from Enable to Disable, but a print job was received before the roll was removed. |
Press or to select Stop Printing, and then press the OK button to stop printing. |
| The mode switches from take-up mode to regular mode after you change the Take-up Reel setting in the Set./Adj. Menu from Enable to Disable and lift the Release Lever to remove a roll, or after you execute Paper Cutting. |
| Press or to select Print, and then press the OK button to resume printing. |
MediaType Mismatch
| Cause |
Corrective Action |
| You tried to print a test pattern for printer adjustment on several sheets, but sheets of different types of paper were used. |
When printing a test pattern for adjustment, use sheets of the same type of paper, in the required quantity. Replace the paper as follows and perform adjustment again.
1. Lift the Release Lever and stop printing.
2. Replace the paper.
(See " Loading and Printing on Sheets (iPF830/iPF840/iPF850) ")
3. Execute adjustment again from the control panel menu.< /td> |
| When Detect Mismatch in the Control Panel menu is set to Warning, the type of paper loaded does not match the type specified in the printer driver. |
You can continue to print, but note that this error may cause paper jams or problems in the printing results. |
Move the blue platen switch No.xx to the right. (xx represents a number)
Multi-sensor error
| Cause |
Corrective Action |
| Direct sunlight or strong lighting may be shining on the printer and causing the sensor to malfunction. |
Take steps to ensure the printer is not used when exposed to direct sunlight or strong lighting. |
| The performance of a sensor inside the printer may be impaired. |
Turn off the printer and wait at least three seconds before restoring the power.
If the message is displayed again, contact your Canon dealer for assistance. |
No ink left.
| Cause |
Corrective Action |
There is no ink left.
There are no ink colors with × displayed above the remaining ink indicator. |
Press the OK button, open the Ink Tank Cover, and replace the Ink Tank for the color that is out of ink.
(See " When and How to Replace Ink Tanks (iPF830/iPF840/iPF850) ") |
No ink tank loaded.
No Maintenance Cartridge capacity.
No Roll Unit.
| Cause |
Corrective Action |
| The printer has received a print job that specifies Roll 2 (Lower), but the Roll Unit is not installed. |
Press the Stop button and stop printing. |
1. Turn the printer off and install the Roll Unit.
Connect the Roll Unit Cable firmly and completely.
2. Turn the printer on and resend the print job. |
Not much ink is left.
| Cause |
Corrective Action |
| Not much ink is left. |
Prepare a new Ink Tank.
We recommend replacing the Ink Tank with a new Ink Tank at this point if you plan to print large-format or high-quantity jobs. |
Paper cutting failed.
| Cause |
Corrective Action |
| There are sheets left on the Ejection Guide. |
1. Lift the Release Lever and remove the paper.
2. If "Not finished printing. Finish printing remaining jobs?" is shown on the Display Screen, press the OK button.
Printing will resume, starting from the page on which the error occurred. |
| There is a foreign object by the Output Tray, obstructing the Cutter Unit. |
1. Lift the Top Cover and remove the foreign object.
2. If "Not finished printing. Finish printing remaining jobs?" is shown on the Display Screen, press the OK button.
Printing will resume, starting from the page on which the error occurred. |
| You are not using the printer under the recommended environmental conditions for the paper. |
Use the printer only where the recommended environmental conditions for the paper are met. Note that various environmental conditions are recommended for various types of paper. For details on the recommended environmental conditions for paper, see the Paper Reference Guide. |
| You are using paper that is not compatible with automatic cutting. |
Specify Manual as the cutting method and cut the roll manually.
For information about paper that is compatible with automatic cutting, see the Paper Reference Guide. |
| The Cutter Unit stops in the middle of cutting. |
If the Carriage is out, move the Carriage out of the way, away from the paper.
If the Cutter is out, move the Cutter to the right side (away from the paper) and remove the jammed paper.
If the paper cannot be cut using the Cutter Unit, specify Manual as the roll cutting method and cut the roll manually. |
| In other cases, the Cutter Unit may be damaged. |
Contact your Canon dealer for assistance. |
Paper jam
"Lift the release lever."
| Cause |
Corrective Action |
| A paper jam occurred in the printer during printing. |
1. Lift the Release Lever and remove the jammed paper.
2. If "Not finished printing. Finish printing remaining jobs?" is shown on the Display Screen, press the OK button.
Printing will resume, starting from the page on which the error occurred. |
"Manually rewind the roll all the way and press OK."
| Cause |
Corrective Action |
| A paper jam occurred when advancing the paper. |
1. Rewind paper on the Roll Holder manually, all the way, and then press the OK button.
2. If "Not finished printing. Finish printing remaining jobs?" is shown on the Display Screen, press the OK button.
Printing will resume, starting from the page on which the error occurred. |
"Lift the release lever and remove the paper."
| Cause |
Corrective Action |
| A paper jam occurred in the printer during printing. |
Lift the Release Lever and remove the jammed paper. |
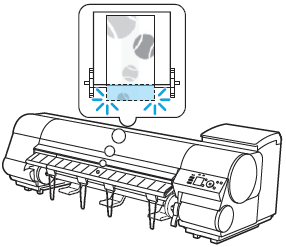
Paper loaded askew.
Paper position not suitable for borderless printing.
| Cause |
Corrective Action |
| Because paper expands or contracts depending on the environment of use, it may become narrower or wider than the supported width for borderless printing. |
Press  or or  to select Stop Printing, and then press the OK button. Use each type of paper only where the recommended environmental conditions are met. For details on environmental conditions for various paper, see the Paper Reference Guide. to select Stop Printing, and then press the OK button. Use each type of paper only where the recommended environmental conditions are met. For details on environmental conditions for various paper, see the Paper Reference Guide. |
| The paper is loaded askew. |
Press  or or  to select Fix Paper Position and straighten the paper so that the edges are between the ink grooves for borderless printing. to select Fix Paper Position and straighten the paper so that the edges are between the ink grooves for borderless printing.
Insert the roll firmly until it touches the flange of the Roll Holder.
(See " Loading and Printing on Rolls (iPF830) ")
(See " Loading and Printing on Rolls (iPF840) ")
(See " Loading and Printing on Rolls (iPF850) ") |
Press  or or  to select Print With Border, and then press the OK button to continue printing. The document will be printed with a border. to select Print With Border, and then press the OK button to continue printing. The document will be printed with a border. |
Press  or or  to select Stop Printing, and then press the OK button. to select Stop Printing, and then press the OK button. |
Paper size not detected.
PaprTypeMismatch
| Cause |
Corrective Action |
| When Detect Mismatch in the Control Panel menu is set to Pause, the type of paper loaded does not match the type specified in the printer driver. |
Follow these steps to ensure the paper type matches on the printer and in the printer driver.
1. Press or to select Stop Printing, and then press the OK button.
2. Change the paper type setting in the printer driver to the type loaded in the printer and try printing again. |
Follow these steps to ensure the paper type matches on the printer and in the printer driver.
1. Press or to select Change Paper, and then press the OK button.
2. Replace the loaded paper with paper of the type and size you have specified in the printer driver.
(See " Loading and Printing on Rolls (iPF830) ")
(See " Loading and Printing on Rolls (iPF840) ")
(See " Loading and Printing on Rolls (iPF850) ")
(See " Loading and Printing on Sheets (iPF830/iPF840/iPF850) ") |
Press or to select Print, and then press the OK button to resume printing.
However, note that this error may cause paper jams and affect the printing quality. |
PaprWidth Mismatch
| Cause |
Corrective Action |
| When Detect Mismatch in the Control Panel menu is set to Pause or Hold Job, the width of the loaded roll does not match the width specified in Fit Roll Paper Width in the printer driver. |
Press  or or  to select Print, and then press the OK button to resume printing. However, note that this error may cause paper jams and affect the printing quality. to select Print, and then press the OK button to resume printing. However, note that this error may cause paper jams and affect the printing quality. |
Press  or or  to select Stop Printing, and then press the OK button. to select Stop Printing, and then press the OK button. |
Follow these steps to replace the roll to match the width specified in the printer driver.
1. Press  or or  to select Change Paper, and then press the OK button. to select Change Paper, and then press the OK button.
2. Replace with paper of the width configured in the printer driver.
(See " Loading and Printing on Rolls (iPF830) ")
(See " Loading and Printing on Rolls (iPF840) ")
(See " Loading and Printing on Rolls (iPF850) ")
The printer now starts printing the print job. |
| Make sure the roll width selected in the dialog box displayed when you select Fit Roll Paper Width in the printer driver matches the width of the roll loaded in the printer, and then try printing again. |
Parts replacement time has passed.
| Cause |
Corrective Action |
| It is past the recommended time to replace consumables for which service is required. |
Contact your Canon dealer for assistance. |
Prepare for parts replacement.
| Cause |
Corrective Action |
| It is almost time to replace consumables for which service is required. |
If "Parts replacement time has passed." is displayed, you can continue to use the printer for some time.
Contact your Canon dealer for assistance. |
Printhead error
Regular printing is selected, but a roll is loaded.
Rel lever is in wrong position.
| Cause |
Corrective Action |
| The Release Lever is pushed back. |
Pull the Release Lever forward.
Turn off the printer and wait a while before restoring power. |
Remaining level of the ink cannot be correctly detected. Check ink tank.
| Cause |
Corrective Action |
| Ink level detection cannot work correctly if you use refill ink tanks. |
The refill ink tank can no longer be used. See the section Ink level detection and take the appropriate action. |
Rewinding error.
| Cause |
Corrective Action |
| There is some foreign object near the Media Take-up Unit sensor and the roll cannot be detected. |
Remove the foreign object near the sensor. |
| The roll is out of range of detection by the Media Take-up Unit sensor. |
Reload the roll.
Press the OK button to clear the error.
(See " Loading and Printing on Rolls (iPF830) ")
(See " Loading and Printing on Rolls (iPF840) ")
(See " Loading and Printing on Rolls (iPF850) ") |
| A paper jam has occurred and the roll cannot be rewound. |
Remove the paper from the Media Take-up Unit.
Press the OK button to clear the error. |
| The Media Take-up Unit sensor is damaged. |
Contact your Canon dealer for assistance. |
*1:Printing will stop momentarily if an error involving the Media Take-up Unit occurs. If you prefer printing not to stop, set Skip Take-Up Err to On. However, note that this error may cause paper jams and affect the printing quality.
Roll feed unit error.
| Cause |
Corrective Action |
| There is a problem with the Roll Unit. |
Turn off the printer and wait at least three seconds before restoring the power. If the message is displayed again, contact your Canon dealer for assistance. |
Roll printing is selected, but sheets are loaded.
Roll printing is selected.
Roll x is empty. (x is 1 (Upper) or 2 (Lower))
| Cause |
Corrective Action |
| The tailing edge of the paper was detected because cut sheets were loaded in the roll paper Paper Feed Slot. |
Follow these steps to install the roll paper.
1. Press the OK button and remove the paper.
2. Load the new roll.
(See " Loading and Printing on Rolls (iPF830) ")
(See " Loading and Printing on Rolls (iPF840) ")
(See " Loading and Printing on Rolls (iPF850) ")
3. If no barcode was printed on the roll, specify the type of paper.
4. If no barcode was printed on the roll, specify the paper length.
5. If "Not finished printing. Finish printing remaining jobs?" is shown on the Display Screen, press the OK button.
Printing will resume, starting from the page on which the error occurred. |
"Lift the release lever and replace the roll."
| Cause |
Corrective Action |
The roll is empty. 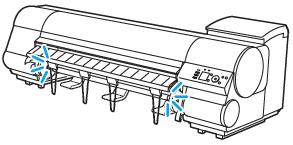 |
Follow these steps to replace the used roll with a new roll of the same type and size.
1. Lift the Release Lever and remove the roll.
2. Load the new roll.
3. If no barcode was printed on the roll, specify the type of paper.
4. If no barcode was printed on the roll, specify the paper length.
5. If "Not finished printing. Finish printing remaining jobs?" is shown on the Display Screen, press the OK button.
Printing will resume, starting from the page on which the error occurred.
(See " Loading and Printing on Rolls (iPF830) ")
(See " Loading and Printing on Rolls (iPF840) ")
(See " Loading and Printing on Rolls (iPF850) ") |
| There is remaining roll paper, but because it could not be advanced, it could not be detected. |
The unused portion of the roll is heavy, and this is placing a burden on the printer. It may be helpful to change the printing mode, which will change the paper feed timing.
Choose a higher level of Print Quality in the Advanced Settings of the printer driver. |
Roll x is selected. (x is 1 (Upper) or 2 (Lower))
Roll x jam (x is 1 (Upper) or 2 (Lower))
"Lift the release lever."
| Cause |
Corrective Action |
| A paper jam occurred in the printer during printing. |
1. Lift the Release Lever and remove the jammed paper.
2. If "Not finished printing. Finish printing remaining jobs?" is shown on the Display Screen, press the OK button.
Printing will resume, starting from the page on which the error occurred. |
"Manually rewind the roll all the way and press OK."
| Cause |
Corrective Action |
| A paper jam occurred when advancing the paper. |
1. Rewind paper on the Roll Holder manually, all the way, and then press the OK button.
2. If "Not finished printing. Finish printing remaining jobs?" is shown on the Display Screen, press the OK button.
Printing will resume, starting from the page on which the error occurred. |
Sheet printing is selected.
| Cause |
Corrective Action |
| You have attempted to print on a sheet, but no sheet is loaded. |
Press or to select Load Paper, and then press the OK button. Load a sheet, and then print.
(See " Loading and Printing on Sheets (iPF830/iPF840/iPF850) ") |
| Press or and select Stop Printing or press the Stop button to stop printing. |
Sheet removed.
| Cause |
Corrective Action |
| A sheet has come out of the printer during printing. |
1. Lift the Release Lever and remove the paper.
2. If "Not finished printing. Finish printing remaining jobs?" is shown on the Display Screen, press the OK button.
Printing will resume, starting from the page on which the error occurred. |
Stacker not ready.
| Cause |
Corrective Action |
| The Stacker is not ready. |
When printing using the Stacker, check the following.
• The Stacker Power is on.
• The Stacker is installed in the right position on the Printer.
Once the preparation is finished, start printing by pressing or to select "Print". |
When printing without using the Stacker, prepare the following.
• Remove the Stacker from the Printer.
Move the Stacker sufficiently far away from the Printer.
Once the preparation is finished, start printing by pressing or to select "Print". |
| Stop printing by pressing or to select "Stop Printing". |
The following ink tanks cannot be recognized.
The mail box is full.
| Cause |
Corrective Action |
| There is no more space on the printer's hard disk. |
Press the Stop button and stop printing. |
| Delete print jobs from the queue. |
| Delete unneeded jobs stored in personal boxes. |
The paper is too small.
| Cause |
Corrective Action |
| When Detect Mismatch in the Control Panel menu is set to Pause, paper smaller than the size specified in the printer driver is loaded. |
Press  or or  to select Print, and then press the OK button to resume printing. to select Print, and then press the OK button to resume printing.
However, note that this error may cause paper jams and affect the printing quality. |
Adjust the paper size setting in the printer driver to match the size loaded in the printer as follows.
1. Press  or or  to select Stop Printing, and then press the OK button. to select Stop Printing, and then press the OK button.
2. Change the paper size setting in the printer driver to the size loaded in the printer and try printing again. |
Replace the loaded paper with paper of a size that matches the size setting in the printer driver as follows.
1. Press  or or  to select Change Paper, and then press the OK button to stop printing. to select Change Paper, and then press the OK button to stop printing.
2. Replace the loaded paper to match the settings in the printer driver and try printing again.
(See " Loading and Printing on Rolls (iPF830) ")
(See " Loading and Printing on Rolls (iPF840) ")
(See " Loading and Printing on Rolls (iPF850) ")
(See " Loading and Printing on Sheets (iPF830/iPF840/iPF850) ") |
| When Detect Mismatch in the Control Panel menu is set to Warning, paper smaller than the size specified in the printer driver is loaded. |
You can continue to print, but note that this error may cause problems in the printing results. |
The paper is too small.
"Replace paper with A4/LTR (vertical) or larger"
| Cause |
Corrective Action |
| The loaded paper is too small. (When you have attempted to print a test print sheet or other printer status information.) |
Replace the paper with paper of A4/Letter (vertical) size or larger as follows.
1. Press or to select Change Paper, press the OK button, and remove the paper.
2. Switch to paper A4/Letter (vertical) or larger.
(See " Loading and Printing on Sheets (iPF830/iPF840/iPF850) ")
The printer will resume printing. |
| Press or to select Stop Printing, and then press the OK button. |
The roll is empty.
| Cause |
Corrective Action |
| The tailing edge of the paper was detected because cut sheets were loaded in the roll paper Paper Feed Slot. |
Follow these steps to install the roll paper.
1. Press the OK button and remove the paper.
2. Load the new roll.
(See " Loading and Printing on Rolls (iPF830) ")
(See " Loading and Printing on Rolls (iPF840) ")
(See " Loading and Printing on Rolls (iPF850) ")
3. If no barcode was printed on the roll, specify the type of paper.
4. If no barcode was printed on the roll, specify the paper length.
5. If "Not finished printing. Finish printing remaining jobs?" is shown on the Display Screen, press the OK button.
Printing will resume, starting from the page on which the error occurred. |
"Lift the release lever and replace the roll."
| Cause |
Corrective Action |
The roll is empty.
 |
Follow these steps to replace the used roll with a new roll of the same type and size.
1. Lift the Release Lever and remove the roll.
2. Load the new roll.
3. If no barcode was printed on the roll, specify the type of paper.
4. If no barcode was printed on the roll, specify the paper length.
5. If "Not finished printing. Finish printing remaining jobs?" is shown on the Display Screen, press the OK button.
Printing will resume, starting from the page on which the error occurred.
(See " Loading and Printing on Rolls (iPF830) ")
(See " Loading and Printing on Rolls (iPF840) ")
(See " Loading and Printing on Rolls (iPF850) ") |
| There is remaining roll paper, but because it could not be advanced, it could not be detected. |
The unused portion of the roll is heavy, and this is placing a burden on the printer. It may be helpful to change the printing mode, which will change the paper feed timing.
Choose a higher level of Print Quality in the Advanced Settings of the printer driver. |
The roll feed unit is loose.
| Cause |
Corrective Action |
| The Roll Unit is detached from the printer. |
Push the Roll Unit firmly all the way in. |
This paper cannot be used as size is not supported.
| Cause |
Corrective Action |
| Paper that is too large for the printer has been loaded. |
Lift the Release Lever and load paper of the correct size. |
| Paper that is too small for the printer has been loaded. |
Lift the Release Lever and load paper of the correct size. |
| Paper has been loaded that is too small to print the test pattern for printhead adjustment or nozzle checking. |
Lift the Release Lever and load unused paper A4/Letter (vertical) or larger. More than one sheet may be required depending on the adjustment. |
This type of paper is not compatible with HP-GL/2.
| Cause |
Corrective Action |
| The printer has received a HP-GL/2 print job that cannot be printed on the paper that has been advanced. |
Follow these steps to replace the type of paper in the printer.
1. Press or to select Change Paper, and then press the OK button.
2. Replace the paper with a type compatible with HP-GL/2. For details on paper compatible with HP-GL/2, refer to the Paper Reference Guide. |
| Press or to select Stop Printing, and then press the OK button. |
| Press or to select Print, and then press the OK button to resume printing. However, note that this error may cause paper jams and affect the printing quality. |
Top cover is open.
| Cause |
Corrective Action |
| The printer has detected that the Top Cover is open. |
Open the Top Cover fully, remove any foreign objects, and close the Top Cover again. |
| If the error occurs again, close the Top Cover, turn off the printer, and wait a while before restoring power. |
Turn on the media take-up unit.
| Cause |
Corrective Action |
| The Take-up Reel setting in the control panel menu was changed to Enable while the power to the Take-up Reel was off and the Roll Media lamp on the control panel was lit. |
Turn the Media Take-up Unit on. |
| The Take-up Reel setting in the control panel menu changes to Disable. |
Unknown file.
| Cause |
Corrective Action |
| Data sent to keep the printer up to date (such as paper information) is in the wrong format. |
Check the data. Turn off the printer and wait a while before restoring power, and then resend the data. |
| You have uploaded firmware for a different model. |
Check the firmware version. Turn off the printer and wait a while before restoring power, and then resend the firmware. |
| If the message is displayed again, contact your Canon dealer for assistance. |
Wrong ink tank.
Wrong maintenance cartridge.
Wrong printhead.
|


