|
The procedure for converting RAW images to JPEG or TIFF images with Digital Photo Professional Ver. 4.x is explained below.
IMPORTANT
The screens displayed may differ depending on the computer you use.
1. Double-click the [Digital Photo Professional 4] icon appearing on the desktop.

If the [Digital Photo Professional 4] shortcut icon does not appear on your desktop, please perform the procedures explained below to start Digital Photo Professional Ver. 4.x.
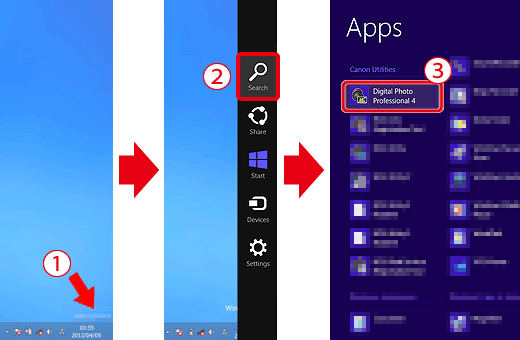
1.  Move the pointer to the bottom right side of the screen. When the Charms are displayed, move the pointer up to select  [Search]. Next, select [Digital Photo Professional 4] from the  [Apps] screen.
NOTE
- Windows 7: Click [Start] -> [All Programs] -> [Canon Utilities] -> [Digital Photo Professional ] -> [Digital Photo Professional ].
- Windows 8.1: Click [â] on the bottom left of the [Start] screen to display the [Apps] screen, and then click [Digital Photo Professional ].
- Mac OS X: Click the [Digital Photo Professional ] icon appearing in the [Dock].
2. When Digital Photo Professional Ver. 4.x starts, the window shown in the example image below appears.
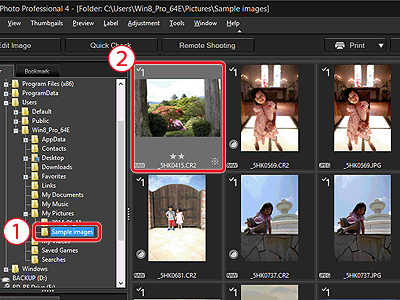
 Select the folder in which the image you want to convert is saved. (Images are saved to the [My Pictures] folder by default)
 Double-click and select the RAW image you want to convert to JPEG or TIFF.
3. The window shown in the example image below appears
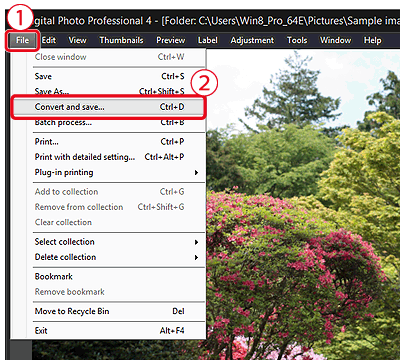
Click [File], and from the menu that appears, click [Convert and save].
4. When the window shown in the example image below appears, Specify the necessary settings, and then click the [Save] button.
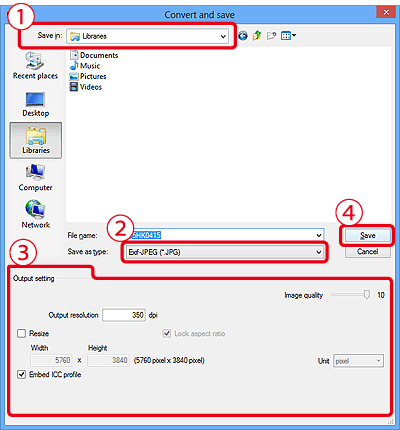
Confirm the destination from [Save in].
Click [Save as type], and select [Exif-JPEG] from the menu that appears (if converting to JPEG).
 As necessary, make the following settings: [Quality setting], [Output setting], and [Resize setting]. (These settings are not necessary and may degrade the image quality.)
 Click [Save].
|
