| Solution |
With your camera, you can shoot photos while viewing the image on the camera's LCD monitor. This is called "Live View shooting".
This page describes how to change the focus mode for Live View shooting. For details on how to perform easy Live View shooting in default settings, please refer to the 'Related information' section at the end of the page.
Please note that some shooting procedures differ between still photos and movies. To shoot still photos, please refer to the instructions for still photos, and to shoot movies, please refer to the instructions for movies.
REFERENCE
Live View shooting is suited to shooting situations like 'Still Life' photography where the distance between the camera and the subject stays constant.
If you handhold the camera and shoot while viewing the CD monitor, camera shake can cause blurred images. Using a tripod is recommended.
Part I. Preparing for Live View Shooting 1. Set the camera's power switch to [ ON ].
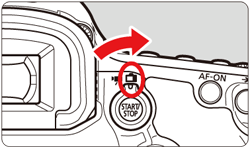
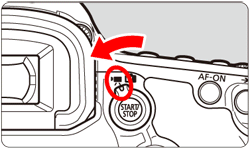
2. To shoot still photos, you can set the Live View shooting/Movie shooting switch to [  ]. To shoot movies, select [  ] (Movie shooting). When [  ] (Movie shooting) is selected, the image will be displayed on the LCD monitor.
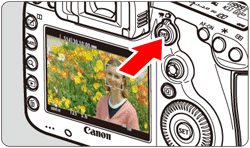
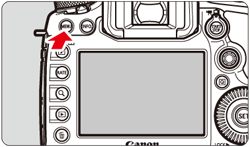
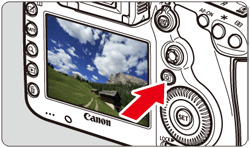
3. For still photos, press the [  ] button. The Live View image will appear on the LCD monitor.
REFERENCE
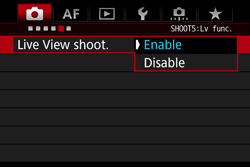
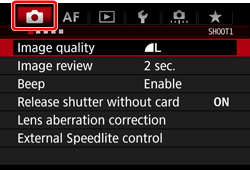
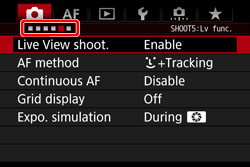
To shoot still photos, select the [ã  ] tab, and then select [Enable] in the [Live View shoot.] option. ([Enable] is set by default.)
To use AF to focus, please proceed to Part II. To focus manually, please proceed to Part III .
Part II, and III describe procedures for both still photos and movies.
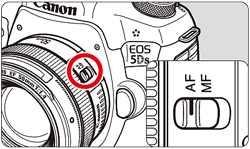
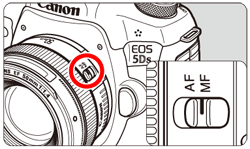
Part II. Selecting the AF Method 4. Set the lens focus mode switch to [AF].
5. Make sure that the camera is ready to take shots, and then press the [MENU] button.
6. Press the [  ] button and select the [  ] tab.
 ã 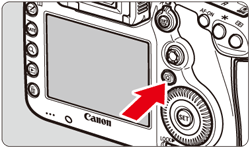
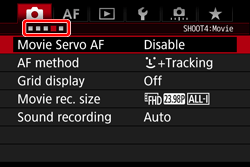
7. Turn the [  ] dial to select the [  ] tab for still images (upper example image), or the [  ] tab for movies (lower example image).
 ã 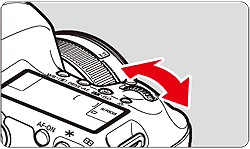
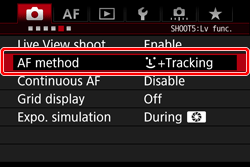
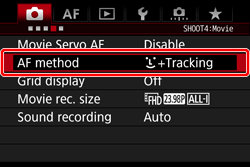
8. Turn the [  ] dial to select the [AF method], and then press [  ].
- Still images: upper example image
- Movies: lower example image
 ã 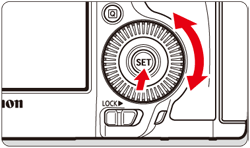
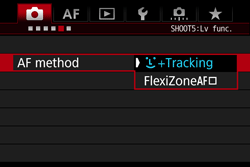
9. Turn the [ ] dial to select an AF mode, and then press [ ].
- Still images: left example image
- Movies: right example image
 ã 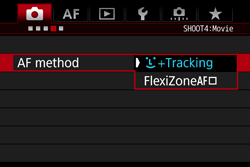
10. Press the [MENU] button, and then close the menu window. An image will appear on the LCD monitor.
NOTE
While the image is displayed on the LCD monitor, pressing the [ ] button will enable you to set the AF method etc. on the Quick Control Screen. For more information, please refer to the instruction manuals included with your camera.
 ã 
As the next step may differ depending on the AF method setting, Please confirm your AF mode setting before proceeding.
Part II-1 Using AF (Face+Tracking) to Focus
Part II-2. Using AF (FlexiZone - Single) to Focus
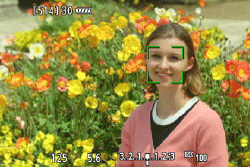
Part II-1 Using AF (Face+Tracking) to Focus In [  +Tracking] AF The camera detects and focuses human faces. If a face moves, the AF point [  ] also moves to track the face.
- Still images: left example image
- Movies: right example image
ã
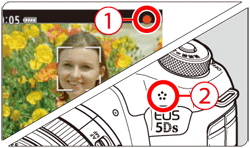
11. Focus the subject's face.
- When a face is detected, the [ ] frame will appear over the face to be focused.
- If multiple faces are detected, [
 ] will be displayed. Use [ ] will be displayed. Use [  ] to move the [ ] frame over the face you want to focus on. ] to move the [ ] frame over the face you want to focus on.
- If no faces are detected, the camera will switch to FlexiZone - Single for automatic selection.

12. Press the shutter button halfway to focus.
- When focus is achieved, the AF point will turn green and the beeper will sound.
- If focus is not achieved, the AF point will turn orange.
IMPORTANT
- At this point the camera has only achieved focus and a picture will not be taken. To take a picture, follow the procedure in Part IV.
REFERENCE
- If the subjectâs face is significantly out of focus, face detection will not be possible. You can prevent this by setting [ : Continuous AF] to [Enable].
- An object other than a human face may be detected as a face.
- Face detection will not work if the face is very small or large in the picture, too bright or too dark, or partially hidden.
- The [ ] may cover only part of the face.
- Since AF is not possible with a face detected near the edge of the picture, the [ ] will be grayed out. If you press the shutter button halfway in this situation, the subject will be focused on in FlexiZone - Single method with automatic selection.
- The shape of the AF frame [
 ] varies depending on the size and shape of the subject. ] varies depending on the size and shape of the subject.
Proceed to Part IV.
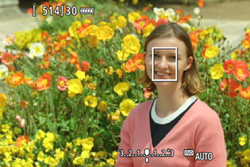
Part II-3. Using AF (FlexiZone - Single) to Focus In [FlexiZone - Single AF], the camera focuses with a single AF point. This is effective when you want to focus a particular subject.
- Still images: left example image
- Movies: right example image
 ã 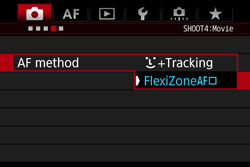
11. The AF point [  ] (  ) will appear. During movie shooting, if [Movie Servo AF] is set to [Enable], the AF point will be displayed in a larger size.

12. Move the AF point.
- Use the [ ] to move the AF point to where you want to focus. (It cannot be moved to the edge of the screen.)
- Pressing [ ] or [ ] will return the AF point to the screenâs center.
13. Aim the AF point over the subject, then press the shutter button halfway and hold it.

- When focus is achieved, the AF point will turn green and the beeper will sound.
- If focus is not achieved, the AF point will turn orange.
IMPORTANT
At this point the camera has only achieved focus and a picture will not be taken. To take a picture, follow the procedure in Part IV.
Proceed to Part IV.
Part III. Focusing Manually You can magnify the image and focus precisely with manual focus.
4. Once you have completed steps 1-3 of Part I, set the lens focus mode switch to [MF].
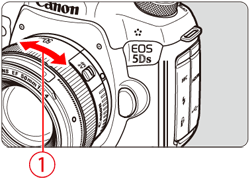
5. Turn the lens focusing ring ( ) to focus roughly.
6. Press [  ] to display the magnifying frame ( ).

7. Use [ ] to move the magnifying frame to the position where you want to focus. Pressing [ ] will return the magnifying frame to the screenâs center.

8. Press the [ ] button to magnify the area within the frame.
- Each time you press the [ ] button, the magnification within the frame will change as follows:
-Normal view  1x 6x 16x Normal view
- While in magnified view, you can use [ ] to scroll around in magnified image.
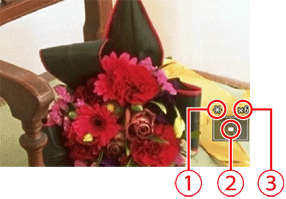 : AE lock,
 : Magnified area position,
 : Magnification (Approx.)
9. While looking at the magnified image, turn the lensâs focusing ring to focus.
10. After achieving focus, press the [ ] button to return to the normal view.
Part IV: Shooting After focus is achieved by following the instructions in Part II-III, you can start shooting.
To shoot still photos, press the shutter button completely.
- The picture will be taken and the captured image is displayed on the LCD monitor.
- After the image review ends, the camera will return to Live View shooting automatically.

To shoot movies, press [ ].
-
While the movie is being shot, the "
 " mark will be displayed on the upper right of the screen. " mark will be displayed on the upper right of the screen.
-
Sound will be recorded by the built-in microphone.
- To stop shooting the movie, press [ ] again.
General Notes for Live View Shooting Please be aware of the following items when performing Live View shooting.
IMPORTANT
[Live View Image]
- Under low- or bright-light conditions, the Live View image may not reflect the brightness of the captured image.
- Even if a low ISO speed is set, noise may be noticeable in the displayed Live View image under low light. However, when you shoot, the image recorded will have minimal noise. (The image quality of the Live View image is different from that of the recorded image.)
- If the light source (illumination) within the image changes, the screen may flicker. If this happens, exit Live View shooting and resume Live View shooting under the actual light source.
- If you point the camera in a different direction, it may throw off the Live View imageâs correct brightness momentarily. Wait until the brightness level stabilizes before shooting.
- If there is a very bright light source in the image, the bright area may appear black on the LCD monitor. However, the actual captured image will correctly show the bright area.
- In low light, if you set the [
 : LCD brightness] to a bright setting, noise or irregular colors may appear in the Live View image. However, the noise or irregular colors will not be recorded in the captured image. : LCD brightness] to a bright setting, noise or irregular colors may appear in the Live View image. However, the noise or irregular colors will not be recorded in the captured image.
- When you magnify the image, the image sharpness may look more pronounced than in the actual image.
ã
[Custom Functions]
- During Live View shooting, some Custom Functions will not work (settings become invalid).
ã
[Lens and Flash]
- If the attached lens has an Image Stabilizer and you set the Image Stabilizer (IS) switch to [ON], the Image Stabilizer will operate at all times even if you do not press the shutter button halfway. The Image Stabilizer consumes battery power and may decrease the number of possible shots. If you use a tripod or if the Image Stabilizer is not necessary, it is recommended that you set the IS switch to [OFF].
- The focus preset function is possible for Live View shooting only when using a (super) telephoto lens equipped with the focus preset mode, available since the second half of 2011.
- FE lock will not work if the built-in flash is used. FE lock and modeling flash will not work if an external Speedlite is used.
ã
[Image Quality]
- When you shoot at high ISO speeds, noise (such as dots of light and banding) may become noticeable.
- Shooting in high temperatures may cause noise and irregular colors in the image.
- If Live View shooting is used continuously for a prolonged period, the cameraâs internal temperature may rise, and image quality may deteriorate. Always exit Live View shooting when you are not shooting.
- If you shoot a long exposure while the cameraâs internal temperature is high, image quality may deteriorate. Exit Live View shooting and wait a few minutes before shooting again.
ã
[ White [  ] and Red [  ] Internal Temperature Warning Icons]
- If the cameraâs internal temperature increases due to prolonged Live View shooting or under a high ambient temperature, a white [ ] or red [ ] icon will appear.
- The white [ ] icon indicates that the image quality of still photos will deteriorate. It is recommended that you temporarily exit Live View shooting and allow the camera to cool down before shooting again.
- The red [ ] icon indicates that the Live View shooting will soon stop automatically. If this happens, you will not be able to shoot again until the cameraâs internal temperature decreases. Exit the Live View shooting or turn off the power and let the camera rest for a while.
- Using Live View shooting at a high temperature for a prolonged period will cause the [ ] or [ ] icon to appear earlier. When you are not shooting, turn off the camera.
- If the cameraâs internal temperature is high, the quality of images shot with high ISO speed or long exposure may deteriorate even before the white [ ] icon is displayed.
ã
[ Shooting Results]
- In magnified view, the shutter speed and aperture will be displayed in red. If you take the picture in magnified view, the exposure may not come out as desired. Return to the normal view before taking the picture.
- Even if you take the picture in magnified view, the image will be captured in the normal view range.
ã
[ Notes for AF]
- Even when focus is achieved, pressing the shutter button halfway will focus again.
- The image brightness may change during and after the AF operation.
- If the light source changes while the Live View image is displayed, the screen may flicker and focusing may be difficult. If this happens, exit Live View shooting and execute AF under the actual light source.
- Magnified view is not possible with [ +Tracking].
- With [FlexiZone - Single], pressing the [ ] button will magnify the image at the AF point. If you press the shutter button halfway, AF will be performed in the magnified view. If focusing is difficult in the magnified view, return to the normal view and perform AF.
- With [FlexiZone - Single], if AF is performed in the normal view and then magnified the view, accurate focus may not be achieved.
|