Converting RAW images to JPEG images in the camera (in-camera RAW processing) (EOS 5DS / EOS 5DS R)
| Article ID: ART162902 |
| |
Date published: 10/05/2015 |
| |
Date last updated: 10/05/2015 |
Description
Converting RAW images to JPEG images in the camera (in-camera RAW processing) (EOS 5DS / EOS 5DS R)
Solution
| Solution |
You can process  images with the camera and save them as JPEG images. As the RAW image itself does not change, you can apply different processing conditions to create any number of JPEG images from it. Note that  and  images cannot be processed with the camera. Use Digital Photo Professional (EOS software) to process those images.
1. Set the camera’s power switch to [ON].
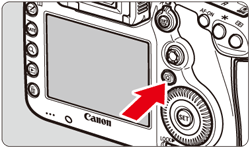
2. Press the [MENU] button to display the menu.
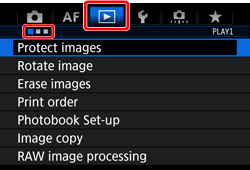
3. Press the [  ] button and select the [  ] tab. (Confirm that the [  ] tab is selected.)
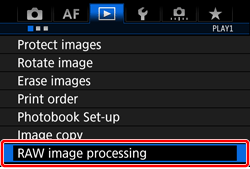
4. Turn the [  ] dial to select [RAW image processing], then press [  ].
5. Turn the [ ] dial to select the image you want to process, then press [ ].
- If you press the [
 ] button and turn the [ ] button and turn the [  ] dial counterclockwise, you can select an image from the index display. ] dial counterclockwise, you can select an image from the index display.
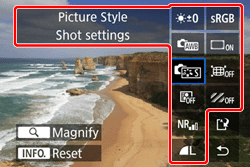
6. Process the image.
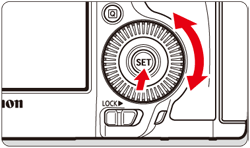
Use [  ] to select an option, then turn the [ ] dial to set it.
- The displayed image will reflect "Brightness adjustment", "White balance", and any other setting adjustments.
- To return to the image settings at the time of shooting, press the [INFO] button.
NOTE
[Displaying the setting screen]
Press [ ] to display the setting screen.
- Turn the [ ] or [ ] dial to change the setting.
- Press [ ] to finalize the setting and return to the previous screen.
[Magnified View]
You can magnify the image by pressing the [ ] button. The magnification will differ depending on the pixel count of [Image quality] set in [RAW image processing].
- With [ ], you can scroll around the magnified image.
- To cancel magnified view, press the [ ] button again.
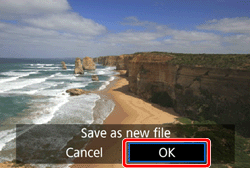
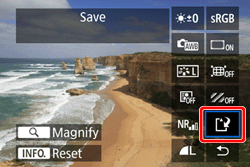
7. Save the image.
Select [  ] (Save) with [ ], then press [ ].
8. Turn the [ ] dial to select [OK] to save the image.
- Check the destination folder and image file number, then press [ ].
- To process another image, repeat steps 5 to 8.
- For more information on image processing, please refer to the camera’s instruction manual.
IMPORTANT
- To execute peripheral illumination correction, distortion correction, and chromatic aberration correction with the camera, the correction data of the lens used must be registered in the camera. If the lens correction data is not registered in the camera, use EOS Utility (EOS software) to register the lens correction data.
- Processing RAW images in the camera will not produce the same results as processing RAW images with Digital Photo Professional.
- When processing images with [Distortion] set to [Enable], AF point display information and Dust Delete Data will not be appended to the image.
NOTE
[Crop/Aspect Ratio]
Frame lines indicating the shooting area will be displayed on images shot when [  : Crop/aspect ratio] is set to an option other than [Full-frame]. JPEG images generated from RAW images will be saved with the cropping area or aspect ratio that was set.
|
|
ID: 8202600800_EN_1
|