|
When you no longer need installed MF Drivers, MF Scan Utility, the Product Extended Survey Program, or Toner Status you can uninstall them to delete them from your computer.
Uninstalling the MF Drivers 1. Log on to the computer with an administrator account.
2. Display [Programs and Features] or [Add or Remove Programs].
- Windows Vista/7/Server 2008 R2
- Windows 8.1/Server 2012 R2
3. Select the MF Drivers that you want to uninstall, and click [Uninstall/Change] or [Change/Remove].
The uninstaller starts.
If you cannot find the drivers that you want to uninstall
Start the uninstaller from the supplied DVD-ROM or from the MF Drivers file that you downloaded.
3-1. Insert the supplied DVD-ROM into the drive on the computer.
- To start the uninstaller from the MF Drivers file that you downloaded, carry out the following step.
3-2. Open the folder where the uninstaller is stored.
- If you do not know whether to specify the 32-bit version or the 64-bit version for Windows Vista/7/8/Server 2008/Server 2012, see the "MF Driver Installation Guide" in the DVD-ROM supplied with the machine.
3-3. Double-click "DelDrv.exe".
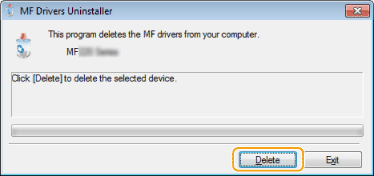
4. Click [Delete].
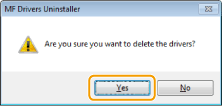
5. Click [Yes].
The uninstall starts.
Uninstalling the MF Scan Utility 1. Log on to the computer with an administrator account.
2. Display [Programs and Features] or [Add or Remove Programs].
- Windows Vista/7/Server 2008 R2
- Windows 8.1/Server 2012 R2
3. Select the MF Scan Utility, and click [Uninstall/Change] or [Change/Remove].
The uninstaller starts.
4. Click [Yes].
5. Click [OK].
Uninstalling the Product Extended Survey Program 1. Log on to the computer with an administrator account.
2. Display [Programs and Features] or [Add or Remove Programs].
- Windows Vista/7/Server 2008 R2
- Windows 8.1/Server 2012 R2
3. Select [Canon Laser Printer/Scanner/Fax Extended Survey Program], and click [Uninstall] or [Remove].
The uninstaller starts.
4. Click [OK].
Uninstalling the Toner Status 1. Log on to the computer with an administrator account.
2. Display [Programs and Features] or [Add or Remove Programs].
- Windows Vista/7/Server 2008 R2
- Windows 8.1/Server 2012 R2
3. Select [Toner Status], and click [Uninstall] or [Remove].
The uninstaller starts.
4. Click [Uninstall].
5. Click [OK].
NOTE
Checking the Bit Architecture
- If you are not sure whether your computer is running 32-bit or 64-bit Windows, follow the procedure below to check.
1. Display [Control Panel].
- Windows Vista/7/Server 2008/Server 2008 R2
[Start] 

select [Control Panel]. - Windows 8/Server 2012
Right-click the lower-left corner of the screen
select [Control Panel]. - Windows 8.1/Server 2012 R2
Right-click [Start]
select [Control Panel]. 2. Display [System].
- Windows Vista/7/8/8.1/Server 2008/Server 2008 R2/Server 2012/Server 2012 R2
Click [System and Security] or [System and Maintenance]
[System]. - Windows Server 2008
Double-click [System].
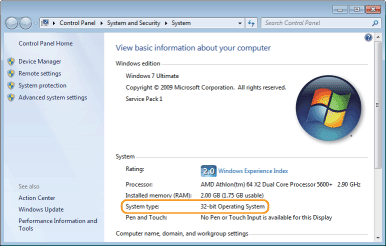
3. Check the bit architecture.
- 32-bit operating systems
[32-bit Operating System] is displayed.
- 64-bit operating systems
[64-bit Operating System] is displayed.
Uninstalling the Software (For Mac OS)
NOTE
When you upgrade a driver, you can overwrite the old driver with a newer one. Uninstalling the driver is not required before the upgrade.
1. If the machine is connected to a computer with a USB cable, disconnect the USB cable.
- If you want to delete the scanner driver or MF Scan Utility, proceed to step 5.
2. Open [System Preferences], and click [Print & Fax], [Print & Scan], or [Printers & Scanners].
3. Select the machine, and click the [-] icon.
4. Click [OK] or [Delete Printer].
5. Start the Finder of Mac OS X.
6. From the menu bar, click [Go]
[Enclosing Folder]. 7. Delete the files or folders below that correspond to the driver you want to uninstall.
- Drag files or folders to the [Trash] icon on the Dock to delete.
- If an authentication dialog box appears, enter the administrator's name and password, and click [OK].
| Software |
Location of the folder to enter |
Name of the file or folder to delete |
| Printer driver
|
/Library/Printers/Canon/ |
CUPS_MF_Printer |
/Library/Printers/PPDs/Contents/
Resources/ |
CNPZBxxxZB.ppd.gz
(xxx may differ depending on the model.) |
| Fax driver
|
/Library/Printers/Canon/ |
CUPSFAX |
/Library/Printers/PPDs/Contents/
Resources/ |
CNMCxxxFB.ppd.gz
(xxx may differ depending on the model.) |
| Scanner driver/MF Scan Utility
|
/Applications/ |
Canon MF Utilities |
| /Library/Image Capture/Devices/* |
Canon MFScannerxxx.app*
(xxx may differ depending on the model.) |
| /Library/Image Capture/TWAIN Data Sources/ |
Canon xxx.ds
Canon xxx USB.ds
(xxx may differ depending on the model.) |
| /Library/Printers/Canon/ |
MFScanner |
| /Library/LaunchAgents |
jp.co.canon.ScanGearMF.appl.Canon-MF-Scan-Agent.plist |
* Mac OS X 10.6 or later
8. Close all windows open.
9. Restart the computer.
|