You can change the print settings when printing from a PictBridge (Wireless LAN) compliant device.
Set the print settings to Default on the PictBridge (Wireless LAN) compliant device when you want to print according to the settings on the machine.
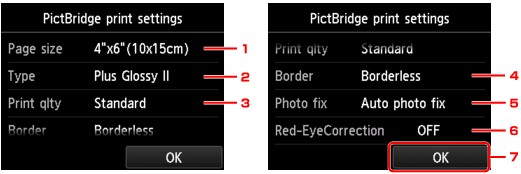
 PictBridge print settings Screen
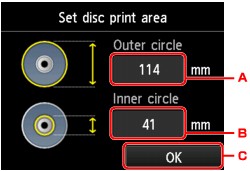
Disc label print setting Screen
PictBridge print settings Screen
Select the print quality, when printing directly from a PictBridge (Wireless LAN) compliant device.
-
Page size
Select the paper size when printing directly from a PictBridge (Wireless LAN) compliant device.
When you perform PictBridge (Wireless LAN) settings from the machine, set Paper size to Default on the PictBridge (Wireless LAN) compliant device.
-
Type (Media type)
Select the media type when printing directly from a PictBridge (Wireless LAN) compliant device.
When you perform PictBridge (Wireless LAN) settings from the machine, set Paper type to Default on the PictBridge (Wireless LAN) compliant device.
-
Print qlty (Print quality)
Select the print quality when printing directly from a PictBridge (Wireless LAN) compliant device.
-
Border (Bordered/Borderless print)
Select the bordered/borderless layout.
When you perform PictBridge (Wireless LAN) settings from the machine, set Layout to Default on the PictBridge (Wireless LAN) compliant device.
-
Photo fix
When Auto photo fix is selected, the scene or person's face of a shot photo is recognized and the most suitable correction for each photo is made automatically. It makes a darkened face by backlight brighter to print. It also analyzes a scene such as scenery, night scene, person, etc. and corrects each scene with the most suitable color, brightness, or contrasts automatically to print.
 Note
Note
-
As a default, photos on a PictBridge (Wireless LAN) compliant device are printed with auto correction applied.
-
If No correction is selected, photos are printed without correction.
-
Red-EyeCorrection
Select ON to correct red eyes in portraits caused by flash photography.
Depending on the type of the photo, red eyes may not be corrected or parts other than the eyes may be corrected.
-
Tap to specify the print settings.
Disc label print setting Screen
The Set disc print area screen is displayed, and you can perform settings for printing on a printable disc from a PictBridge (Wireless LAN) compliant device.
Follow the procedure below to perform disc label print setting.
-
Adjust the printing area (the outer/inner diameter of the printable disc).
-
Tap to specify the outer diameter.
-
Tap to specify the inner diameter.
-
Tap to specify the printing area.
Note
-
Measure the outer and inner diameters of the printing surface of the printable disc and make sure you set a value smaller than the measured value for the outer diameter, and a value larger than the measured value for the inner diameter.
-
Contact the manufacturers of printable discs for details.
-
Select the type of the printable disc you use.
Note
MG7520 Page