If you had your PIXMA MG5320 connected to a wireless LAN and then the connection was lost (due to a router change or security setting change in your router), follow the steps below to reconnect the printer to the wireless router.
- From the HOME screen, press the up or down arrows until Setup appears. Press the Function button under Setup.

- In the Setup menu, press the right arrow to select Wireless LAN setup. Press OK.

NOTE: If a WPS compatible access point is detected, the following screen will appear.

After this screen appears, you will then see this screen:

Press the Stop  button. Proceed to the next step.
- After the printer searches for nearby access points, the Wireless LAN setup menu will appear. Standard setup will be highlighted. Press OK.

- The printer will search for nearby access points again. A list of detected access points will be displayed. Use the up and down arrows on the printer to highlight your network. Press OK when your network is highlighted.

- A screen will appear asking you to enter the passphrase for your network. Press OK. (Note: If your wireless network does not have a password, the printer will attempt to connect automatically.)

- To enter the passphrase for your wireless network, use the arrow keys and the OK key to enter in the characters needed. To change between lower case letters, upper case letters, and numbers / symbols, press the function key below Aa1. If you have entered in an incorrect character, press the function key below Del. character to delete the incorrect character. When you have finished entering in the passphrase, press the function key below Done.

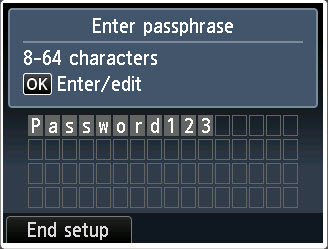
- You will be taken back to the Enter passphrase screen. It will show the passphrase you entered in for your wireless network. If you notice that an incorrect character has been entered, press OK to go back and make any changes to the passphrase entered. To have the printer attempt to connect to the wireless LAN, press the function key below End setup.
- The printer will attempt to connect to the wireless network. If the printer fails to connect, an error will appear stating that the printer failed to connect to the access point. If this happens, press OK and you will be back at the Enter passphrase screen. Confirm that the passphrase is correct and either make changes to it by pressing OK or try to connect by pressing the function key under End setup.
- If the printer connects successfully, a confirmation message will appear. Press OK.

- Press the HOME key to go back to the HOME screen.
