|
This section describes instructions for installing the driver.
To use the printer, you need to install the driver, then add the printer you are using in [System Preferences].
Installing the Driver
IMPORTANT
- Before installing the driver, exit all other applications.
- When you upgrade a driver, you can overwrite the old driver with a newer one. Uninstalling the driver is not required before the upgrade.
- To use the printer, you need to install the driver and add the printer (see "Adding a Printer").
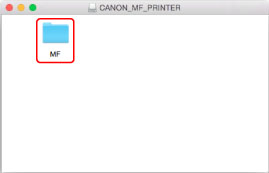
1. Open the following folders: [CANON_MF_PRINTER] â [MF].
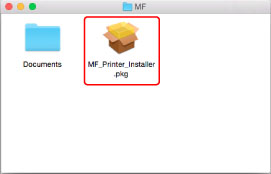
2. Double-click the [MF_Printer_Installer.pkg] icon.
3. Click [Continue].
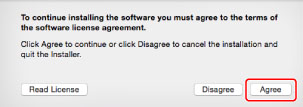
4. Read the software license agreement carefully â click [Continue].
5. Click [Agree].
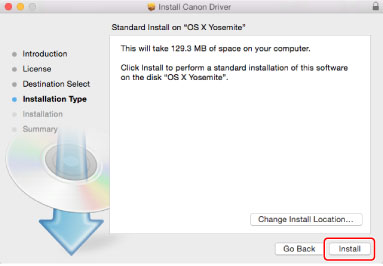
6. Click [Install].
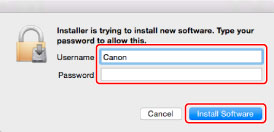
7. Enter the administrators name and password when the dialog box below appears â click [OK] or [Install Software].
Installation starts.
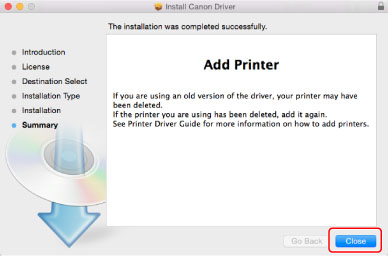
8. Click [Close].
Installation is complete.
Before using the driver, you must add the printer in [System Preferences] (see "Adding a Printer").
Adding a Printer This section describes instructions for adding a printer.
To use the printer, you need to install the driver, then add the printer you are using.
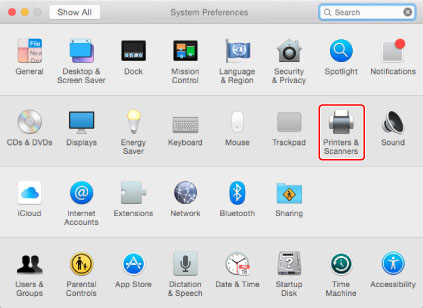
1. Open [System Preferences] â click [Print & Fax], [Print & Scan], or [Printers & Scanners].
2. Turn the device on â connect the device to a computer with a USB cable.
3. Confirm that the device has been added â close the dialog box.
Confirm that the driver name is displayed beside [Kind].
After this, set the options of the device (see "Setting the Printer Options").
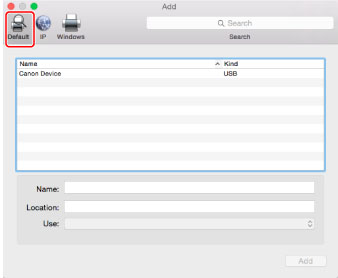
 The printer may not be automatically added when USB connected. If this happens, add the printer by performing the following procedure.
4. Click [Default].
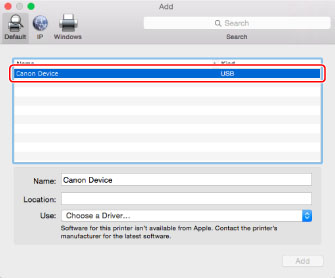
5. Select the device you are going to use.
Select a device that has [USB] displayed in the [Kind] column.
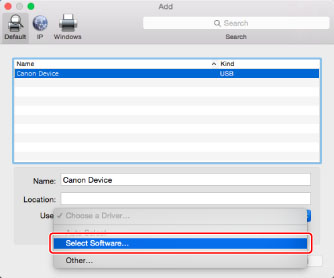
6. Select [Select Printer Software]/[Select Software] from [Print Using]/[Use] â select the driver corresponding to the device you are going to use from the list â click [OK].
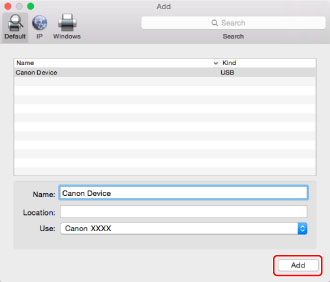
7. Click [Add].
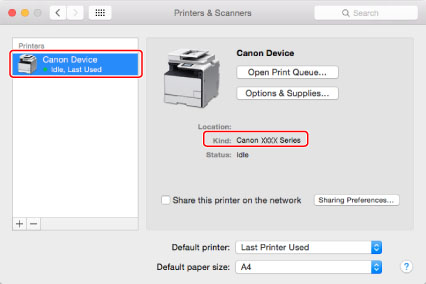
8. Confirm that the device has been added â close the dialog box.
Confirm that the driver name selected in the step 6 is displayed beside [Kind].
After this, set the options of the device (see "Setting the Printer Options").
Setting the Printer Options You need to set the printer options (such as paper feed options, paper output options, etc.) attached to and the device.
If you are using the driver for the first time or want to change the options of the device, set the options so that you can use the functions of the device.
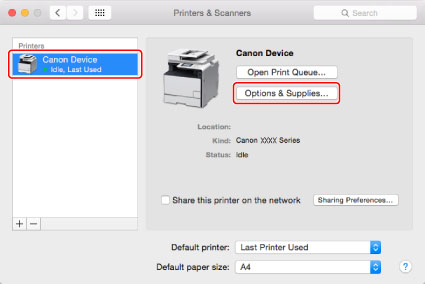
1. Open [System Preferences] â click [Print & Fax], [Print & Scan], or [Printers & Scanners].
2. Select the device you are using â click [Options & Supplies].
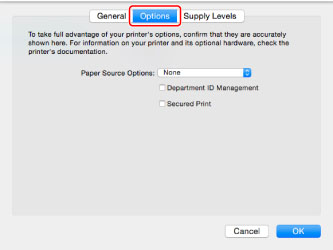
3. Click [Driver] or [Options].
4. Set the options â click [OK].
If you are using Mac OS X 10.7 or earlier, check that the driver corresponding to the device you are using is selected for [Print Using].
- Be sure to select only those options that are actually set in the device.
- Be sure to set the function version of the device you are using correctly. The function version is printed in the status sheet that can be printed from the control panel of the device.
|