|
You must specify the paper size and type settings to match the paper that is loaded. Make sure to change the paper settings when you load the paper that is different from the previously loaded paper.
IMPORTANT
- If the setting does not match the size and type of loaded paper, a paper jam or printing error may occur.
Specifying Paper Size and Type in the Paper Drawer
NOTE
- To specify a custom paper size, you need to register that size before hand.
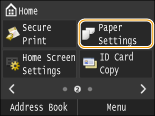
1. Press  and tap <Paper Settings>.
2. Tap <Drawer 1> or <Drawer 2>.
- <Drawer 2> is displayed only when the optional paper feeder (drawer 2) is installed.
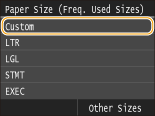
3. Select the paper size.
- If the loaded paper size is not displayed, tap <Other Sizes>.
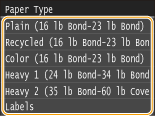
4. Select the paper type.
Specifying Paper Size and Type in the Multi-Purpose Tray The screen shown here is displayed when paper is loaded in the multi-purpose tray. Follow the on-screen instructions to specify settings that match the size and type of the loaded paper.
NOTE
If the screen shown above is not displayed when paper is loaded
- If you always load the same paper in the multi-purpose tray, you can skip the paper setting operations by registering the paper size and type as the default setting. When the default setting is registered, however, the screen shown above is not displayed. To display the screen, select <Paper Settings>
 <Register Custom Paper> <Specify When Loading Paper>. <Register Custom Paper> <Specify When Loading Paper>.
1. Select the paper size.
- If the loaded paper size is not displayed, tap <Other Sizes>.
 When loading custom size paper
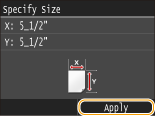
1-1. Tap <Custom>.
1-2. Specify the length of the <X> (shorter) side.
- Tap <X>.
- Input the length of the <X> side using
 / / , with , with  / / to move the cursor between the digits for inputting whole numbers and fractions, and tap <Apply>. to move the cursor between the digits for inputting whole numbers and fractions, and tap <Apply>.
1-3. Specify the length of the <Y> (longer) side.
- Tap <Y>.
- Input the length of the <Y> side, and tap <Apply>.
1-4. Tap <Apply>.
2. Select the paper type.
Registering a Custom Paper Size You can register up to three frequently used custom paper sizes.
1. Press and tap <Paper Settings>.
2. Tap <Register Custom Paper>.
3. Tap <Not Registered>.
- If paper sizes <1> to <3> have already been registered, either change or delete the setting to continue. The procedures for changing and deleting these settings are described below.
3-A. Changing a setting
3-A-1. Select the registered size you want to change.
3-A-2. Tap <Edit>, and proceed to step 4.
3-B. Deleting a setting
3-B-1. Select the registered size you want to delete.
3-B-2. Tap <Delete> <Yes>.
4. Specify the paper size.
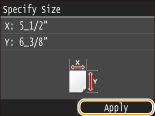
4-1. Specify the length of the <X> (shorter) side.
- Tap <X>.
- Input the length of the <X> side using /, with / to move the cursor between the digits for inputting whole numbers and fractions, and tap <Apply>.
4-2. Specify the length of the <Y> (longer) side.
- Tap <Y>.
- Input the length of the <Y> side, and tap <Apply>.
4-3. Tap <Apply>.
5. Select the paper type.
 Selecting a Registered Custom Paper Setting
The paper sizes that are registered in the procedure above are displayed on the screen for selecting the paper size.
When selecting the paper size for the paper drawer
On the screen to specify the size of the paper that is loaded in the paper drawers, the registered paper sizes are displayed.
- Of the registered paper sizes, only those that can be loaded in a paper drawer are displayed.
 When selecting the paper size for the multi-purpose tray
When paper is loaded in the multi-purpose tray, the screen for selecting the paper size for the multi-purpose tray is displayed. The registered paper sizes are displayed on this screen.
- The registered paper sizes are displayed when you set the default paper settings for the multi-purpose tray. From the screen, you can select one of the displayed sizes as the default paper size for the multi-purpose tray.
Registering Default Paper Settings for the Multi-Purpose Tray You can register default paper settings for the multi-purpose tray. Registering default settings can save yourself the effort of having to specify the settings each time you load the same paper into the multi-purpose tray.
NOTE
- After the default paper setting is registered, the paper setting screen is not displayed when paper is loaded, and the same setting is always used. If you load a different paper size or type without changing the paper settings, the machine may not print properly. To avoid this problem, select <Specify When Loading Paper> in step 3, and then load the paper.
1. Press and tap <Paper Settings>.
2. Tap <Multi-Purpose Tray>.
3. Select the paper size.
- If the loaded paper size is not displayed, tap <Other Sizes>.
Registering a custom paper size
3-1. Tap <Custom>.
3-2. Specify the length of the <X> (shorter) side.
- Tap <X>.
- Input the length of the <X> side using /, with / to move the cursor between the digits for inputting whole numbers and fractions, and tap <Apply>.
3-3. Specify the length of the <Y> (longer) side.
- Tap <Y>.
- Input the length of the <Y> side, and tap <Apply>.
3-4. Tap <Apply>.
4. Select the paper type.
Limiting the Paper Sizes Displayed You can ensure that only frequently used paper sizes are shown in the screen for selecting the paper size setting.
1. Press and tap <Paper Settings>.
2. Tap <Select Frequently Used Paper Sizes>.
3. Tap <Multi-Purpose Tray>, <Drawer 1>, or <Drawer 2>.
- <Drawer 2> is displayed only when the optional paper feeder (drawer 2) is installed.
4. Clear the check boxes for paper sizes you do not want displayed.
- Ensure that only the check boxes for frequently used paper sizes are selected.
- Paper sizes that are not selected can be viewed by tapping <Other Sizes> in the paper size setting selection screen.
5. Tap <Apply>.
|