
Maintenance and Inspections
| Article ID: ART165446 | | | Date published: 04/18/2016 | | | Date last updated: 09/12/2017 |
Description
Maintenance and Inspections
Solution
| Solution |
Clean this machine periodically. If dust accumulates, the machine may not operate properly. When cleaning, be sure to observe the following.
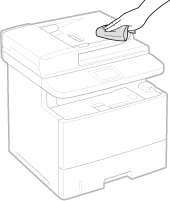
Exterior Regularly wipe the exterior of the machine, especially around the ventilation slots, to keep the machine in good condition.
1. Turn OFF the machine, and unplug the power cord from the AC power outlet.
2. Clean the exterior of the machine and the ventilation slots.
3. Wait for the exterior of machine to dry completely.
4. Reconnect the power cord and turn ON the machine.
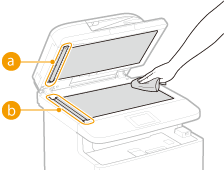
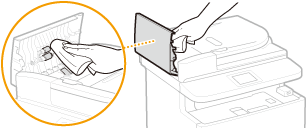
Platen Glass Regularly wipe off the dust from the platen glass and the underside of the feeder to prevent smudges to be printed on documents or printouts.
1. Turn OFF the machine, and unplug the power cord from the AC power outlet.
2. Open the feeder.

3. Clean the platen glass and the underside of the feeder.

 If the problem persists If the problem persistsRemove the transparent plastic part (
 ) and wipe it. ) and wipe it.
3-1. Hold the tabs (
 ) at both ends of the transparent plastic part, and remove the plastic part by gently lifting the rearward end first. ) at both ends of the transparent plastic part, and remove the plastic part by gently lifting the rearward end first.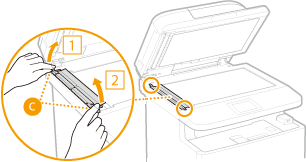
ã»The plastic part (
) is rather damageable. When removing it, be careful not to bend it.
3-2. Wipe the scanning area (
 ). ).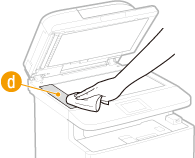
3-3. Wipe the back side of the transparent plastic part.

3-4. Wait for the plastic part to dry completely.
3-5. Place the transparent plastic part back into position.
4. Wait for the cleaned area to dry completely.
5. Gently close the feeder.
6. Reconnect the power cord and turn ON the machine.
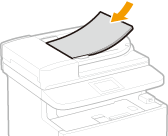
Feeder Graphite powder or dust on the rollers inside the feeder may cause smudges to appear on printouts. If this occurs, clean the feeder. If smudges still appear after you clean the feeder, run automatic feeder cleaning.
 Cleaning the Feeder Cleaning the Feeder
1. Turn off the machine and unplug it from the power outlet.
2. Open the feeder cover.

3. Wipe the rollers in the feeder.
4. Close the feeder cover.
5. Plug the machine back into the power outlet and switch it on.
Automatic Feeder CleaningAutomatic feeder cleaning uses paper loaded in the feeder. Set 10 sheets of plain A4 or US Letter size paper in the feeder before starting automatic cleaning. [ Placing Documents ]
1. Press
 and tap <Menu>. and tap <Menu>.
2. Tap <Adjustment/Maintenance>.
3. Tap <Clean Feeder>.
4. Tap <Start>.
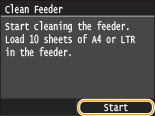
 Cleaning starts. When the <Finished.> message is displayed approximately 60 seconds later, press to return to the Home screen. Cleaning starts. When the <Finished.> message is displayed approximately 60 seconds later, press to return to the Home screen.Fixing Unit Dirt may adhere to the fixing units inside the machine and cause black streaks to appear on printouts. To clean the fixing unit, perform the following procedure. Note that you cannot clean the fixing unit when the machine has documents waiting to be printed. To clean the fixing unit, you need plain A4 or Letter size paper. Set the paper in the paper drawer or multi-purpose tray before performing the following procedure.[ Loading Paper in the Paper Drawer ]
 [ Loading Paper in the Multi-Purpose Tray ] [ Loading Paper in the Multi-Purpose Tray ]
1. Press
and tap <Menu>.
2. Tap <Adjustment/Maintenance>.
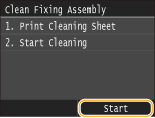
3. Tap <Clean Fixing Assembly>.
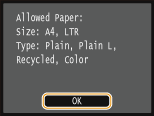
4. Check that the size and type of paper displayed is loaded in the machine, and tap <OK>.
5. Tap <Start>.
 The cleaning sheet is printed out.
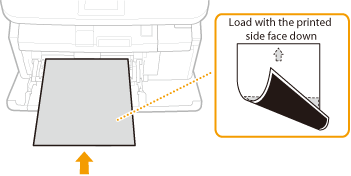
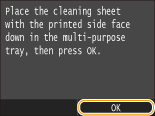
6. Load the printed cleaning sheet in the multi-purpose tray, with the printed side face down.

If paper remains in the multi-purpose tray
7. Tap <OK>.
 Cleaning starts. When the <Finished.> message is displayed approximately 95 seconds later, press to return to the Home screen.
Paper Roller Dust on the paper roller may cause paper jams to occur frequently. In this case, perform the following procedure to clean the paper rollers. If you have any queries or worries about cleaning by yourself, contact your local authorized Canon dealer.
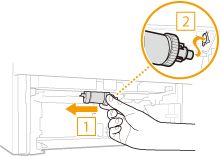
1. Pull out the paper drawer.
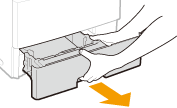
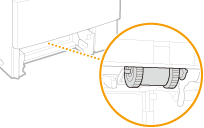
2. Remove the paper roller.
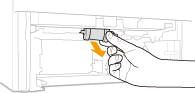
2-1. Disengage the right portion of the shaft while pushing the paper roller to the left.

2-2. Pull out the paper roller downwards.
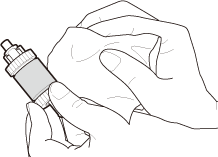
3. Wipe the paper roller.
4. Place the paper roller back into position.
4-1. Hold the right portion of the paper roller shaft and insert the left portion of the shaft.
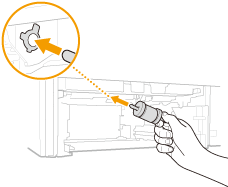

4-2. Insert the right shaft while pushing the paper roller to the left.
5. Install the paper drawer into the machine.
|
|
ID: 8202773800_EN_1
|
|
 ) and the surface of the transparent plastic part (
SIMS Doc Id
8202773800