About printing from a USB flash drive
You can use your printer's operation panel to print the following types of
PDF (.pdf) files that are stored on a USB drive:
You can't print the following types of PDF files:
Print from a USB flash drive
 If you receive and store faxes automatically on a USB, you will need to turn the Auto save setting in FAX settings to OFF, remove the USB you use for saving faxes, and insert the USB flash drive that contains the document data.
-
Turn the machine ON.
-
Load A4, Letter, or Legal-sized plain paper in the tray.
-
Insert the USB flash drive into the USB port.
-
Select the document you want to print.
-
Swipe to display the name of documents (A), then tap the document to print.
-
Tap (B) to switch to the preview display.
-
Swipe to display document preview (C), then tap the document to print.
-
Tap to switch to the file name list (D).
-
Tap to display the Details screen (E).

.jpg)
-
File names may not display properly on the document list if the file name is too long or includes incompatible characters.
-
The first page of each PDF file displays on the preview screen on the touch screen. If a document is in landscape format, it will display rotated by 90 degrees.
-
For some PDF files, it may take longer to display and part of the preview may be cropped.
-
Some PDF files display even though they can't be printed from the operation panel. These include:
PDF files saved using application software other than Canon IJ Scan Utility.
PDF files that have no preview available ("?" displays on the preview screen.)
-
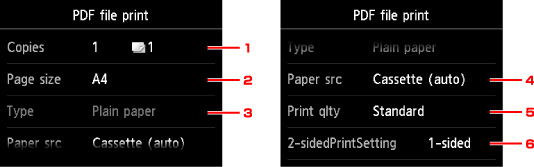
Specify the settings as necessary.
-
(1) Copies: Specify the number of copies.
-
(2) Page size: Select the page size depending on the loaded paper.
-
(3) Type (Media type): The paper type is set to Plain paper.
-
(4) Paper src (Paper source): Select the cassette to feed paper.
Select Cassette (auto) if you want the machine to feed paper from cassette 2 when cassette 1 runs out of paper.
-
(5) Print qlty (Print quality): Specify the print quality.
-
(6) 2-sidedPrintSetting: Select two-sided printing or single-sided printing.
If you tap Advanced with 2-sided selected, you can specify the orientation and the stapling side of the document.
When the machine name or IJ Scan Utility displays in Created with on the Details screen, you can select 2-sided to print onto the both sides of a single sheet of paper.
-
Press the Color button for color, or the Black button for black & white to begin printing.
Good to know
-
You can print up to 250 pages at a time. If you need to print more than 250 pages of a PDF file, print them from a computer.
-
Depending on the PDF file, the printed copy may rotate by 90 degrees.
-
If the document size is larger than the page size selected on the printer, the document will print at a reduced size. In this case, thin lines on the document may not print or images may be misaligned.
-
For some PDF files, an error message may display before printing starts or while it's in progress.
-
If both photo files and PDF files are saved your flash drive, tap Print documents when the confirmation screen displays.
-
If no printable document (PDF files) are saved on the flash drive, Data of supported types are not saved displays on the touch screen.