
Sending images from a camera to an Android smartphone
| Article ID: ART165805 | | | Date published: 06/21/2016 | | | Date last updated: 09/01/2016 |
Description
Sending images from a camera to an Android™ smartphone
Solution
| Solution |
If a Wi-Fi connection to the camera cannot be made using Camera Connect, please refer to The camera cannot be connected via Wi-Fi using Camera Connect
Getting Started The procedure for using the Wi-Fi function to send images from a camera to an Android⢠smartphone is explained in the following four steps. Proceed in order from Step 1.
 Step 1: Confirming the Android⢠OS version Step 1: Confirming the Android⢠OS version Step 2: Installing Camera Connect on the Android⢠smartphone Step 2: Installing Camera Connect on the Android⢠smartphone Step 3: Connecting the camera to the Android⢠smartphone Step 3: Connecting the camera to the Android⢠smartphone Step 4: Sending images to the Android⢠smartphone Step 4: Sending images to the Android⢠smartphone
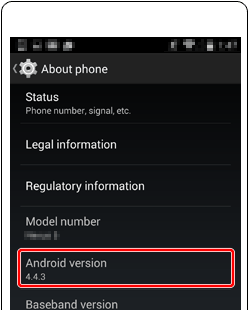
Step 1: Confirming the Android⢠OS version
 1. Check the smartphoneâs specifications. 1. Check the smartphoneâs specifications.
Step 2: Installing Camera Connect on the Android⢠smartphone
Download Camera Connect from Google Play⢠and install it on the smartphone.
If Camera Connect is already installed on the smartphone, please proceed to Step 3: Connecting the camera to the Android⢠smartphone.
 1. Touch the [Play Store] application on your Android⢠smartphone to access Google Playâ¢. 1. Touch the [Play Store] application on your Android⢠smartphone to access Google Playâ¢.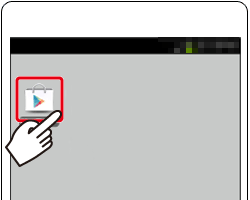
2. Touch the search icon.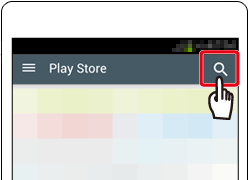
3.  Enter [Camera Connect] in the search field, and then Enter [Camera Connect] in the search field, and then  touch [Search]. touch [Search].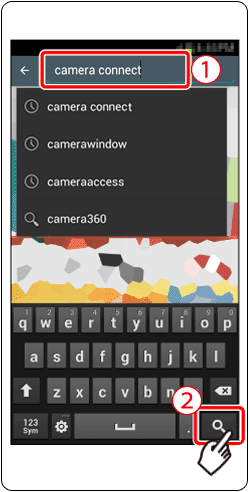
4. Choose [Camera Connect] from the displayed search results, and install it on the Android⢠smartphone.After installation has been completed, tap the [Home] button to return to the Home Screen.
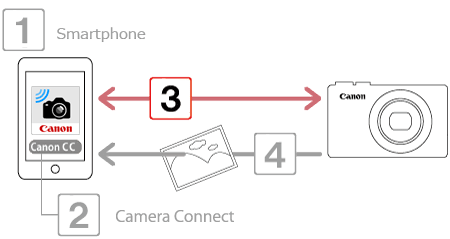
Step 3: Connecting the camera to the Android⢠smartphone
1. Touch the menu key, and then touch [Settings].
2. Confirm that the Android⢠smartphone is not set to [Airplane mode].
3. Set the [Wi-Fi] switch to [ON], and then touch [Wi-Fi].
 4. Press the <Playback> ( 4. Press the <Playback> ( ) button to turn the camera on. ) button to turn the camera on.
5. Press the <Wi-Fi> ( ) button. ) button.
6. Press the < >< >< >< >< >< >< > buttons to choose [ > buttons to choose [  ], and then press the <FUNC./SET> ( ], and then press the <FUNC./SET> ( ) button. ) button. 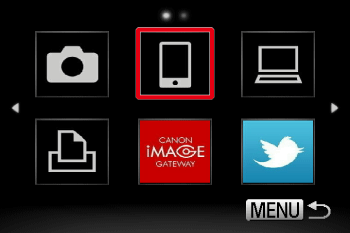
7. Press the <><> buttons to choose [Add a Device], and then press the <FUNC./SET> () button.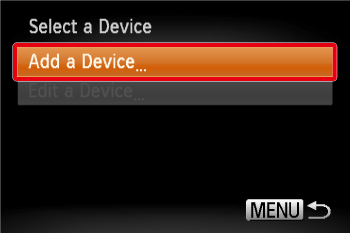
The cameraâs SSID is displayed on the screen.
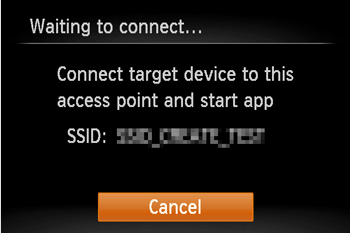
 8. Choose the SSID (network name) displayed on the cameraâs screen from the list of access points displayed on the Android⢠smartphone. 8. Choose the SSID (network name) displayed on the cameraâs screen from the list of access points displayed on the Android⢠smartphone.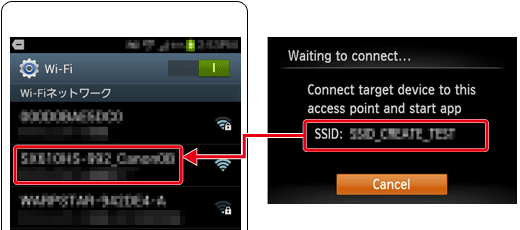
After confirming that the Android⢠smartphone and the camera are connected, touch the [Home Button] to return to the [Home Screen].
9. Tap the [Canon CC] (  ) application icon on the Android⢠smartphone to start [Camera Connect]. ) application icon on the Android⢠smartphone to start [Camera Connect].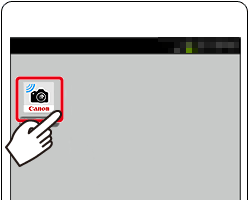
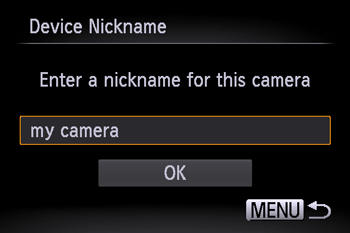
Once the Android⢠smartphone is recognized on the camera, its nickname will be displayed on the camera as shown in the image below.
10. Press the <><> buttons to choose the Android⢠smartphone's nickname, and then press the <FUNC./SET> () button.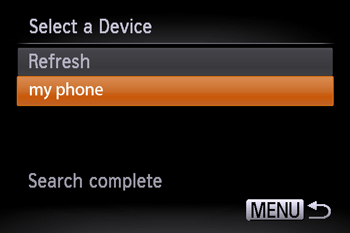
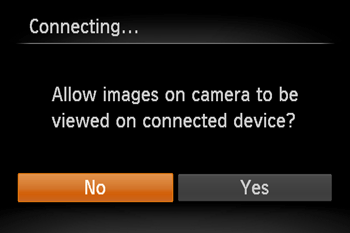
11. Press the <><> buttons to choose [No], and then press the <FUNC./SET> () button.Choose [Yes] to use an Android⢠smartphone to send images from the camera to the Android⢠smartphone.
12. The following screen appears.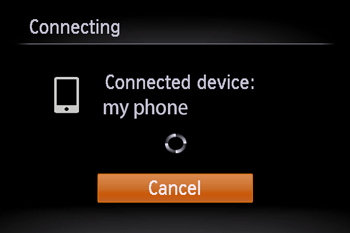
13. Once you have connected to the Android⢠smartphone, a screen like the one below will appear.
Step 4: Sending images to the Android⢠smartphone
1. Press the <><> buttons to choose [Select and send], and then press the <FUNC./SET> () button.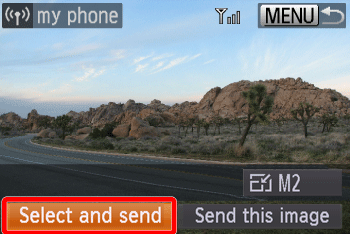
2. The following screen appears.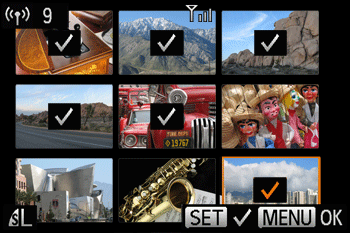
3. The following screen appears.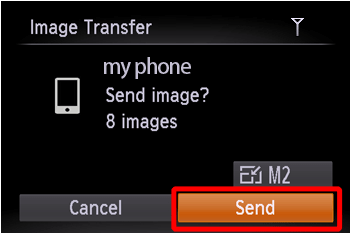
Press the <
><><><> buttons to choose [Send] and then press the <FUNC./SET> () button.
4. To disconnect from the camera, press the < MENU> button, and after the confirmation message, press the < >< > buttons to choose [OK], and then press the <FUNC./SET> () button.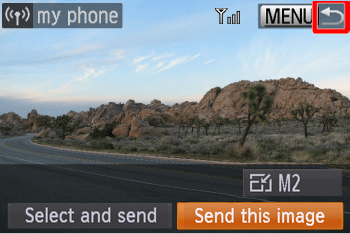 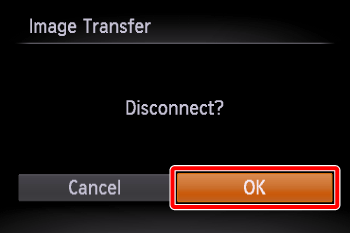
The camera cannot be connected via Wi-Fi using Camera Connect The information registered to the smartphone for CameraWindow cannot be used for Camera Connect. Therefore, it will be necessary to re-register connection information for Camera Connect.
The procedures for making connections with Camera Connect are explained below.
1. Press the [Playback] ( ) button.
2. Press the [Wi-Fi] ( ) button.
3. A list of settings registered to the camera will be displayed. Press the [ ], [ ] buttons to display the [Select a Device] screen. 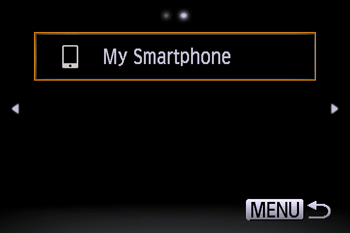
4. Press the[ ] [ ] [ ] [ ] buttons to choose [ ], and then press the <FUNC./SET> () button.
5. Press the [ ], [ ] buttons to choose [Edit a Device], and then press the <FUNC./SET> () button.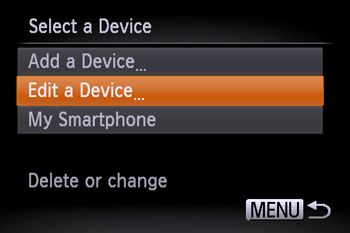
6. Choose the name of the smartphone you installed the Camera Window app on, and then press the <FUNC./SET> () button.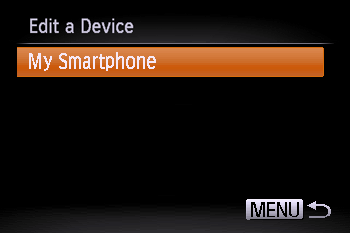
7. Choose [Erase Connection Info], and then press the <FUNC./SET> () button.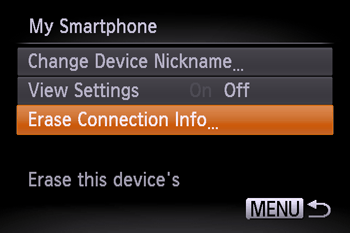
8. Choose [OK], and then press the <FUNC./SET> () button.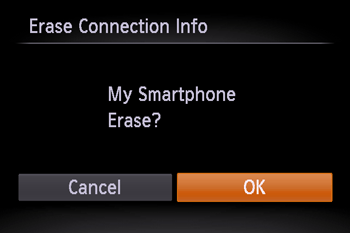
Androidâ¢, and Google Play⢠are trademarks of Google Inc.
|
||||
|
ID: 8202705500_EN_2
|
|||||
 icon.
icon.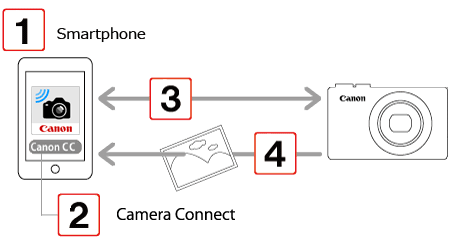
 )
)  [About device]
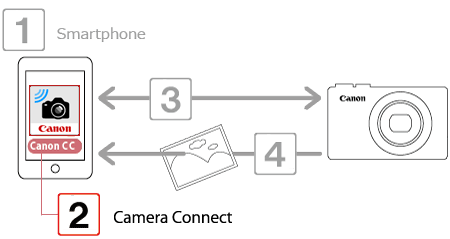
 ] tab > [Wi-Fi Settings] > [Password] > [On]. In this case, enter the password displayed on the camera in the password field on the Android⢠device when it is displayed.
 ] tab, choose [Wi-Fi Settings] > [Target History] > [Off].
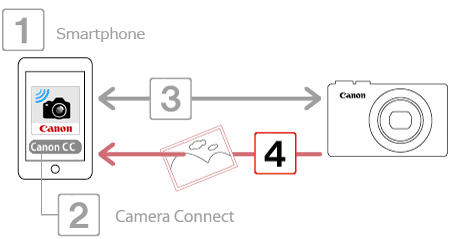
 ) is displayed.
SIMS Doc Id
8202705500