| Solution |
Reducing Flicker If you shoot an image with a fast shutter speed under a light source such as fluorescent light, the blinking of the light source causes flicker and the image may be vertically unevenly exposed. If continuous shooting is used under these conditions, uneven exposures or colors across the images may result. When you use this feature during viewfinder shooting, the camera detects the flickering frequency of the light source and takes the picture when the flicker causes less effect on exposure or color tone.
1. Turn on the camera.
- 1. Set the camera's power switch to <ON>.
2. Select the shooting mode.
- Set the Mode Dial to Creative Zone [ P / Tv / Av / M / B ].
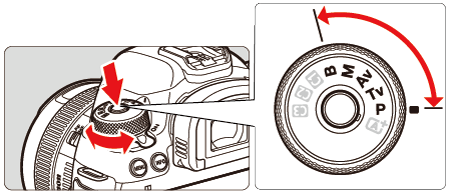
 Press the lock release button
 Turn the Mode Dial
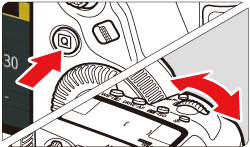
3. Press the <MENU> button to display the menu screen.
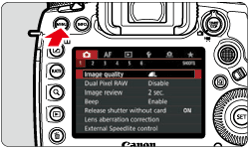
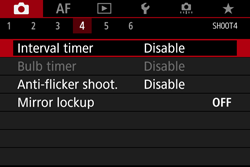
4. Press the <  > button, then turn the <  > dial to select the [  ] tab.
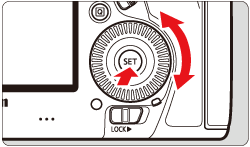
5. Turn the <  > dial to select [Anti-flicker shoot.], then press <  >.
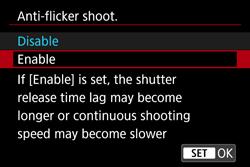
6. Turn the < > dial to select [Enable], then press < >.
7. Take the picture.
- The image will be taken with reduced unevenness of exposure or color tone caused by the flicker.

IMPORTANT
- When [Enable] is set and you shoot under a flickering light source, the shutter-release time lag may become longer. Also, the continuous shooting speed may become slower, and the shooting interval may become irregular.
- This function does not work with mirror lockup, Live View shooting, or movie shooting.
- In the <P> or <AV> mode, if the shutter speed changes during continuous shooting or if you shoot multiple shots of the same scene at different shutter speeds, the color tone may be inconsistent. To avoid inconsistent color tones, use the <TV> or <M> mode at a fixed shutter speed.
- The color tone of the captured images when [Anti-flicker shoot.] is set to [Enable] may look different from when [Disable] is set.
- Flicker at a frequency other than 100 Hz or 120 Hz cannot be detected. Also, if the flickering frequency of the light source changes during continuous shooting, effects of the flicker cannot be reduced.
- If the subject is against a dark background or if there is a bright light in the image, flicker may not be properly detected.
- Under certain special types of lighting, the camera may not be able to reduce the effects of the flicker even when <
 > is displayed. > is displayed.
- Depending on the light source, flicker may not be detected properly.
- If you recompose a shot, <> may appear and disappear intermittently.
- Depending on the light sources or shooting conditions, the expected result may not be obtained even if you use this function.
NOTE
- Taking test shots in advance is recommended.
- In the <
 > mode, <> will not be displayed, but the picture will be taken with flicker reduction. > mode, <> will not be displayed, but the picture will be taken with flicker reduction.
- Flicker reduction also works with flash. However, the expected result may not be obtained for wireless flash shooting.
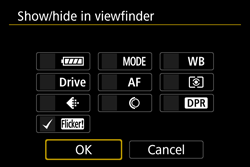
How to Set [Flicker detection] Icon to Be Displayed In the Viewfinder If < > is not displayed in the viewfinder, change the [Show/hide in viewfinder] setting.
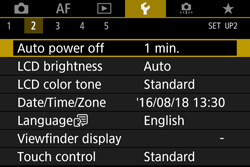
1. Press the <MENU> button to display the menu screen.
2. Press the < > button and turn the < > dial to select the [  ] tab, then press the < > button.
3. Turn the < > dial to select [Viewfinder display], then press < >.
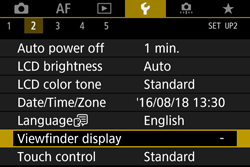
4. Turn the < > dial to select [Show/hide in viewfinder] and press < >.

5. Turn the < > dial to select [Flicker detection] and press < >.
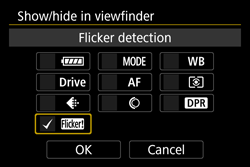
6. Turn the < > dial to select [OK], then press < >.
NOTE
- Under a light source which does not flicker, or if no flicker is detected, < > will not be displayed.
- If a checkmark [
 ] is added to [Flicker detection] and [ ] is added to [Flicker detection] and [  : Anti-flicker shoot.] is set to [Disable], metering under a flickering light source will cause < > to blink in the viewfinder as a warning. Setting to [Enable] before shooting is recommended. : Anti-flicker shoot.] is set to [Disable], metering under a flickering light source will cause < > to blink in the viewfinder as a warning. Setting to [Enable] before shooting is recommended.
|