|
Configuring Printer Ports Printing errors can occur when the IP address of the machine has been changed, or when a printer has been added via the Windows printer folder. These errors are typically caused by incorrect printer port settings. For example, an incorrect port number or port type may have been specified. In such situations, your attempt to print fails because the document data cannot reach the machine. To fix this type of problem, configure the printer port settings on the computer.
IMPORTANT
To perform the following procedure, log on to your computer with an administrator account.
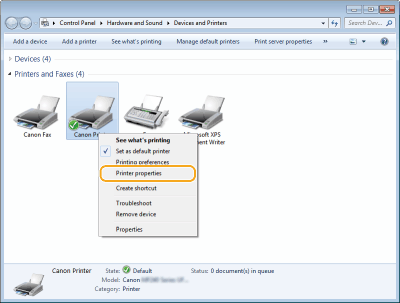
1. Open the printer folder.
[Start]  select [Control Panel] [Printer]. [Start] select [Devices and Printers]. Right-click the lower-left corner of the screen select [Control Panel] [View devices and printers].
- Windows 8.1/Server 2012 R2
Right-click [Start] select [Control Panel] [View devices and printers]. Right-click [  ] select [Control Panel] [Hardware and Sound] [Devices and printers]. [Start] select [Printers and Faxes]. [Start] select [Control Panel] double-click [Printers].
2. Right-click your printer icon and click [Printer properties] (or [Properties]).
3. Click the [Ports] tab and configure the required settings.
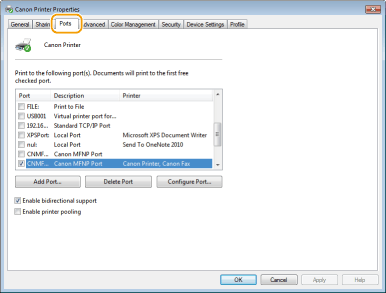
3-A. Adding a port
If the IP address of the machine has been changed, add a new port. Adding a port is also an effective solution when an incorrect port type was selected in the Windows printer folder during the printer driver installation.
3-A-1. Click [Add Port].
3-A-2. Select [Canon MFNP Port] in [Available port types] and click [New Port].

3-A-3. Click [Auto Detect], select the machine when it is detected, and click [Next].
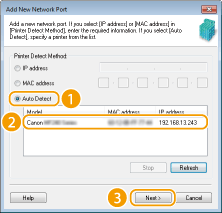
If the machine is not detected
- Click [Refresh]. If the problem persists, click [IP address] or [MAC address], enter the IP address or MAC address of the machine (For details, see the "User's Guide" from the Canon website (canon.com/oip-manual), and then click [Next].

3-A-4. Click [Add] [Finish].
3-A-5. Click [Close].
3-B. Changing the port type or number
If the printing protocols or port numbers (For details, see the "User's Guide" from the Canon website (canon.com/oip-manual)) have been changed on the machine, the corresponding settings on the computer must also be configured. This change is only available for LPR or RAW ports.
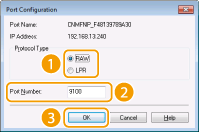
3-B-1. Click [Configure Port].
3-B-2. Click the [LPR] or [RAW] radio button in [Protocol Type], change the number in the [Port Number] text box as necessary, and then click [OK].
4. Click [Close].
|

