|
Install the MF Drivers and MF Scan Utility from the DVD-ROM that is supplied with the machine. For more information about how to connect the machine and a computer, see "Getting Started" before starting.
NOTE
- The options to be displayed differ depending on your model.
- The installation screen differs depending on the version of Mac OS X.
- Be sure to close all applications that are running.
1. Insert the provided DVD-ROM into the drive on the computer.
2. Perform the following procedure.
If you are making a wired or wireless LAN connection, connect the machine to the computer.
- Before starting installation of the drivers, configure network settings. For more information about how to configure network settings, see "Getting Started".
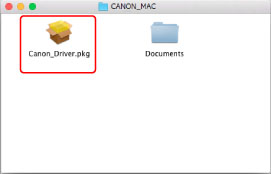
3. Double-click the DVD-ROM icon, and double-click the [Canon_Driver.pkg] icon.
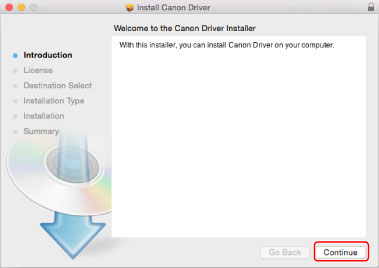
4. Click [Continue].
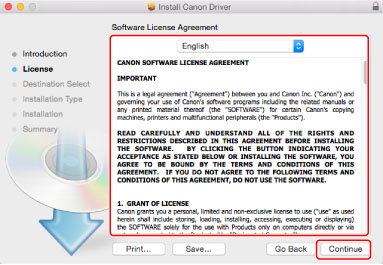
5. Read the License Agreement, and click [Continue].
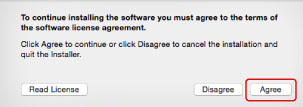
6. Click [Agree].
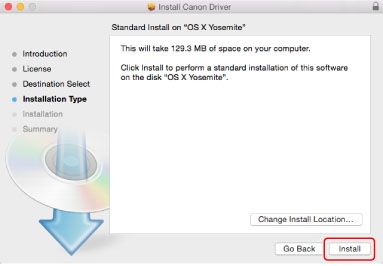
7. Click [Install].
- [Change Install Location] may appear, but you cannot change the installation location.
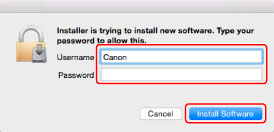
8. Enter the administrators name and password, and click [OK] or [Install Software].
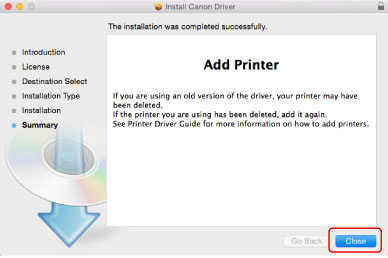
9. When the following screen appears, click [Close].
10. Open [System Preferences], and click [Print & Fax], [Print & Scan], or [Printers & Scanners].
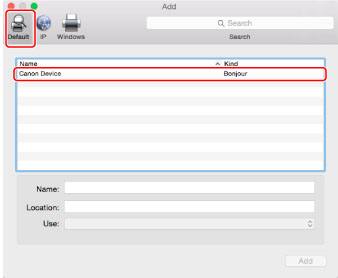
11. Click the [+] icon.
- If another dialog box does not appear, click [Add Other Printer or Scanner] or [Add Printer or Scanner] after clicking the [+] icon.
12. Register the printer.
12-A. Bonjour Connection
12-A-1. Click [Default], and select a printer name for which [Bonjour] is displayed in the [Kind] column.
12-A-2. Select either one of the following options from [Print Using] or [Use]: [Select Printer Software], or [Select Software].
12-A-3. Select a driver that is capable for this machine from the driver list, and click [OK].
12-A-4. Click [Add].
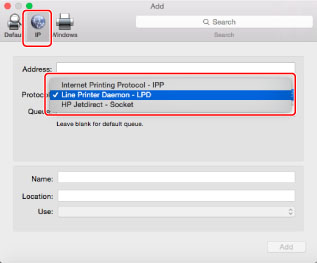
12-B. TCP/IP Connection
12-B-1. Click [IP], and select [Line Printer Daemon - LPD] from [Protocol].
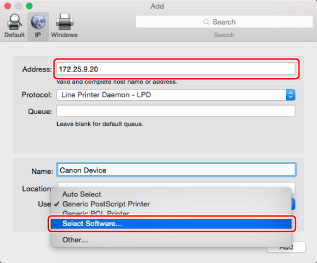
12-B-2. Enter the IP address of the machine to [Address], and select either one of the following options from [Print Using] or [Use]: [Select Printer Software], or [Select Software].
12-B-3. Select a driver that is capable for this machine from the driver list, and click [OK].
12-B-4. Click [Add].
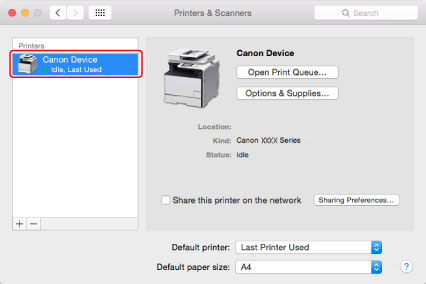
13. Check that this machine is added to the [Print & Fax], [Print & Scan], or [Printers & Scanners] dialog box.
14. Close the dialog box.
|