
Basic Network Settings
| Article ID: ART166437 | | | Date published: 09/09/2016 | | | Date last updated: 06/03/2021 |
Description
Basic Network Settings
Solution
| Solution |
Connecting to a Network
When connecting the machine to a wired or wireless local area network (LAN), you need to set an IP address unique to the selected network. Select "wired" or "wireless" depending on your communication environment and networking devices. For steps to connect the machine and set an IP address, see "Getting Started". For specific IP address settings, contact your Internet service provider or Network Administrator.
 Before You Start Before You Start
Follow these steps to connect the machine to a network.
1. Check your computer settings.


- Depending on the network, you may need to change settings for the communication method (half-duplex/full-duplex) or the Ethernet type (10BASE-T/100BASE-TX). For more information, contact your Internet service provider or Network Administrator.
- To check the MAC address of the machine, see the "User's Guide" from the Canon website (canon.com/oip-manual).
- To connect to an IEEE 802.1X network, see the "User's Guide" from the Canon website (canon.com/oip-manual).
2. Select wired or wireless LAN.

see "Selecting Wired LAN or Wireless LAN".
3. Connect to a wired or wireless LAN.

see "Connecting to a Wired LAN" or "Connecting to a Wireless LAN".
4. Set the IP address as necessary.

see [ Setting IP Addresses ].
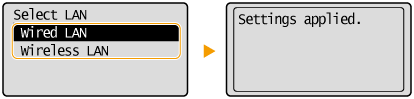
Selecting Wired LAN or Wireless LAN
After you decide on wired or wireless LAN to connect the machine to the computer, select wired LAN or wireless LAN using the operation panel. For how to connect to and specify settings for a wireless LAN/wired LAN, see "Getting Started". Note that if you change the setting from <Wired LAN> to <Wireless LAN> or vice versa, you will need to uninstall MF Drivers installed on your computer and then reinstall them. For more information, see the "MF Driver Installation Guide" from the Canon website (canon.com/oip-manual).
1. Press
 . .
2. Use
 / /  to select <Network Settings>, and press to select <Network Settings>, and press  . .
3. Select <Select Wired/Wireless LAN>, and press
.
4. Select <Wired LAN> or <Wireless LAN>, and press
.
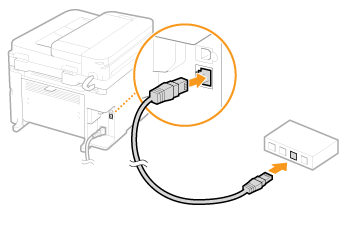
Connecting to a Wired LAN
Connect the machine to a computer via a router. Use a LAN cable to connect the machine to the router.
1. Connect a LAN cable.
2. Wait approximately 2 minutes.
You can set the IP address manually. [ Setting IP Addresses ]
Connecting to a Wireless LAN
Wireless routers (or access points) connect the machine to a computer via radio waves. If your wireless router is equipped with Wi-Fi Protected Setup (WPS), configuring your network is automatic and easy. If your networking devices do not support automatic configuration, or if you want to specify authentication and encryption settings in detail, you need to manually set up the connection. Make sure that your computer is correctly connected to the network.
Setting Up Connection Using WPS
When using WPS, two modes are available: push button mode and PIN code mode.
Find the WPS mark shown below on the package of your wireless router. Also make sure that there is a WPS button on your networking device. [ Setting the Wireless LAN Using WPS ]

Some WPS routers do not support the push button mode. If WPS PIN code mode is mentioned on the package or in the instruction manuals of your networking device, set up the connection by entering the PIN code. [ Setting the Wireless LAN Using WPS ]
Manually Setting Up Connection
When manually setting up a wireless connection, you can either select a wireless router or manually enter the required information. Regardless of the method, make sure that you have the required setup information, including the SSID and network key. [ Checking the Access Point Name or Network Key ]
Select this setup option if you need to manually set up the connection but want to complete the setup as easily as possible. [ Setting the Wireless LAN Manually ]
If you want to specify security settings in detail, such as authentication and encryption settings, manually enter the SSID and network key to set up the connection. [ Setting the Wireless LAN Manually ]
Viewing Network Settings
Viewing IPv4 Settings


 <Network Information>
<IPv4>
Select the setting to view
<Network Information>
<IPv4>
Select the setting to view
Viewing IPv6 Settings
<Network Information>
<IPv6>
Select the setting to view
Testing the Network Connection
1. Press
.
2. Use
/ to select <Network Settings>, and press .
3. Select <TCP/IP Settings>
<IPv4 Settings> <PING Command>.
4. Enter the IPv4 address of another device on the network, and press
.
|
| Related Info |
Setting IP Addresses
Setting the Wireless LAN Using WPS
Setting the Wireless LAN Manually
|
|
ID: 8203147000_EN_1
|
|


SIMS Doc Id
8203147000