To change the wireless network settings of the printer, connect the printer and the computer with a USB cable temporarily. If you modify the wireless network settings of the computer over wireless connection without USB connection, your computer may not be able to communicate with the machine after modifying the settings.
 Note
Note
-
Start up IJ Network Tool.
-
Select printer in Printers:.
When the printer is connected to the computer with a USB cable temporarily, select the printer with USB appearing in the Connected to column.
-
Click the Configuration... button.
-
Click the Wireless LAN button.
-
Change or check settings.
Click OK after changing configuration. A screen is displayed asking you for confirmation before the settings are sent to the printer. If you click OK, the settings are sent to the printer and the Transmitted Settings screen is displayed.
-
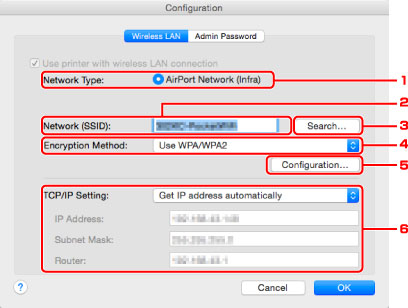
Network Type:
Displays the wireless LAN mode currently selected.
Note
-
When Direct Connection is displayed on Network Type:, you cannot change the settings on the Wireless LAN sheet or the Admin Password sheet.
-
You can change or check the settings from Set up printer's direct connection... on the Settings menu when you use the printer with the direct connection (access point mode).
 Changing Settings in Direct Connection
AirPort Network (Infra)-
Connects the printer to the wireless LAN with a wireless router.
Direct Connection-
Connects external wireless communication devices (e.g. computers, smartphones, or tablets) to the printer using it as an access point (wireless router).
-
Network (SSID):
The network name (SSID) of the wireless LAN currently used is displayed.
Note
In the direct connection (access point mode), the access point name (SSID) of the printer is displayed.
-
Search...
The Wireless Routers screen is displayed to select a wireless router to connect to.
Wireless Routers Screen
Note
-
Encryption Method:
Select the encryption method used over the wireless LAN.
 Important
-
If all encryption types of the wireless router, printer, or computer do not match, the printer cannot communicate with the computer. If the printer cannot communicate with the computer after the encryption type of the printer was switched, make sure encryption types for the computer and the wireless router match that set to the printer.
-
If you connect to a network that is not protected with security measures, there is a risk of disclosing data such as your personal information to a third party.
- Do Not Use
-
Select to disable encryption.
- Use Password (WEP)
-
Transmission is encrypted using a WEP key you specified.
-
If a network password (WEP) has not been set, the WEP Details screen is displayed automatically. To change WEP settings set before, click Configuration... to display the screen.
-
Changing WEP Detailed Settings
Use WPA/WPA2-
Transmission is encrypted using a network key you specified.
-
The security has been strengthened more than WEP.
-
If a network key has not been set, the Authentication Type Confirmation screen is displayed automatically. To change network key settings before, click Configuration... to display the WPA/WPA2 Details screen.
-
Changing WPA/WPA2 Detailed Settings
-
Configuration...
The detailed settings screen is displayed. The network password (WEP) or the WPA/WPA2 key selected in Encryption Method: can be checked and changed.
- For more on WEP setting:
-
Changing WEP Detailed Settings
For more on WPA/WPA2 setting:-
Changing WPA/WPA2 Detailed Settings
-
TCP/IP Setting:
Sets the IP address of the printer to be used over the LAN. Specify a value appropriate for your network environment.
- Get IP address automatically
-
Select this option to use an IP address automatically assigned by a DHCP server. DHCP server functionality must be enabled on your wireless router.
- Use following IP address
-
Select this option if no DHCP server functionality is available in your setup where you use the printer, or you want to use a particular IP address or a fixed IP address.
-
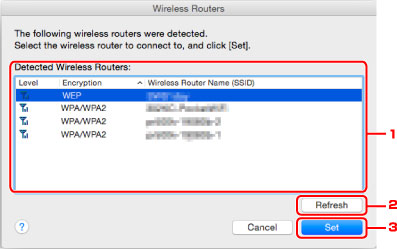
Wireless Routers Screen
-
Detected Wireless Routers:
The signal strength from the wireless router, encryption type, name of wireless router, and the radio channel can be checked.
Important
Note
-
Signal strength is displayed as follows.
 : Good
 : Fair
 : Poor
-
Type of encryption is displayed as follows.
Blank: No encryption
WEP: WEP is set
WPA/WPA2: WPA/WPA2 is set
-
Refresh
Click to update the list of wireless routers when your target wireless router is not detected.
If the target wireless router is set to a closed network (the stealth mode), click Cancel to return to the previous screen and enter the network name (SSID) in Network (SSID).
Note
-
Set
Click to set the network name (SSID) in Network (SSID): on the Wireless LAN sheet.
Note
-
The WPA/WPA2 Details screen or the WEP Details screen appears if the selected wireless router is encrypted. In this case, configure the details to use the same encryption settings set to the wireless router.
-
Wireless routers that cannot be used by this machine (including those configured to use different encryption methods) are displayed grayed out and cannot be configured.