|
Images can have the effects of shooting in [Fish-eye effect], [Art bold effect], [Water painting effect], [Miniature effect], [Toy camera effect], [Soft focus], and [Grainy B/W] modes applied to them, then be saved as a separate image.
IMPORTANT
When you shoot in Creative Filter mode, the camera saves only the image with the filter effect applied. If you also want to save the image without a filter effect applied, take the picture without a filter effect. Then apply a filter effect and save it as a new image.
NOTE
Try taking some test shots first, to make sure you obtain the desired results.
Creative Filter Characteristics

| Monochrome (Grainy B/W) | Take monochrome pictures with a gritty, rough feeling. |

| Soft Focus Effect | This function allows you to shoot images as if a soft focus filter were attached to the camera. You can adjust the effect level as desired. |

| Fish-Eye Effect | Shoot with the distorting effect of a fish-eye lens. |

| Art Bold Effect | Make subjects look more substantial, like subjects in oil paintings. |

| Water Painting Effect | Soften colors, for photos resembling watercolor paintings. |

| Toy Camera Effect | This effect makes images resemble shots from a toy camera by vignetting (darker, blurred image corners) and changing the overall color. |

| Miniature Effect | Creates the effect of a miniature model, by blurring image areas above
and below your selected area.
You can also make movies that look like scenes in miniature models by choosing the playback speed before the movie is recorded. People and objects in the scene will move quickly during playback. Note that sound is not recorded. |
Applying a Creative Filter When Shooting 1. Set the cameraâs power switch to [ON].
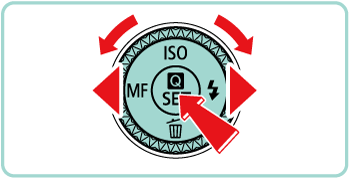
2. Set the mode dial to [  ].

3. Press the [  ] button, then press the [  ], [  ] buttons to choose [Shooting mode] in the menu.
4. Press the [  ], [  ] buttons or turn the [  ] dial to choose the desired filter effect. Press the [ ] button.
- You can confirm the filter effect on the LCD monitor.

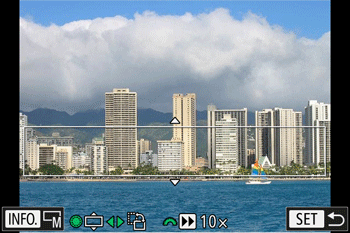
5. Adjust the filter effect.
The [  ] (except for Toy camera) or [  ] (Toy camera) indicator will appear on the bottom of the screen. Turn the [  ] dial to adjust the effect while checking the results on the LCD monitor.

NOTE
In Miniature mode, a white frame is displayed, indicating the image area that will not be blurred. Press the [ ] button, and then press the [INFO.] button to resize the frame. Next, press the [ ], [ ], [ ], [ ] buttons or turn the [ ] dial to move the frame. You can turn the [ ] dial to choose the movie playback speed. Press the [ ] button to return to the shooting screen and then shoot. For more information on setting the playback speed, please refer to the camera's instruction manual.
6. Press the shutter button to shoot.
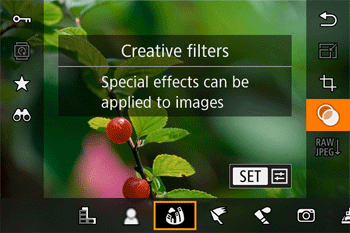
Applying Creative Filter Processing to Images That Have Already Been Shot You can apply Creative filters even to the images that have already been shot. An image applied with a Creative filter during playback can be saved as a new image, leaving the original image intact.
You can use the same Creative filters that are available during shooting.
1. Hold down the [  ] button and slide the power switch to [ON] to turn the camera on in Playback mode.

2. Press the [ ] , [ ] buttons or turn the [ ] dial to select the image you want to apply a filter to and press the [ ] button.
3. Press the [ ], [ ] buttons to choose [Creative Filter ( ) ] in the menu, and then press the [ ], [ ] buttons or turn the [ ] dial to select the desired effect.
4. When you press the [ ] button, the effect you selected will be applied to the image.

5. Press the [ ], [ ] buttons or turn the [ ] dial to adjust the effect, and then press the [ ] button.
REFERENCE
In [Miniature Effect] ( ) press the [INFO.] button to adjust the size of the frame. Next, press the [ ], [ ], [ ] , [ ] buttons or turn the [ ] dial to move the frame.
6. After [Save new image?] is displayed, press the [ ], [ ] buttons or turn the [ ] dial to choose [OK], then press the [ ] button.

7. Press the [ ], [ ] buttons or turn the [ ] dial to choose [Processed img.], then press the [ ] button.
- The saved image is now displayed.

|