|
The procedure for switching shooting modes is explained below.
Shooting in Scene Intelligent Auto Mode
For fully automatic selection of the optimal settings for specific scenes, simply let the camera determine the subject and shooting conditions.
1. Set the camera's power switch to [ON].
2. Hold down the mode dial release button and turn the mode dial to [  ].
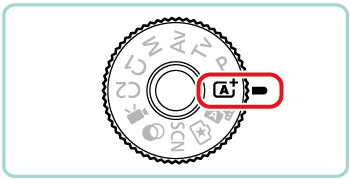
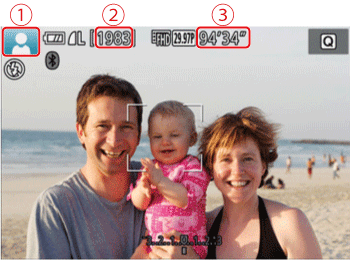
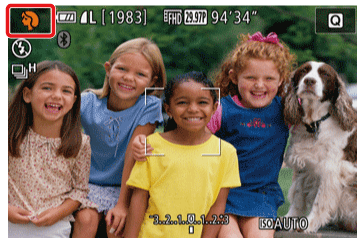
- Frames are displayed around faces and subjects that have been detected, indicating that they are in focus.
 Scene icon  Number of shots  Length of movies
Switching to Hybrid Auto Mode
You can make a short movie of the day just by shooting still images. The camera records 2 â 4-second clips of scenes before each shot, which are later combined in a digest movie.
1. Set the camera's power switch to [ON].
2. Hold down the mode dial release button and turn the mode dial to [  ].

IMPORTANT
- Battery life is shorter in this mode than in [ ] mode, because digest movies are recorded for each shot.
- A digest movie may not be recorded if you shoot a still image immediately after turning the camera on, choosing [ ] mode, or operating the camera in other ways.
- Any sounds and vibrations from your camera or lens operations will be recorded in digest movies.
Switching to Other Shooting Modes
Shoot more effectively in various scenes, and take shots enhanced with unique image effects or captured using special functions.
1. Set the camera's power switch to [ON].
2. Turn the mode dial and set it to one of the modes within the area indicated in the image below.
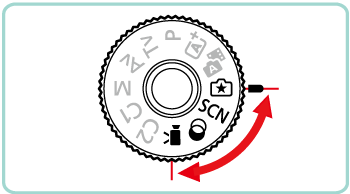
The setting procedure for Specific Scene [SCN] mode is shown here for the purposes of illustration. Creative Filters (  ) mode can also be set using the procedure explained.
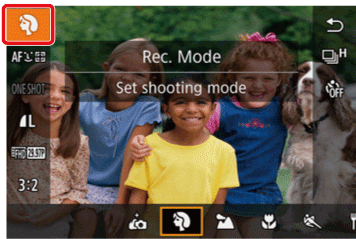
3. Hold down the mode dial release button and turn the mode dial to [SCN].

4. Press the [  ] button.

5. Choose a shooting mode.
Press the [  ], [  ] buttons to choose [Shooting Mode]. (If the default settings have not been changed, (Portrait) [  ] will be displayed.)
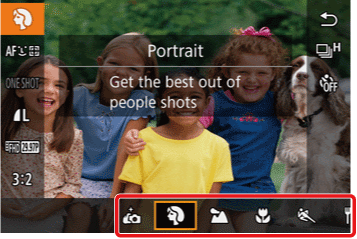
6. Press the [  ], [  ] buttons or turn the [  ] dial to choose the desired shooting mode. Press the [ ] button.
7. If the mode icon for the desired shooting mode appears in the upper left of the screen, the setting is complete.
- The available shooting modes are listed below.
| Mode dial |
Scene |
Shooting mode |
Effect |
 |
Shooting with Your Favorite Settings |
Creative Assist |
Capture shots just as you imagine them, without having to know photography terms. Choose from easy-to-understand options to defocus the background, adjust brightness, or customize shots in other ways as you watch the screen. |
 |
Specific Scenes |
Shooting Portraits |
Portrait |
Take shots of people with a softeningãeffect. |
| Shooting Landscapes |
 Landscape Landscape |
Capture wide-open landscapes or similar scenery in sharp focus from near to far, with blue skies and greenery reproduced vividly. |
| Shooting Flowers and Small Objects |
 Close-up Close-up |
Take close-ups of flowers or other small objects to enlarge them in your shots. |
| Shooting Moving Subjects |
 Sports Sports |
Shoot continuously as the camera keeps the subject in focus. |
| Shooting Evening Scenes without Using a Tripod |
 Handheld Night Scene Handheld Night Scene |
Beautiful shots of evening scenes or portraits with evening scenery in the background, without the need to hold the camera very still (as with a tripod).
A single image is created by combining consecutive shots, reducing camera shake and image noise. |
| Shooting Yourself under Optimal Settings |
 Self Portrait Self Portrait |
For self-portraits, customizable image processing includes skin smoothing as well as brightness and background adjustment to make yourself stand out. |
| Enhancing Colors in Shots of Food |
 Food Food |
Adjust color tones to make food look fresh and vibrant. |
| Conveying a Sense of Speed by Blurring the Background |
 Panning Panning |
By panning, you can blur the background to convey a sense of speed. |
| Shooting in Backlit Scenes |
 HDR Backlight Control HDR Backlight Control |
Three consecutive images are captured at different brightness levels each time you shoot, and the camera combines image areas with optimal brightness to create a single image. This mode can reduce the loss of detail in shadows that tends to occur in shots with mixed bright and dark image areas. |
| |
Image Effects |
Shooting in Monochrome |
 Grainy B/W Grainy B/W |
Take monochrome pictures with a gritty, rough feeling. |
| Shooting with a Soft Focus Effect |
 Soft Focus Soft Focus |
This function allows you to shoot images as if a soft focus filter were attached to the camera. You can adjust the effect level as desired. |
| Shooting with a Fish-Eye Lens Effect |
 Fish-Eye Effect Fish-Eye Effect |
Shoot with the distorting effect of a fish-eye lens. |
| Shots Resembling Oil Paintings |
 Art Bold Effect Art Bold Effect |
Make subjects look more substantial, like subjects in oil paintings. |
| Shots Resembling Watercolors |
 Water Painting Effect Water Painting Effect |
Soften colors, for photos resembling watercolor paintings. |
| Shooting with a Toy Camera Effect |
 Toy Camera Effect Toy Camera Effect |
This effect makes images resemble shots from a toy camera by vignetting (darker, blurred image corners) and changing the overall color. |
| Shots Resembling Miniature Models |
 Miniature Effect Miniature Effect |
Creates the effect of a miniature model, by blurring image areas above and below your selected area. |
| Shooting High-Contrast Scenes |
High Dynamic Range (HDR) |
Three consecutive images are captured at different brightness levels each time you shoot, and the camera combines image areas with optimal brightness to create a single image. This mode can reduce the washed-out highlights and loss of detail in shadows that tend to occur in high-contrast shots. |
 |
Shooting Various Movies |
Recording Movies |
Standard |
Locking or changing image brightness before recording. |
| Recording Time-Lapse Movies |
 Time-Lapse Movie Time-Lapse Movie |
Time-lapse movies combine images that are shot automatically at a specified interval. Any gradual changes of the subject (such as changes in a landscape) are played back in fast motion. You can adjust the shooting interval and number of shots. |
| Recording Movies at Specific Shutter Speeds and Aperture Values |
 Manual Manual |
Set your preferred shutter speed, aperture value, and ISO speed. |
Switching to [P] Mode
You can customize many function settings to suit your preferred shooting style.
1. Set the camera's power switch to [ON].
2. Hold down the mode dial release button and turn the mode dial to [P].
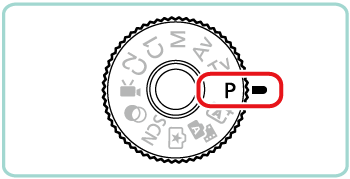
Customize the settings as desired, and then shoot.
NOTE
- Movies can be recorded in [P] mode as well, by pressing the movie button. However, some menu settings may be automatically adjusted for movie recording.
Switching to Tv, Av, M, or C Mode
You can set the camera to one of these modes to take smarter, more sophisticated shots, and customize the camera for your shooting style.
1. Set the camera's power switch to [ON].
2. Turn the mode dial and set it to one of the modes within the area indicated in the image below.
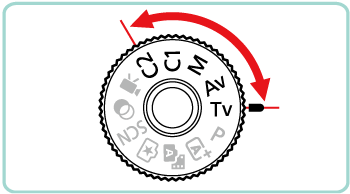
The settings that can be made in each mode are explained below:
ãSet your preferred shutter speed before shooting. The camera automatically adjusts the aperture ãvalue to suit your shutter speed.
ãSet your preferred aperture value before shooting. The camera automatically adjusts the shutter ãspeed to suit your aperture value.
ãSet your preferred shutter speed and aperture value before shooting to obtain the desired exposure.
Save commonly used shooting modes and your configured function settings for reuse. To access saved settings later, simply turn the mode dial to [C].
|