This article shows the main components of the PIXMA G4200. Click on one of the following options below to see these components.
Front View
Rear View
Inside View
Operation Panel
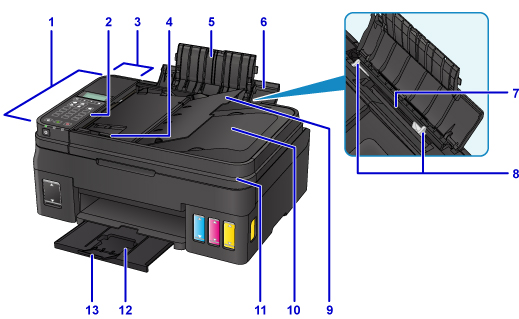
Front View
- (1) ADF (Auto Document Feeder)
-
Load a document here. The documents loaded in the document tray are scanned automatically one sheet at a time.
- (2) operation panel
-
Use to change the settings of the printer or to operate it.
- (3) document feeder cover
- Open when clearing jammed documents.
- (4) document guide
- Adjust this guide to match the width of document in the ADF.
- (5) paper support extension
- Open to load paper in the rear tray.
- (6) paper support
- Open to load paper in the rear tray.
- (7) rear tray
-
Load paper here. Two or more sheets of the same size and type of paper can be loaded at the same time, and fed automatically one sheet at a time.
- (8) paper guides
- Align with both sides of the paper stack.
- (9) document tray
- Open to load a document in the ADF. You can load two or more sheets of document of the same size and thickness. Load the document with the side you want to scan facing up.
- (10) document output slot
- Documents scanned from the ADF are delivered here.
- (11) document cover
- Open to load an original on the platen glass.
- (12) paper output tray
- Printed paper is ejected. Open before printing.
- (13) output tray extension
- Open to support ejected paper.
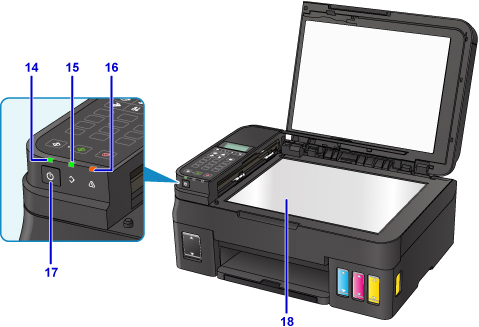
- (14) POWER lamp
- Lights after flashing when the power is turned on.
- (15) FAX Memory lamp
-
Lights or flashes depending on the document stored in the printer's memory.
- Lights:
- Printed received document or unsent document is stored in the printer's memory.
- Flashes
- Unprinted received document is stored in the printer's memory.
- (16) Alarm lamp
- Lights or flashes when an error occurs.
- (17) ON button
-
Turns the power on or off. Before turning on the power, make sure that the document cover is closed.
- (18) platen glass
- Load an original here.
Rear View
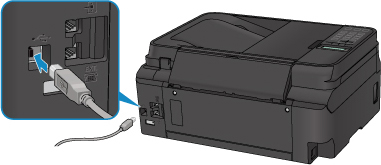
- (1) USB port
-
Plug in the USB cable to connect the printer with a computer.
- (2) external device jack
- Connect an external device such as telephone or answering machine.
- (3) telephone line jack
- Connect the telephone line.
- (4) power cord connector
- Plug in the supplied power cord.
 Important
- Do not touch the metal casing.
- Do not plug in or unplug the USB cable while the printer is printing or scanning originals with the computer.
Inside View
- (1) ink tank covers
- Open to refill ink tanks.
- (2) scanning unit / cover
- Scans originals. Open to refill ink tanks or to remove jammed paper.
- (3) ink tanks
-
The black ink tank is on the right, and the color ink tanks (cyan, magenta, and yellow) are on the left.
If any ink levels are low, refill the low tanks.
(4) cartridge holder- Install the cartridge here.
 Note
Note
- (5) Upper limit line
- Indicates the maximum capacity of the ink.
- (6) Single dot
- Indicates the amount of ink required when performing system cleaning.
- (7) Lower limit line
- Indicates the lower limit of the sufficient amount of ink to print. Refill the ink tank before the amount of ink is below the this line.
Operation Panel
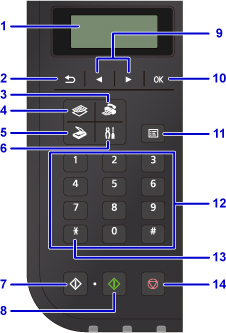
- (1) LCD (Liquid Crystal Display)
- Displays messages, menu items, and the operational status.
- (2) Back button
- Returns the LCD to the previous screen.
- (3) FAX button
- Switches the printer to the fax mode.
- (4) COPY button
- Switches the printer to the copy mode.
- (5) SCAN button
- Switches the printer to the scan mode.
- (6) Setup button
- Displays the Setup menu screen. With this menu, you can perform printer maintenance and change printer settings.
- (7) Black button
- Starts black & white copying, scanning, faxing, etc.
- (8) Color button
- Starts color copying, scanning, faxing, etc.
- (9)
 and
and  buttons
-
Used to select a menu or setting item. The button is also used when entering characters.
- (10) OK button
- Finalizes the selection of a menu or setting item. This button is also used to resolve an error or ejects documents in the ADF (Auto Document Feeder).
- (11) Menu button
- Displays the Copy menu, Scan menu, or FAX menu screen.
- (12) Numeric buttons
- Used to enter numerical values such as the number of copies, as well as fax/telephone numbers and characters.
- (13) Tone button
- Switches to tone dialing temporarily if your printer is connected to a rotary pulse line.
- (14) Stop button
- Cancels operation when print, copy, scan, or fax transmission/reception job is in progress.