| Solution |
You can shoot while viewing the image on the camera's LCD monitor. This is called "Live View shooting". This section describes how to shoot still photos using the Live View function with the default settings.
For details on how to change settings to enable Live View shooting, please refer to the "Related information" section.
CAUTION
Do not point the camera toward an intense light source, such as the sun or an intense artificial light source. Doing so may damage the image sensor or the cameraâs internal components.
IMPORTANT
If you handhold the camera and shoot while viewing the LCD monitor, camera shake may cause blurred images. Using a tripod is recommended in such cases.
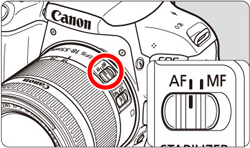
1. Set the lens's focus mode switch to <AF>.
2. Set the camera's power switch to <ON>.

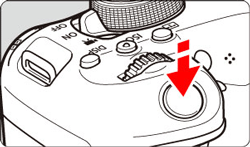
3. Press the <  > button to display the Live View image on the LCD monitor.
- The Live View image will be displayed in the brightness level closely matching that of the actual image to be captured.
4. Check the AF point.
- When a face is detected, the Area AF frame is displayed, and the AF point <
 > will appear over the face to be focused on. > will appear over the face to be focused on.
- If multiple faces are detected, <
 > will be displayed. Use the < > will be displayed. Use the <  > < > <  > keys to move < > over the face you want to focus on. > keys to move < > over the face you want to focus on.
- You can also tap on the LCD monitor screen to select the face or subject. If you tap on a subject other than a human face, the AF point will be switched to <
 >. >.
- If no faces can be detected or if you do not tap anything on the screen, focus will be achieved within the Area AF frame.
IMPORTANT
- If the subjectâs face is significantly out of focus, face detection will not be possible. Adjust the focus manually so that the face can be detected, then perform AF.
- An object other than a human face may be detected as a face.
- Face detection will not work if the face is very small or large in the picture, too bright or too dark, or partially hidden.
- The < > may cover only a part of the face, not the whole face.
- If you press <
 > or the < > or the <  > button, the AF point < > will appear at the center and you can use the < > button, the AF point < > will appear at the center and you can use the <  > cross keys to move the AF point. Once the AF point < > achieves focus, it will track the subject even if you change the composition or the subject moves. > cross keys to move the AF point. Once the AF point < > achieves focus, it will track the subject even if you change the composition or the subject moves.
5. Press the shutter button halfway to focus.
- When focus is achieved, the AF point will turn green and the beeper will sound.
- If focus is not achieved, the AF point will turn orange.
6. Press the shutter button completely to take the picture.
- The picture is taken and the captured image is displayed on the LCD monitor.
- When the playback display ends, the camera will return to Live View shooting automatically.
7. Press the < > button to end Live View shooting.
NOTE
- The imageâs field of view is approx. 100% (with image-recording quality set to JPEG
 and aspect ratio set to 3:2). and aspect ratio set to 3:2).
- In Creative Zone modes, you can check the depth of field by pressing the depth-of-field preview button.
- You can also use a remote controller (sold separately) for Live View shooting.
|