Loading Plain Paper / Photo Paper - TS3120 / TS3122

Article ID: ART167900 | Date published: 06/20/2017 | Date last updated: 04/16/2019
 

Description

This article explains how to load plain paper or photo paper into your PIXMA TS3120 / TS3122.


Solution

You can load plain paper or photo paper.


 Important

  • If you cut plain paper into small size such as 4" x 6" (10 x 15 cm) or 5" x 7" (13 x 18 cm) to perform trial print, it can cause paper jams.


 Note

  • We recommend Canon genuine photo paper for printing photos.
    For details on the Canon genuine paper, see Supported Media Types.
     

  • You can use general copy paper or Canon Red Label Superior WOP111/Canon Océ Office Colour Paper SAT213.
    For the page size and paper weight you can use for this printer, see Supported Media Types.
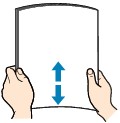
     

  1. Prepare paper.
    Align the edges of paper. If paper is curled, flatten it.


     Note

    • Align the edges of paper neatly before loading. Loading paper without aligning the edges may cause paper jams.
       
    • If paper is curled, hold the curled corners and gently bend them in the opposite direction until the paper becomes completely flat.


  2. Load paper.

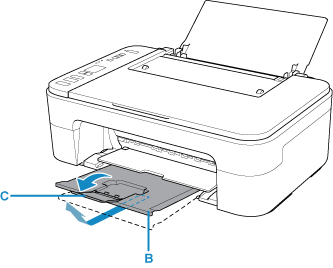
    1. Open the paper support (A).


    2. Pull out the paper output tray (B) and the output tray extension (C).


    3. Load paper vertically against the far right of the rear tray WITH THE PRINT SIDE FACING YOU.
       

    4. Adjust the paper guide (D) with the paper left side.
      Do not slide the paper guide too hard against the paper. The paper may not be fed properly.


       Important

      • Always load paper in the portrait orientation (E). Loading paper in the landscape orientation (C) can cause paper jams.


       Note

      • Do not load sheets of paper higher than the load limit mark (G).


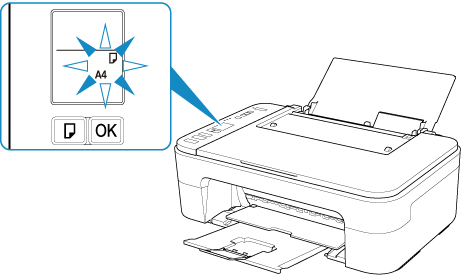
      After loading paper on the rear tray, the Paper status and the current paper size flash on the LCD.


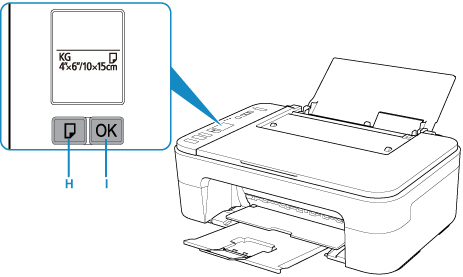
    5. Press the Paper Select button (H) to select a paper size according to the paper loaded on the rear tray and press OK button (I).


 Note

  • After loading paper, select the size and type of the loaded paper on the print settings screen of the computer.

    • There are various types of paper, such as paper with a special surface coating for printing photos at optimal quality and paper suitable for documents. Each media type has specific preset settings (how ink is used and sprayed, distance from nozzles, etc.), that allow you to print to that type with optimal image quality. The wrong paper settings may cause poor printout color quality or scratches on the printed surface. If you notice blurring or uneven colors, increase the print quality setting and try printing again.
       

    • To prevent incorrect printing, this printer has a function that detects whether the size set for the paper loaded on the rear tray matches the paper settings. Before printing, make paper settings in accordance with the rear tray paper size setting. When this function is enabled, an error message and an error code are displayed if these settings do not match to prevent incorrect printing. When the error message and the error code are displayed, check and correct the paper settings.


Rate this Article
Was this article helpful?
Yes, This document is helpful
No, This document needs a clearer explanation
 
Please provide your comments