You can load plain paper or photo paper in the rear tray.
Lear how to load envelopes in the rear tray.
 If you cut plain paper into small size such as 4" x 6" (10 x 15 cm) or 5" x 7" (13 x 18 cm) to perform trial print, it can cause paper jams.
Please follow the video or the written steps below to learn how to load paper in the rear tray.
Written instructions
Prepare the Paper
-
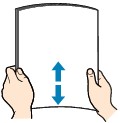
Align the edges of paper. If paper is curled, flatten it.
Load the paper
-
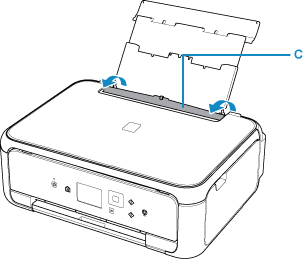
Open the rear tray cover (A) and then pull up the paper support (B).

-
Open the feed slot cover (C).
-
Slide the paper guides to open them, and load the paper in the center of the rear tray with the print side facing up.
-
Slide the paper guides (D) to align them with both sides of the paper stack.
Don't slide the paper guides too hard against the paper, or the paper wont feed properly.
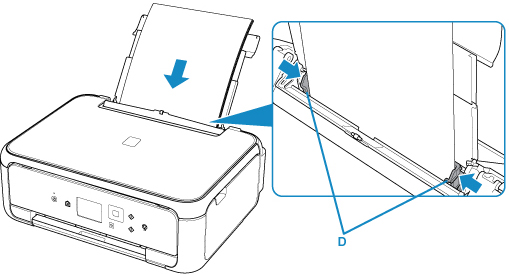
Always load paper in the portrait orientation (E). Loading paper in the landscape orientation (F) can cause paper jams.

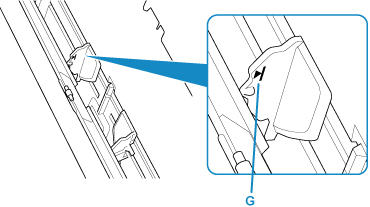
 Don't load sheets of paper higher than the load limit mark (G).
-
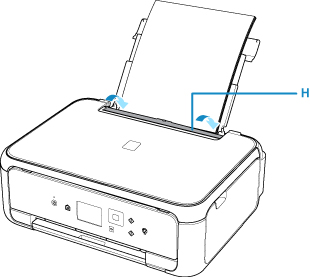
Close the feed slot cover (H) gently.
If the feed slot cover is open, the paper can't be fed. Be sure to close the feed slot cover.
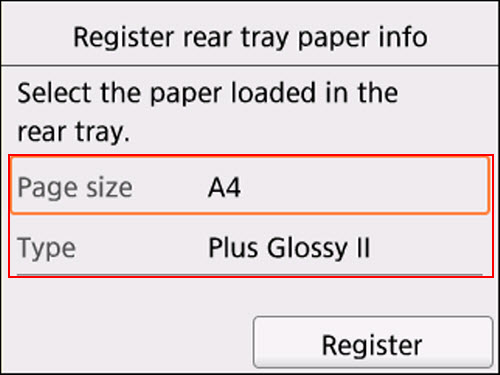
After closing the feed slot cover, the paper information registration screen for the rear tray is displayed on the LCD.
-
Select the size and type of the paper you loaded in the rear tray, and select Register.
-
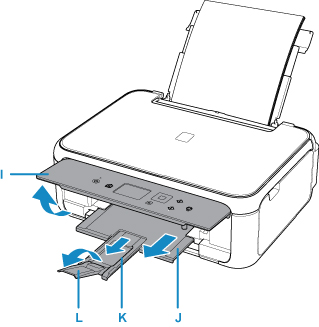
Open the operation panel (I), pull out the paper output tray (J) and paper output support (K), and open the output tray extension (L).
Be sure to open the operation panel, or the printer won't start printing.
Good to Know
- Some types of paper have a special surface coating for printing photos at optimal quality. These papers have specific preset settings (how ink is used and sprayed, distance from nozzles, etc.), that allow you to print to them with the best possible image quality. Using the wrong paper settings may cause poor print color quality or scratches on the printed surface. If you notice blurring or uneven colors, increase the print quality setting and try printing again.
- We recommend Canon genuine photo paper for printing photos. For details on Canon genuine paper, see Supported Media Types. You can also use general copy paper or Canon Red Label Superior WOP111/Canon Océ Office Colour Paper SAT213. For the paper sizes weights you can use for this printer, see Supported Media Types.
- To prevent incorrect printing, the printer detects whether the information set for the paper loaded on the rear tray matches the paper settings. When this function is enabled, an error message displays if these settings don't match. If you see this error, check and correct the paper settings.
TS5120 Page
