To print on a printable CD or DVD using Easy-PhotoPrint EX with the PIXMA iP7220, follow the steps below.
- Make sure that the machine is turned on.
- Start Easy-PhotoPrint EX.
- Click Photo Print from Menu.
The Select Images screen appears.

IMPORTANT:
The thumbnails (reduced images) displayed in the screen may appear as follows:
- A black line appears along an edge of the image.
- An edge of the image appears cropped.
However, such images will be displayed normally when enlarged or previewed, and print results will not be affected.
- Select the folder that contains the image you want to print from the Folder Tree area.
The images in the folder will be displayed as thumbnails (miniatures).
IMPORTANT:
If Easy-PhotoPrint EX is started from another application (MP Navigator EX, ZoomBrowser EX or Digital Photo Professional), the Folder Tree area will not be displayed.
The images selected in the application will be displayed as thumbnails.
REFERENCE:
- You can also use still images captured from videos.
- You can also use images downloaded from photo sharing sites on the Internet.
- Click the image you want to print.
The number of copies appears as "1" below the clicked image, while the selected image itself will appear in the selected image area.
REFERENCE:
- Set the Printer in the Select Paper screen.
- Select Printable Disc for Paper Size.
Set the Media Type according to the printable disc to be used.
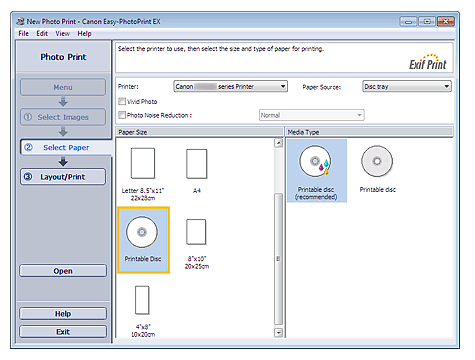
REFERENCE:
When Printable Disc is selected for Paper Size, only Disc tray will be selectable for Paper Source.
- Click Layout/Print.
The Layout/Print screen appears.

- Select a layout you want to use.
- Enter the title(s) and specify the details of the layout in Advanced.
REFERENCE:
Items that can be set may vary depending on the selected layout.
- Click Print.
Follow the message to load a printable disc, then start printing.
Printing starts from the top of the image displayed in Preview.
REFERENCE:
- You can adjust the printing position on the printable disc in the Adjust dialog box. To display the Adjust dialog box, click
 (Adjust Print Area/Print Position).
- You can specify advanced Photo Print settings (number of copies, print quality, etc.) in the Preferences dialog box. To display the Preferences dialog box, click
 (Settings) or select Preferences... from the File menu.

 (Delete Imported Image).
 (Delete All Imported Images).
 (Up arrow) until the number of copies you want is reached. To reduce the number of copies shown in the box, click
  (Down arrow).