The order of operations in an Easy Installation is "Configure network settings" "Install the printer driver" "Install the e-Manual." If you are connecting the printer and a computer via wired LAN or wireless LAN, read the notes in Things to Check before Starting (Wired LAN) or Things to Check before Starting (Wireless LAN) before starting.
1. If you are making a USB connection, turn OFF the printer.
- The printer may not be recognized if you install the printer driver with the printer turned ON. Always turn OFF the power before installing.
2. Log on to the computer with an administrator account.
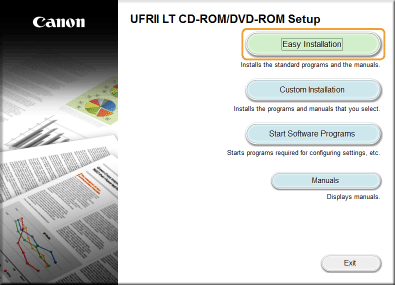
3. Insert the User Software CD-ROM/DVD-ROM into the drive on the computer.
4. Click [Easy Installation].
Note:
- If you do not want to install the e-Manual on your computer, click [Custom Installation].
- If [AutoPlay] is displayed, click [Run MInst.exe].
5. Click [Install].

Note:
If you clicked [Custom Installation] in step 4
Clear the [e-Manual] check box, and click [Install].
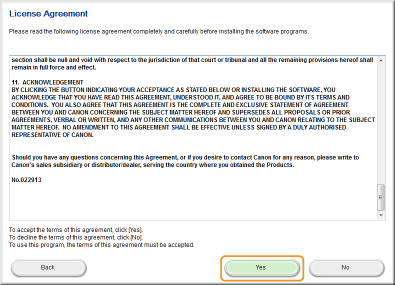
 6. Read the License Agreement and click [Yes] to agree.
 7. Configure the network settings.
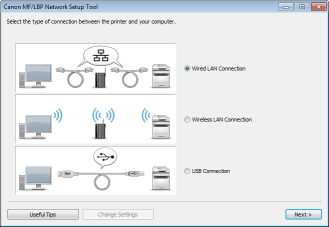
Wired LAN or Wireless LAN Connection
1. Select [Wired LAN Connection] or [Wireless LAN Connection], and click [Next].
2. Follow the on-screen instructions to configure the network settings.
Note:
If there is something you do not understand
Click [Useful Tips] at the bottom left of the screen to display troubleshooting tips.

If you are not sure how to make a LAN cable connection (wired LAN connection)
See the "e-Manual" supplied with your printer for the connection method for the printer and router or cable connection troubleshooting.
1. Select [USB Connection], and click [Next].
2. Click [Next].
8. Install the printer driver.
Wired LAN or Wireless LAN Connection
1. Select [Standard], select the [Reactivate Printers in the Sleep Mode and Search] check box, and click [Next].

- If you are using the printer in an IPv6 environment, click [Detailed Settings] select [Standard TCP/IP Port] click [OK].
Note:
About [Detailed Settings]
You can select the port type.
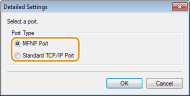 [MFNP Port] (only for IPv4 environment)
This is a port that enables automatic detection of the printer's IP address. Even if the IP address of the printer is changed, the connection between the printer and computer will be maintained, provided that they belong to the same subnet. Therefore, you do not need to add a new port every time the IP address is changed. If you are using the printer in an IPv4 environment, choose this setting.
[Standard TCP/IP Port]
This is a standard Windows port. Whenever the IP address of the printer is changed, a new port must be added.
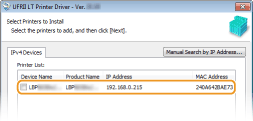
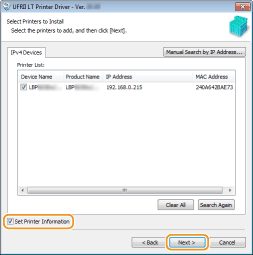
2. Select check box for the printer that you want to install from the [Printer List].
- If you want to use the printer in an IPv6 environment, click the [IPv6 Devices] tab.
Note:
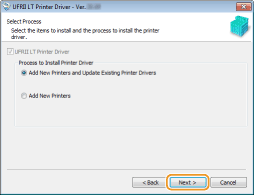
If the [Select Process] screen is displayed
If a printer driver is already installed, the [Select Process] screen is displayed before the [Select Printers to Install] screen. For your printer, the selection made here makes no difference for the setup process. Simply click [Next].
If the [IPv6 Devices] tab is not displayed
Return to the previous screen, and click [Detailed Settings] select [Standard TCP/IP Port].
3. Select the [Set Printer Information] check box, and click [Next].
4. Set the printer information as necessary, and click [Next].
 [Printer Name]
Change the printer name as necessary.
[Set as Default]
Select the check box if you want to use your printer as your default printer.
[Use as Shared Printer]
Select the check box if you want to share the printer (using the computer where you are performing the installation as a print server).
5. Check the printer information in [Printer List for Driver Installation], and click [Start].

Installation of the printer driver starts.
USB Connection
1. Select [USB Connection], and click [Next].

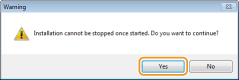
2. Click [Yes].
3. When the following screen appears, connect the computer and the printer with a USB cable (Connecting via USB), and turn ON the printer.

Installation of the printer driver starts.
9. Install the e-Manual.
If you selected [Custom Installation], proceed to step 10.
1. Click [Install].
- If you want to change the installation destination, click [Browse] and select your desired location.

Installation of the e-Manual starts.
2. Click [Exit].

10. Read the information in the following screen carefully, select [Accept] or [Do Not Accept], and click [Next].

If you select [Accept], the Product Extended Survey Program is installed.
The Product Extended Survey Program is a program to send basic information related to installation and usage of the printer to Canon every month for 10 years. It does not send any other information, including your personal information. You can uninstall the Product Extended Survey Program at any time.
11. Click [Next].
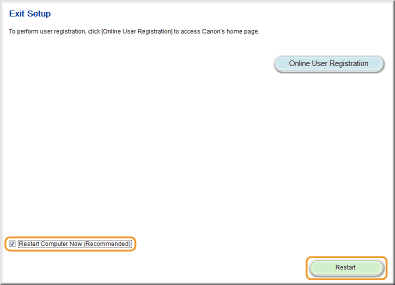
 12. Select the [Restart Computer Now (Recommended)] check box, and click [Restart].
- If you want to register information about your printer with Canon, click [Online User Registration].
Checking the Results of the Installation
If the printer driver has been installed correctly, an icon for the installed printer will be displayed in the printer folder (Displaying the Printer Folder).

If the e-Manual has been installed correctly, a shortcut icon for the e-Manual will be displayed on the desktop.
* However, the icon is not displayed if you selected [Custom Installation].

If the icon is not displayed
- Uninstall the printer driver and repeat the setup from the beginning.
- If the shortcut icon for the e-Manual is not displayed (that is, the icon for the installed printer alone is displayed), perform the procedure for installing the e-Manual alone.
