Before you begin
Reasons that documents are stored in your printer's memory
- Incomplete fax reception.
- Not enought remaining ink to print the fax.
- Paper has run out, or the wrong size is loaded.
- Do not print is selected for Received documents in Auto print settings under FAX settings.
Note: If an error occurs during fax transmission, the document is not stored in the machine's memory.
What you can do
Steps
You can delete one document from the printer's memory or all the documents at once.
To delete documents stored in the printer's memory
Note: When deleting one document, you'll use its transaction number. If you do not know the transaction number for the document you want to delete, you can print out a list of all the stored documents (see instructions farther down this page).
- Make sure that the printer is turned on with paper loaded.
- Press the FAX button, to go to the fax standby screen.
- Press the left Function button, to go to the Fax menu screen.
- Select Memory reference, then press OK.
- Use the arrow buttons

 to scroll to Delete specified document, then press OK to go to the document selection screen.
Note: you can also select Delete all documents in memory > OK if you want to delete all documents in memory. Select Yes > OK when the confirmation screen is displayed.
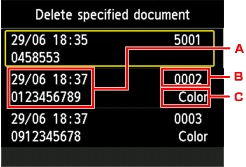
- Date and time of transaction and fax/telephone number
- Transaction number (TX/RX NO.) - A transaction number from "0001" to "4999" indicates a document being sent. A transaction number from "5001" to "9999" indicates a document being received.
- Color information - Color is displayed for color transmission/reception. Nothing is displayed for black & white transmission/reception.
- Scroll to select the transaction number of the document you want to delete, then press OK. The confirmation screen is displayed.
- Select Yes, then press the OK button. The document will be deleted.
Good to know
Note: If you unplug the power cord of the machine, all faxes stored in the machine's memory are deleted.
To print a list of the documents stored in the printer's memory
- Make sure that the printer is turned on with paper loaded.
- Press the FAX button, to go to the fax standby screen.
- Press the left Function button, to go to the Fax menu screen.
- Select Memory reference, then press OK.
- Use the arrow buttons to scroll to Print memory list, then press OK.
- Select Yes, then press OK. The list of documents stored in the machine's memory is printed.
Note: A transaction number from "0001" to "4999" indicates a document being sent. A transaction number from "5001" to "9999" indicates a document being received.
MX922 Page
