Removing Jammed Paper from the Rear Side - TS6120 (TEXT) (VIDEO)
Article ID: ART168739
|
Date published: 10/25/2017
|
Date last updated: 04/29/2019
Description
This article provides instructions on paper that is jammed in the back of your PIXMA TS6120.
Solution
The following video will walk you through the process outlined below.
Follow the steps below to remove paper that is jammed in the back of the printer.
Note
If paper becomes jammed during printing and you need to turn off the printer to remove it, press the Stop button to stop the printing before you turn off the printer.
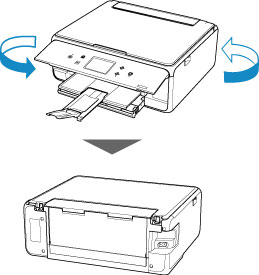
Rotate the printer so that its rear side faces toward you.
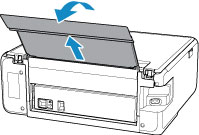
Open the rear tray cover and then pull up the paper support.
Pull out the rear cover.
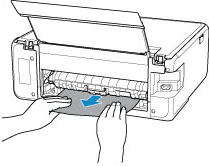
Slowly pull the paper out.
Note
Do not touch the inner parts of the printer.
If you were not able to remove the paper in this step, detach the transport unit cover and remove the paper by following these steps.
Lift up the transport unit cover and pull it out.
Slowly pull the paper out.
Note
Do not touch the inner parts of the printer.
Make sure that all of the jammed paper is removed.
Insert the transport unit cover slowly all the way into printer and take down the transport unit cover.
Insert the projections of the right side of the rear cover into the printer, and then push the left side of the rear cover until it is closed completely.