Follow these steps to quickly set up your PIXMA printer's fax functions.
Start the setup
-
Make sure the printer is turned ON.
-
Press MENU.
-
Select Setup, and press OK.
-
Select Device settings, and press OK.
-
Select Fax settings, and press OK.
-
Select Start easy setup or Easy setup, and press OK or Start setup.
-
Follow the on-screen instructions to complete the settings.
Connect the wires
-
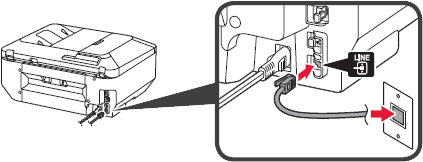
Connect the printer / fax to a telephone jack with the supplied cable.
 European users must use a six-wire telephone cable.
-
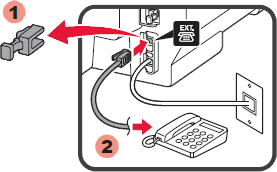
When you connect a telephone or an answering machine, remove the cap (1), then connect a telephone or an answering machine with a telephone cable (2).
Telephone line duplexers are not supported. United Kingdom users may need a BT adapter.
Good to know
Refer to these articles for instructions for how to:
Enter sender information
Set the date and time
Enter user information - unit fax number, and the unit name
