Print Studio Pro - Correction Tab Settings
| Article ID: ART169106 |
| |
Date published: 12/05/2017 |
| |
Date last updated: 12/05/2017 |
Description
Correct color tones of images. The setting items differ between color photos and black and white photos.
Solution
Settings Area (Correction)
Correct color tones of images. The setting items differ between color photos and black and white photos.
Color Tone Adjustment
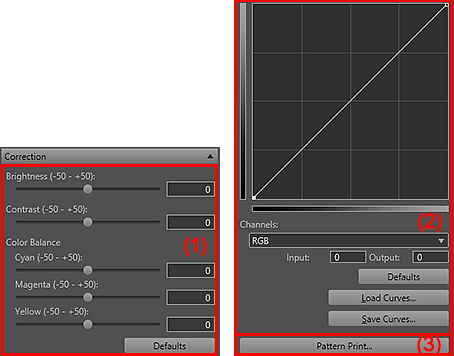
(1) Tone Adjustment Area
- Brightness
-
Move the slider for brightness to adjust the overall image brightness.
You can set within the range of -50 to 50; move the slider to the right to brighten and left to darken.
You can also set by entering the values.
- Contrast
-
Move the slider for contrast to adjust the overall image contrast.
You can set within the range of -50 to 50; move the slider to the right to increase and left to decrease the contrast.
You can also set by entering the values.
- Color Balance
-
Move the sliders for Cyan, Magenta and Yellow to adjust the color balance.
You can set within the range of -50 to 50; move the slider to the right to emphasize and left to weaken the color tone.
You can also set by entering the values.
- Defaults
- Restores the settings made in the Tone Adjustment area to the default state.
(2) Curves Setting Area
- Curves Adjustment Space
- Adjust the image brightness using graphs (Curves) showing the balance of tone input and output.Drag specific points to freely adjust the brightness of the corresponding areas.
- Channels
-
Each dot of an image is a mixture of Red, Green, and Blue in various proportions (gradation).These colors can be adjusted individually.
- RGB
- Adjust the Red, Green, and Blue combined.
- Red
- Adjust the Red channel.
- Green
- Adjust the Green channel.
- Blue
- Adjust the Blue channel.
- Input/Output
- Displays the values for the point selected in the Curves adjustment space.
- Defaults
- Restores the Curves setting to the default state.
- Load Curves...
- Load a saved Curves setting.
- Save Curves...
- Save the current Curves setting.
Black and White Tone Adjustment
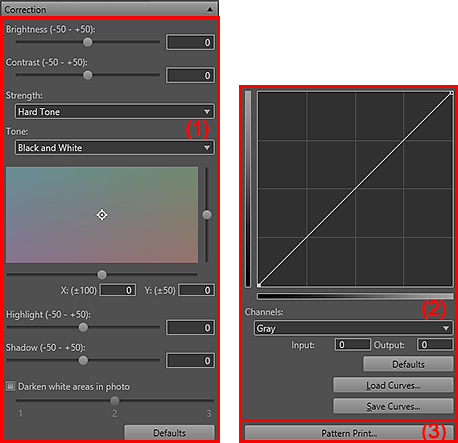
(1) Black and White Tone Adjustment Area
- Brightness
-
Move the slider for brightness to adjust the overall image brightness.
You can set within the range of -50 to 50; move the slider to the right to brighten and left to darken.
You can also set by entering the values.
- Contrast
-
Move the slider for contrast to adjust the overall image contrast.
You can set within the range of -50 to 50; move the slider to the right to increase and left to decrease the contrast.
You can also set by entering the values.
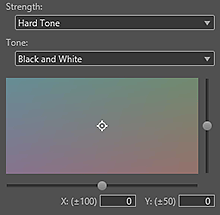
- Strength
- Select the image's midtone brightness from Soft Tone, Standard, Medium-hard Tone, Hard Tone, and Strong-hard Tone.
- Tone
-
Select a tone for the black and white image from Cool Tone, Black and White and Warm Tone.
 Note
Note
- The selection changes to Custom when you set the color in the black and white color tone adjustment space.
- Black and White Color Tone Adjustment Space
-
You can adjust the color tone of the black and white image by clicking the color field.
You can also adjust by moving the sliders or by entering the X-coordinate and Y-coordinate values.
- Highlight
-
Adjust the brightness of the brightest area. Move the slider to adjust the highlights.
Set within the range of -50 to 50; move the slider to the right to increase and left to decrease the highlights.
You can also set by entering the values.
- Shadow
-
Adjust the brightness of the darkest area. Move the slider to adjust the shadows.
Set within the range of -50 to 50; move the slider to the right to increase and left to decrease the shadows.
You can also set by entering the values.
- Darken white areas in the photo
-
Select this checkbox to darken the highlights in the image; it will be easier to distinguish the boundary between the image and the paper.
Move the slider to the right to darken and left to lighten the color.
Note
- To use this function, select the XPS printer driver (Canon XXX series XPS) for Printer in the Settings area (Print Settings). The model name appears in XXX.
- Defaults
- Restores the settings made in the Black and White Tone Adjustment area to the default state.
(2) Curves Setting Area
- Curves Adjustment Space
- Adjust the image brightness using graphs (Curves) showing the balance of tone input and output.Drag specific points to freely adjust the brightness of the corresponding areas.
- Channels
-
- Gray
- Adjust the Gray channel.
- Input/Output
- Displays the values for the point selected in the Curves adjustment space.
- Defaults
- Restores the Curves setting to the default state.
- Load Curves...
- Load a saved Curves setting.
- Save Curves...
- Save the current Curves setting.