
Setting the Microphone (XA15 / XA11)
| Article ID: ART169140 | | | Date published: 12/06/2017 | | | Date last updated: 12/07/2017 |
Description
Setting the Microphone (XA15 / XA11)
Solution
| Solution |
Recording Audio You can record audio using the built-in stereo microphone, commercially available external microphone (INPUT 1/INPUT 2 terminals*, MIC terminal) or line input (INPUT 1/INPUT 2 terminals*). Using the INPUT 1/INPUT 2 terminals, you can select the audio input independently for channel 1 (CH1) and channel 2 (CH2).
* Only available when the handle unit is attached to the camcorder.
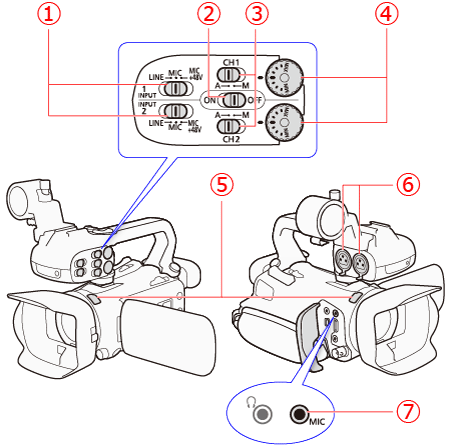  : Input selection switches for INPUT 1 and INPUT 2 : Input selection switches for INPUT 1 and INPUT 2 : INPUT terminal ON/OFF switch : INPUT terminal ON/OFF switch : Audio level switches for CH1 and CH2 : Audio level switches for CH1 and CH2 : Audio level dials for CH1 and CH2 : Audio level dials for CH1 and CH2 : Built-in stereo microphone : Built-in stereo microphone : INPUT 1 and INPUT 2 terminals (collectively referred to as "INPUT terminals") : INPUT 1 and INPUT 2 terminals (collectively referred to as "INPUT terminals") : MIC terminal : MIC terminal
Audio Settings and Recorded Audio Channels The available audio recording options depend on whether the handle unit is attached to the camcorder, the position of the INPUT terminal ON/OFF switch, and whether an audio source is connected to the MIC terminal.
*1 [FUNC.] -> [MENU] ->
 -> [CH2 Input] setting. -> [CH2 Input] setting.*2 Monaural audio.
Using Line Input or an External Microphone Connected to an INPUT Terminal
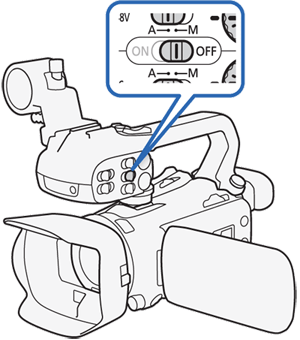
1. Set the INPUT terminal ON/OFF switch to ON.

2. Set the input selection switches for INPUT 1/INPUT 2 to LINE or MIC.

Recording Audio to Channel 2 (CH2) You can select the audio source that will be recorded to channel 2.
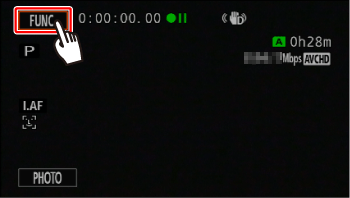
1. Touch [
 ]. ].
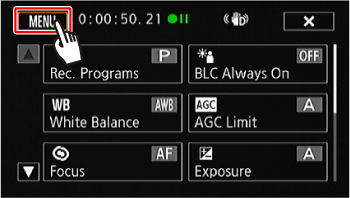
2. Touch [
 ]. ].
3. Scroll up or down (
) and touch [CH2 Input] ().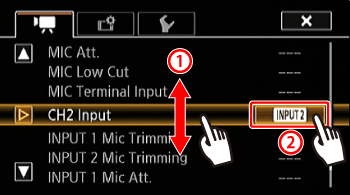
4. Touch the desired option (
 Default value). Default value).
5. touch [
 ]. ].
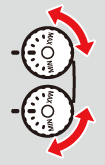
Audio Recording Level (INPUT Terminals) You can set the audio recording level for audio input to automatic or manual independently for each channel. Furthermore, when you adjust the audio recording level manually, you can set the level (from â
 to 18 dB) independently for each channel, as well. to 18 dB) independently for each channel, as well.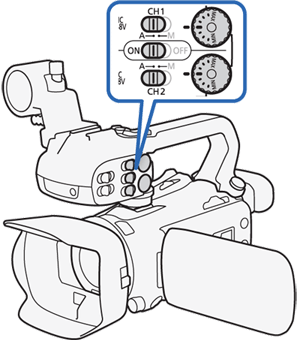
1. Set the audio level switch of the desired channel to A (automatic) or M (manual).
 ã ã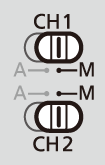
2. Turn the corresponding audio level dial.
Adjusting the Microphone's Sensitivity (INPUT terminals) You can adjust the sensitivity of a microphone connected to the INPUT 1 or INPUT 2 terminal.
1. Touch [
].
2. Touch [
].
3. Scroll up or down (
) and touch [INPUT 1 Mic Trimming] or [INPUT 2 Mic Trimming] ().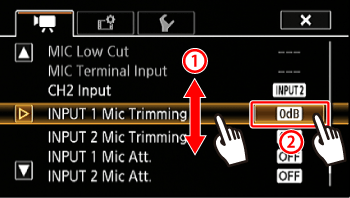
4. Touch the desired level.

5. Touch [
].
Activating the Microphone's Attenuator (INPUT terminals) You can activate the microphone attenuator (20 dB) for microphones connected to the INPUT 1 and INPUT 2 terminals to prevent audio from being distorted if the audio level is too high.
1. Touch [
].
2. Touch [
].
3. Scroll up or down (
) and touch [INPUT 1 Mic Att.] or [INPUT 2 Mic Att.] ().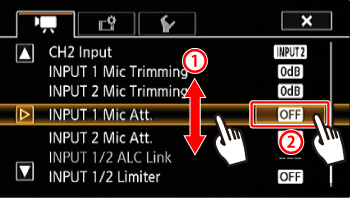
4. Touch [
 : On ]. : On ].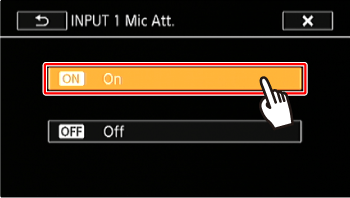
5. Touch [
].
Using the Built-in Microphone or an External Microphone Connected to the MIC Terminal Follow the step below to use the built-in microphone or an external microphone connected to the MIC terminal. Use commercially available condenser microphones with their own power supply and a Ï 3.5 mm mini-stereo plug.
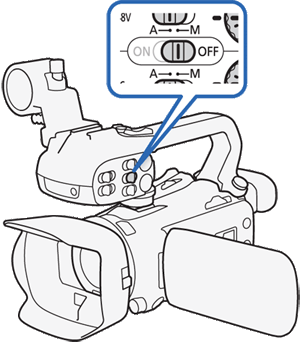
1. Set the INPUT terminal ON/OFF switch to OFF.

|
||||||||||||||||||||||||||||||||||||
|
ID: 8203591500_EN_2
|
|||||||||||||||||||||||||||||||||||||


 Audio Scene ] will be set to [
  Standard ].
 appears on the screen and the audio peak limiter will limit the amplitude of audio input signals so that they do not exceed -6 dBFS.
SIMS Doc Id
8203591500