Any error in the print head installation position can cause color and line shifts. Adjusting the print head position improves print results.
Print head position can be adjusted either automatically or manually.
This article describes the procedure for adjusting the head position manually.
 Print Head Alignment
-
Open the Canon IJ Printer Assistant Tool.
-
Check that the printer power is on, and then click Custom Settings.
-
Select Align heads manually.
-
Click OK. When the confirmation message appears, click OK.
-
Click Print Head Alignment.
-
In the rear tray, load 2 sheets of plain A4-sized or Letter-sized paper.
-
Click Start. Perform the necessary operations by following the message instructions.
 Don't open the scanning unit / cover while printing is in progress; otherwise, printing will stop.
-
In each entry field, enter the number of the pattern with the least prominent streaks or stripes from among the printed patterns.
You can also enter numbers into the entry fields automatically by clicking relevant pattern in the preview.
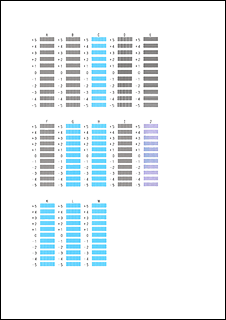
After completing the entries, click OK.
 If the patterns aren't uniform, select the pattern with the least prominent vertical streaks.
(A) Less prominent vertical streaks
(B) More prominent vertical streaks
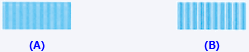
If the patterns are not uniform, select the pattern with the least prominent horizontal stripes.

(A) Less prominent horizontal stripes
(B) More prominent horizontal stripes
-
Check message content, and click OK.
The print head adjustment patterns on the second sheet are printed.
Don't open the scanning unit / cover while printing is in progress; otherwise, printing will stop.
-
In each entry field, enter the number of the pattern with the least prominent stripes from among the printed patterns.
You can also enter numbers into the entry fields automatically by clicking relevant pattern in the preview.
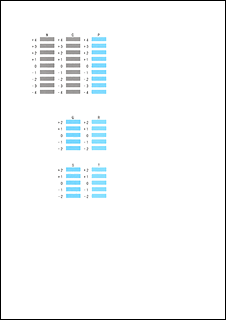
After completing the entries, click OK.
If the patterns are not uniform, select the pattern with the least prominent horizontal stripes.

(A) Less prominent horizontal stripes
(B) More prominent horizontal stripes
-
Click OK.
The adjustment of the head position is complete.
In the Print Head Alignment dialog box, click Print Alignment Value to print the current settings so that you can check the settings.
If your product issue was not resolved after following the steps above, or if you require additional help, please create or log in to your Canon Account to see your technical support options.
Or if you still need help, visit our Canon Community by clicking the button below to get answers:

____________________________________________________________________________________________
PIXMA G4210 Page
