
Loading Paper - CX-G2400
| Article ID: ART169477 | | | Date published: 01/25/2018 | | | Date last updated: 04/13/2018 |
Description
Load Paper
Solution
Loading Paper
 IMPORTANT
Use the dedicated paper. Using other paper could cause blurred or faint printing or have a negative impact on
the printer, resulting in a printer failure.
 NOTE
NOTETypes of paper that can be used with this printer are as follows:
-- Matte Coated Paper
-- Glossy paper
-- Plastic card
For details of paper and how to get paper, contact your place of purchase.
- Make sure the Power lamp is lit.
If the Power lamp is off, press the Power key to turn on the printer.
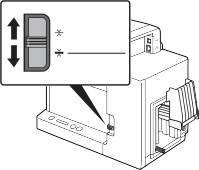
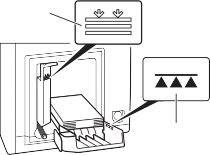
- Set the paper switch lever.
- Set the lever to the appropriate position according to the paper to be printed on. Plastic card or extra thick paper: Set it to [Plastic Card/Extra Thick Paper] Paper other than above: Set it to [Paper]
IMPORTANT
Paper will not be fed properly if the paper switch lever is not in the appropriate position for the paper. - Set the lever to the appropriate position according to the paper to be printed on. Plastic card or extra thick paper: Set it to [Plastic Card/Extra Thick Paper] Paper other than above: Set it to [Paper]
- Lower the feeder lift tray.
If the feeder lift tray is already lowered, proceed to step 4.
- Press the Tray key
- Wait for the feeder lift tray to stop.

- Wait for the feeder lift tray to stop.
 CAUTION
When the feeder lift tray is moving, do not touch it. Also, do not insert your hand or place objects below the tray. Doing so can cause injury or malfunction. - Press the Tray key
- Prepare paper.
- For business card or card
- Flip through the four sides of the paper to separate the sheets.
- As shown in the figure, flip through the four sides (a, b, c, and d) of the paper thoroughly to remove paper dust.


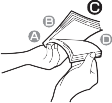


- Loading the paper after flipping through it prevent multiple sheets from being fed at once.
- As shown in the figure, flip through the four sides (a, b, c, and d) of the paper thoroughly to remove paper dust.
- Check the paper curl.
- As shown in the figure, if the paper is placed with the printing surface facing up and the paper is curled upward (Fig.1), fix the curl so that the paper is flat. If the paper is curled downward , flatten the paper so that the curl does not exceed 2 mm.


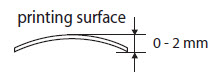
- Paper that is curled upward can cause paper jams or printing surface rubbing. If the paper is curled, bend in the direction opposite to the curl in order to flatten it.
- It is possible to check the amount of curl in paper that is curled downward with the curl index (A). When you place the paper with the printing surface facing down as shown in the figure, check that the index is not exceeded (the curl is 2 mm or less).

- As shown in the figure, if the paper is placed with the printing surface facing up and the paper is curled upward (Fig.1), fix the curl so that the paper is flat. If the paper is curled downward , flatten the paper so that the curl does not exceed 2 mm.
- Flip through the four sides of the paper to separate the sheets.
- For plastic card
- Flip through the two short edges of the card to separate the cards.


- When flipping through the card, do not touch the printing surface with your fingers.
- Flip through the two short edges of the card thoroughly. If you have difficulty flipping through the card, do it in small number of the card.
- Loading the card after flipping through it prevent multiple cards from being fed at once.
IMPORTANT
Depending on the operating environment may paper jams or printing surface rubbing. In such a case, adjust the
paper guides to the paper width.
However, when the paper guides are adjusted to the paper width, micro margin printing is not possible.
- When flipping through the card, do not touch the printing surface with your fingers.
- Flip through the two short edges of the card to separate the cards.
- For business card or card
- Load paper.
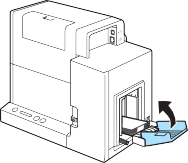
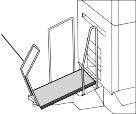
- Open the auxiliary tray.
If there is paper in the feeder slot, remove it.

- Loosen the side guide screw.
When turn the screw too much, the screw will come off.

- Load the paper so that the further edge touches the back of the feeder lift tray.

- Align the paper neatly before loading.
- If the paper has front and back sides, face the side that you want to print on up.
- If the side guides are too narrow, pull them outward and then load the paper.
- Align the paper neatly before loading.
- Adjust the side guides to the paper edge, and secure them in place with the screw.

- Close the auxiliary tray.
For long sheets of paper (paper length of 157 mm or longer): You do not need to close the auxiliary tray.- Align the edges before loading. Not doing so can cause paper jams.


- Check that the height of the paper stack is not exceeding the load limit mark. Paper length of 91 mm or less (business card, etc. ): Can be set up to the load limit mark (arrow) (B). Paper length of 157 mm or longer: Can be set up to the load limit mark (line) (C).
- If a paper feed error occurs, reduce the number of sheets loaded in the tray.
- If the paper is not touching the back of the feeder lift tray, the paper may not be fed properly.
- Fix the side guides in place so that they gently touch the edges of the paper. If they are set too tightly against the paper, the paper may not be fed properly
- When changing the paper size, adjust the width of the side guides according to the width of the paper. If they are not set properly, the paper may not be fed properly.
- When loading a paper, close the auxiliary tray. However, when loading a long paper (paper length of 157 mm or longer) do not need to close it.
- When printing on long paper (paper length of 157 mm or longer), remove the printed paper frequently. Continuing to print without removing the printed paper can cause paper jams or printing failure.
- Align the edges before loading. Not doing so can cause paper jams.
- Open the auxiliary tray.
- Raise the feeder lift tray.
- Press the TRAY key.

- Wait for the feeder lift tray to stop
- If the power lamp is blinking, press the Power key to turn on the printer
CAUTION
When the feeder lift tray is moving, do not touch it. Doing so can cause injury or malfunction.IMPORTANT
Do not adjust the side guides after the tray has been raised. It can cause paper jams.
- Wait for the feeder lift tray to stop
- Press the TRAY key.
- Check the paper guide positions.
- Remove the stacker if it is used.

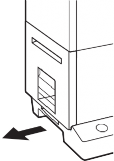
- Raise the transport unit lever, and pull the transport unit out.
- Pull out the transport unit with both hands as shown in the figure.

- As shown in the figure, check that the paper guides are set to the MM position.
While holding the paper guides (D and E) with your fingers, adjust them to the paper width
indexes (F and G). For example, the figure on the left shows adjustment to guide position MM

When performing micro margin printing, be sure to set the paper guides to the MM position. Otherwise, the
transport belt, paper guides, or other areas may be stained with ink. If stain occurs, clean the transport unit, refer
to “Cleaning the Printer” (User’s Guide).
• Normally, there is no need to set the paper guides to positions other than MM.
You only need to adjust the paper guides to the paper width when paper jams or printing surface rubbing does
not improve.
- Slowly insert the transport unit as far as it will go.
As you do this, be careful not to touch the paper guides causing their positions to be changed.

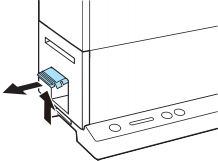
- Push the transport unit lever until it clicks.

- When using the stacker, install it back to the correct position.
- Insert the connection part of the stacker straight into the slot of the printer.

- Insert the connection part of the stacker straight into the slot of the printer.
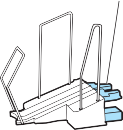
- Set the extension tray according to the paper to be printed on.
- For paper with the length of 91mm or less (business card, etc.), use the stacker with the extension tray at the standing position.
- For paper with the length of 157mm or more, use the stacker with the extension tray at the open position.

- For paper with the length of 91mm or less (business card, etc.), use the stacker with the extension tray at the standing position.
- Remove the stacker if it is used.
IMPORTANT
- If the printer will not be used for a long period, remove paper from the printer to prevent it from discoloring and curl. Put the removed paper in its original plastic bag or box, and store it in a place which is not exposed to high temperature, high humidity, and direct sunlight.
- It is recommended that unpacked paper be used up in the shortest time possible.
- If you change to paper of different type or size, change the printer driver setting. Printing on paper of a wrong size could make the stain on the transport belt, paper guides, or other areas. If the stain occurs, clean the transport unit, refer to “Cleaning the Printer” (User’s Guide).
- Store the transport unit in the printer.
- Install the stacker on a platform such as a table on which the printer is installed.
- Be sure to insert the connection part of the stacker firmly all the way. If it is not attached properly, paper jam may occur.
- To maintain print quality, do not attach or detach the stacker while the printer is running.
- Stacking capacity of the business card is 250 sheets. (thickness 0.245 mm) If the printer keeps running till the stacker full, it may cause paper jam.
- When printing pictures or characters on paper with the length of 91mm or less (business card, etc.), the edges of sheets of paper stacked in the stacker may not be aligned properly. To prevent paper jams, as a guideline, remove the printed paper when it reaches position A in the figure.
