Before Starting Wireless Connection Setup
-
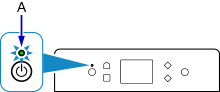
Make sure the printer is turned on.
If the power is on, the ON lamp (A) will be lit.
(Appears in a new window)
If printer is performing cleaning, print head alignment, or other processes
Wait for the process to finish, before starting setup.
-
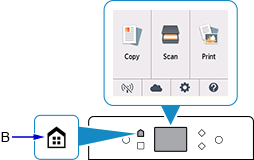
Press the HOME button (B) on the printer.
If an error screen is displayed, press the OK button, and then press the HOME button.
-
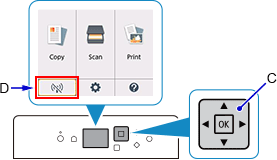
Use the 


 buttons (C) to select
  (D) and press the OK button.
-
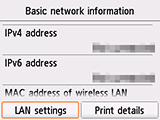
Select LAN settings and press the OK button.
-
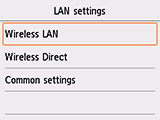
Select Wireless LAN and press the OK button.
-
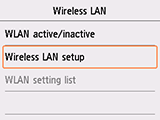
Select Wireless LAN setup and press the OK button.
-
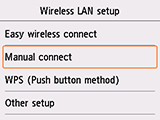
Select Manual connect and press the OK button.
-
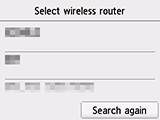
Select your wireless router and press the OK button.
If a different screen appears or no wireless router is found, see "Troubleshooting."
-
One of the screens below will appear.
If "Connected to the wireless router." appears, the network does not require a password. Continue from step 13.
If a different screen appears, see "Troubleshooting."
-
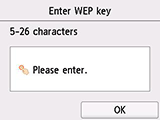
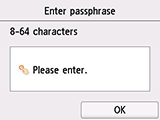
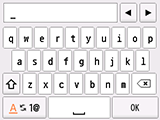
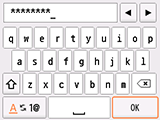
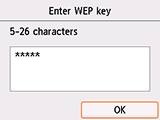
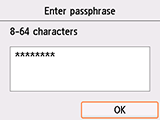
Select the input area and press the OK button.
-
Enter the network password (WEP key or passphrase). Text entry is case-sensitive.
If you don't know the network password for your wireless router, see the wireless router manual or contact its manufacturer.
(Appears in a new window)
-
Select OK.
-
Press the OK button on the printer.
-
Select OK.
-
When the screen on the below appears, tap OK.
If a different screen appears, see "Troubleshooting."
-
Press the HOME button.
When connection is complete,  appears at the bottom left of the screen.
-
The network connection setup is now complete.
TS5120 Page