What are the printer driver options available for the RP-10?
| Article ID: ART170110 |
| |
Date published: 04/25/2018 |
| |
Date last updated: 04/25/2018 |
Description
You can configure the print settings using the printer driver.
Solution
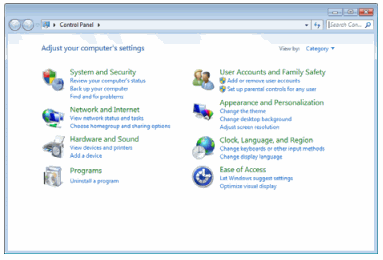
- Click the Windows Start button, and then click [Control Panel].
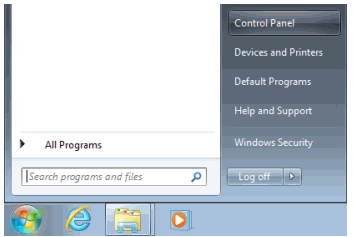
- Click [View devices and printers] under [Hardware and Sound].
- Right-click the [Canon RP10] icon, and then select [Preferences].
- Click [Advanced options] in the [Canon RP10 Preferences] screen.
The printer driver setup screen appears.
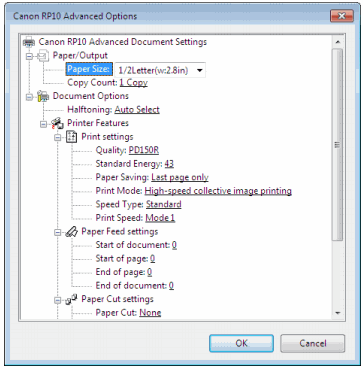
Paper/Output
Specify the paper size and number of copies.
Document Options
Specify the halftone.
Print Settings
[Quality]
Select paper that you want to use. Recommended paper is only displayed.
[Standard Energy]
Specify the print density in the range of 0 to 127.
Lower values will result in lighter prints, while higher values will result in darker prints.

The default value for [Standard Energy] differs depending on the [Quality] setting. If the [Quality] setting is changed and then changed again back to its original setting, [Standard Energy] will revert to its default value.
[Paper Saving]
When you select [Each page], the next page is printed successively without leaving bottom margins at the end of each page.
When you select [Last page only], the next document is printed successively without leaving bottom margins at the trailing edge of the document.
When you select [None], printing is performed using the specified paper length.
[Print mode]
When you select [High-speed collective image printing], all of the print data is loaded to the printer's memory before printing starts. Although the transfer of data before printing starts can take some time, printing is unaffected by communication issues with this method.
When you select [Bit image printing], printing occurs as each line of data is received. Although there is no waiting period before printing starts, printing can be affected by communication issues with this method.
For small data volumes, [Bit image printing] will result in faster print times. [High-speed collective image printing] will result in higher print quality.
Paper Feed settings
[Start of document]
Specify the paper feed volume at the start of a printed page in the range of 0 to 255.
Unit: dot per line (1 mm = 8 dots per line)
[End of page]
Specify the paper feed volume at the end of a printed page in the range of 0 to 255.
Unit: dot per line (1 mm = 8 dots per line)
[End of document]
Specify the paper feed volume at the end of a document in the range of 0 to 255.
Unit: dot per line (1 mm = 8 dots per line)
Paper Cut settings
[Paper Cut]
Select whether to cut paper for each printed page or after printing a document (all pages).
When you select [None], paper is not cut.
[Cutting Method]
When you select [Partial Cut], paper is cut except for its center.
When you select [Full Cut], paper is cut completely.
[Feed lines before Cut]
Specify the paper feed volume before cutting paper in the range of 0 to 255.
Unit: dot per line (1 mm = 8 dots per line)
[Feed lines after Cut]
Specify the paper feed volume after cutting paper in the range of 0 to 255.
Unit: dot per line (1 mm = 8 dots per line)
Mark Detection settings
[Mark Detection]
Specify how to detect the mark when using paper with a mark.
When you select [Each page], mark direction is performed for each page, and then paper is fed to the mark position.
When you select [Each document], mark detection is performed for each document, and then paper is fed to the mark position.
When you select anything other than [None], [Feed lines before Cut] is disabled.
[Mark Feed line]
Specify the leading edge feed volume after detecting the mark in the range of 13 to 63.
Unit: dot per line (1 mm = 8 dots per line)
