 OVERVIEW
The GPS Receiver GP-E2 can record location information such as latitude, longitude, elevation, direction, and coordinated universal time (UTC) in the EXIF data of your images as you shoot. This can be valuable in a wide variety of photographic applications, including travel, architecture, landscape, forensics, and documentary. Geotags (GPS information) can be applied to RAW (.CR2) and JPEG images only. They are visible in Canon as well as third-party image browsers, raw converters, and digital asset managers. When combined with Canon’s Map Utility software, the GP-E2 also allows you to log and view the route you traveled. This guide will provide instructions for how to use the GP-E2 to its full capabilities.
COMPATIBILITY
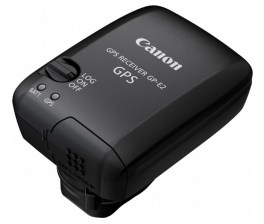
The GP-E2 can transfer data directly through the hot shoe, as you shoot, when mounted on the EOS-1D X, EOS 5D Mark III, EOS 6D, EOS M, Rebel 4Ti, or any later model that displays [GPS device settings] in its Set-up menu. When used with the EOS 7D, the GP-E2 can transfer data only through the terminal. The following additional restrictions also apply to the EOS 7D: • Geotagging will not work while recording movies. • Geotagging will not work with movies when using the Map Utility. • Electronic compass information and automatic time setting are not available. With all cameras listed above, as well as all other Canon digital cameras, you can use the GP-E2 with Canon’s Map Utility application to geotag images later with a Windows or Macintosh computer. ATTACHING AND REMOVING THE GP-E2 You can either mount the GP-E2 to your camera’s hot shoe or carry it separately and connect it to the camera with an accessory connector cable. Carrying the GP-E2 separately will free up the hot shoe for use with an external flash or other shoe-mounted accessory. It will also allow you to use your camera’s built-in flash, if available. In either case, always be sure to turn the GP-E2 off before attaching or removing it. SWITCHING THE GP-E2 ON As soon as you switch the GP-E2 to or , the red light should blink approximately every 5 seconds. If it does not, you need to replace the single AA battery; otherwise: • Single slow blink indicates battery okay • Three fast blinks indicates battery low
ACQUIRING A SIGNAL
Once the receiver is on, check that the red light is blinking.
- Fast blink indicates signal not yet acquired
- Slow blink indicates signal acquired
It normally takes 30–60 seconds for the GP-E2 to acquire a signal. Once it has done so it will shift to power-saving mode, at which point the light will blink every 3 to 6 seconds. The GPS will function as normal. Note: It may take longer to acquire a signal and reception is likely to be poor under the following conditions:
- Indoors, underground, or near tall buildings
- In tunnels, valleys, or forests
- Near high-voltage lines
- When the receiver is inside a bag or suitcase
This is true of all GPS devices. Try to work outdoors, with the receiver exposed, and with an unobstructed view of the sky whenever possible.
GPS DEVICE SETTINGS MENU
For cameras with GPS device settings menu: In addition to the GP-E2 itself, you can see a status indicator on your camera’s LCD whenever the receiver is on. (The EOS-1D X displays this on smaller rear LCD panel.)
- Blinking [GPS] = signal not yet acquired
- Constant [GPS] = signal acquired
You can also view GPS and digital compass information as you shoot. The benefit is that this allows you to zero in on a pre-established location, elevation, and direction based on its GPS coordinates.
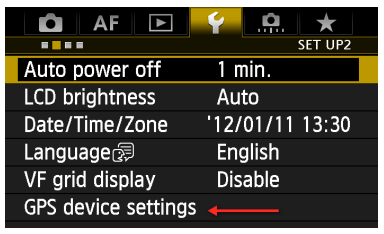
To view device settings, first make sure GPS device is set to [Enable], then select GPS device settings/GPS information display.
ENABLING THE DIGITAL COMPASS
To enable the digital compass, make sure
[GPS device] in your camera’s Set-up Menu is set to
[Enable], then select
GPS device settings/Digital compass. To view the direction the camera is pointing, press the
<INFO> or
<DISP> button on your camera. The compass will be visible on the rear LCD during all shooting modes, including movies.
GEOTAGGING IMAGES AS YOU SHOOT
Set the GP-E2’s power switch to the
<ON> position. With cameras that have a GPS device settings menu selection, the camera will automatically geotag your images whenever the receiver is attached to the hot shoe. With the EOS 7D, the receiver must be connected via the
<DIGITAL> port on the side of the camera. The EOS 7D is not able to tag images with digital compass data.
LOGGING YOUR ROUTE
Set the GP-E2’s power switch to the
<LOG> position. There’s no need to attach the receiver to the camera; however, the carrying case allows you to attach it to your belt or camera strap. As long as you’re carrying it, the receiver itself will automatically log location information along your route. If the receiver is attached to a camera that has a GPS device settings menu selection, the receiver will also geotag your images as you shoot. Location logs are recorded daily, at set intervals of your choice, and stored in the receiver. The interval settings are available on your camera’s GPS device settings menu: First, make sure GPS device is set to Enable, then select GPS device settings/Position update timing, then select the interval you want. Intervals range from once per second to every 5 minutes. Shorter intervals provide more precise tracking but reduce battery life. Longer intervals do the reverse. Generally speaking, the longer your route and the larger the area you will be covering, the greater your positioning intervals can be. Conversely, you may prefer shorter intervals if you need to track a circuitous route within a small area. Keep in mind, however, that the tracking accuracy cannot exceed that of the GP-E2 itself.
SETTING GPS SYNCHRONIZED TIME
By default, the date and time recorded in your image’s EXIF data files will be derived from the date and time settings in your camera. For more accurate and precise time notations (within ±0.02-second relative to UTC with the EOS-1D X), you can have the camera’s time automatically synchronized and updated via the GP-E2. To enable GPS synchronized time:
- Enable the GPS and select GPS device settings.
- Select [Auto time setting]
- Select the time setting you prefer:
- [Set now] will set the time based on the GPS signal and let the camera maintain the time from then on.
- [Auto update] will automatically update the time whenever the camera and GP-E2 are on and the GP-E2 is receiving a signal.
- [Disable] is useful if you do not need auto time setting or if it may conflict with other timecoordinated accessories or applications.
PRECAUTIONS
Some countries or regions may place restrictions on the use of GPS devices. When in doubt, ask before using the GP-E2 in foreign countries.
Keep in mind that others may be able to locate you or others based on the coordinates in your geotagged images. Be careful before posting photographs of your home, office, private residences, or other personally identifiable information.
Never leave the GP-E2 near equipment that generates a strong magnetic field, such as magnets or electric motors as this may affect the short-term accuracy of the receiver.
CANON MAP UTILITY APPLICATION
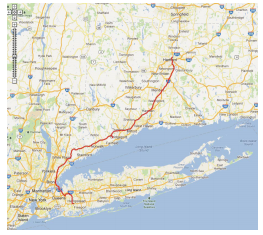
You can import GPS Log files from the GP-E2 into your computer via USB connection, view the paths on a map, view the location, direction and GPS data of images taken with the GP-E2 active, and more with the Map Utility software provided with the GP-E2. Log files can be saved with Map Utility, and converted to the popular .KMZ file type for viewing in on-line map software such as Google Earth. GPS info can be added to images or edited as needed. Please refer to your Map Utility manual for more specific information.
