Introduction
This QuickGuide will explain how to use the Integrated Speedlite Transmitter feature incorporated in Canon EOS 7D, 60D, and Rebel T3i (660D) cameras. This feature uses the camera’s built-in flash unit to wirelessly trigger one or more off-camera (receiver) Speedlites, either individually or in groups. Compatible Speedlites include the 580EX II, 430EX II, 320EX, and 270EX II. Settings can be controlled from the camera by using the camera’s menu interface. Speedlite exposures can be either fully automatic or fully manual. Flash output ratios are fully adjustable. The builtin Speedlite can either contribute to the flash exposure or trigger the receivers without contributing to the flash exposure.
Options include the ability to:
Fire one or more Speedlites off-camera and all at the same output, with or without the built-in flash firing
Fire two or more Speedlites at different outputs, using A:B ratio control, with or without the built-in flash firing independently
Set an A:B ratio between the built-in flash and one or more Speedlites. All Speedlites are combined into one group.
Separately control flash compensation for off-camera Speedlites and the built-in flash Setting up an EOS 7D, 60D, or Rebel T3i (600D) to control one or more wireless Speedlites involves two basic steps:
1. Set up the camera for Integrated Speedlite Transmitter operation.
2. Set up the off-camera Speedlite(s) for wireless control.
This QuickGuide will describe both steps.
Wireless Flash Tips
1. Your camera must be set either to P, Tv, Av, M or A-DEP exposure mode for the Integrated Speedlite Transmitter function to work.
2. Make sure the Wireless Sensor on the front of your Speedlite is pointed directly towards the built-in flash on your camera, is unobstructed, and is within a 30-foot range. Also make sure the built-in flash is in the up-position. The Wireless Sensor on the flash has to be able to “see” the control pulses from the built-in flash for the wireless system to work.
3. Make sure your off-camera Speedlites are set to the same channel as your camera. As shipped from the factory, your camera is set to Channel 1. Speedlites set to a different channel than the camera will not fire. If you are in an area with other EOS photographers who are also using Speedlites, setting your equipment to different channels will prevent accidental firings.
4. Remember to disable the auto power-off feature on your off-camera Speedlites. This will keep them on and ready to flash at all times. If a Speedlite goes to sleep, wake it up by pressing the <✻> button on your camera or press the illuminated test flash button on the Speedlite.
5. Assign multiple receiver units to the same group if you want them to flash at the same output. Receiver units must be in different groups (A, B, or C) if you want them to flash at different output ratios.
6. Units assigned to group A or B are normally used to light the foreground. Group C is normally used only for lighting the background.
Camera Set-up – EOS 7D and 60D

1. Select the first [Shooting Menu].
2. Scroll down to [Flash control]. Press <Set>.
3. Scroll down to [Built-in flash func]. Press <Set>.
4. Scroll down to [Wireless func.] Press <Set>.
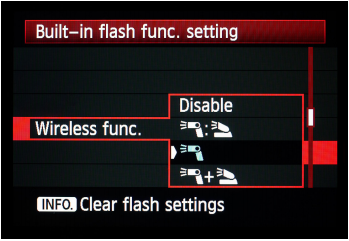
The Wireless function menu options are:
Disable
Choose this option to allow the built-in flash to fire normally, without emitting wireless signals.
Ratio control between built-in flash and off-camera Speedlites
Choose this option if you want the built-in flash to fire at one level of E-TTL power and the combined receiver unit(s) to fire at another.
Note: Because the built-in flash is smaller and less powerful than an external Speedlite, the camera will not allow you to set ratios that would require the built-in flash to overpower the receiver units.
Trigger off-camera Speedlites only Choose this option if you want the want the built-in flash to trigger off-camera Speedlites without the built-in flash contributing to the exposure.
Trigger the Speedlite(s) with separate flash exposure from the built-in flash Choose this option if want the off-camera Speedlites to fire either at equal output or with ratio control, in combination with independent fill-flash from the built-in flash.
The Flash control menu also allows you to select and control:
E-TTL II Automatic vs. Manual flash exposure
Flash Channel
Flash Exposure Compensation (FEC)
Flash Ratio Control
Camera Set-up – EOS Rebel T3i (600D)
1. Raise the built-in flash.
2. Select the first [Shooting Menu].
3. Scroll down to [Flash control]. Press <Set>.
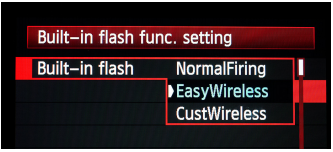
4. Scroll down to [Built-in flash func]. Press <Set>.
Menu options include:
Normal Firing
The built-in flash will function normally, without triggering external Speedlites set up as receiiver units.
EasyWireless
The built-in flash will automatically trigger one or more external Speedlites which have been set up as receiver units. All external units will fire in E-TTL II auto-exposure and at the same flash output. The light from the built-in flash will trigger the external units but will not contribute to the flash exposure.
The only other options available in EasyWireless mode are the Channel setting and Flash Exposure Compensation (FEC). You must set the flash and camera to the same channel. You can adjust FEC up or down as necessary to control the brightness of the overall flash exposure.
CustWireless
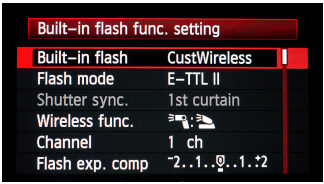
The built-in flash will trigger one or more external Speedlites at either the same output or different outputs, depending on how you set the flash ratio control. Custom Wireless control options include:
Ratio control between built-in flash and all combined off-camera Speedlites
Choose this if you want different output from the built-in flash vs. all combined off-camera Speedlites.
Trigger off-camera Speedlites only
Choose this if you want the want the built-in flash to trigger off-camera Speedlites, without contributing to the flash exposure.
Fire the Speedlite(s) with separate flash exposure from the built-in flash Choose this if want to fire the Speedlites (either at equal power or with A:B ratio control), with independent flash exposure from the built-in flash unit
Wireless Speedlite Set-up
You must set up each external Speedlite to operate in Receiver mode, which means that it can be triggered and controlled by the camera’s Integrated Speedlite Transmitter (or a Canon ST-E2 Speedlite Transmitter or 580EX II Speedlite set up as a Master.)
320EX and 270EX II
1. Set the Power switch to the Slave position.
2. Set the Channel selection switch to the same channel (1 – 4) you have set on your camera. The external Speedlite will not fire unless set to the same channel as the camera.
3. Set the Firing Group selection switch (320EX only) to Group A, B, or C. The 270EX II is automatically set to Group A and cannot be changed.
430EX II
1. Press the Zoom button and hold-in for several seconds until the display appears.
2. Press (but don’t hold down) the Zoom button until the Channel and number blink. Use the + or – buttons to set the channel to the same number you have set on your camera.
3. Press the Zoom button again until the "SLAVE" and ID number blink. Use the + or – buttons to dial-in group A, B or C. Press the Speedlite SET button to complete.
580EX II
1. Press the Zoom button and hold it in for several seconds until the display begins to blink.
2. Turn the Speedlite Control Dial until “SLAVE” and “ON” appear. Press the Speedlite SET button.
3. Press (but don’t hold down) the Zoom button repeatedly until Channel and number blink. Turn the Control Dial to the same channel number you have set on your camera.
4. Press the Zoom button again until the ID letter blinks. Turn the Control Dial to dial-in Group A, B or C. Press the Speedlite SET button to complete. The built-in flash will function normally, without triggering external Speedlites set up as receiver units.
